We’ll see via this detailed tutorial how to build a cross-platforms game using an adaptive gameplay. This will allow the same web app to be played on touch screens, using a mouse or pen on desktops, up to the ultimate immersive experience thanks to WebVR! By using PWA, it will run totally offline, can be pinned on your mobile home screen or even be pushed to the Microsoft Store.
You can play to the game by navigating to: https://aka.ms/applescrusher and the source code is available on my github.
The gameplay is dead simple. If you’re using a mouse or a pen, you can draw single lines to cut the Apples. If you’re using multi-touches screens, you can draw several lines simultaneously to cut them. Finally, if you’re using WebVR with 6-DOF (six degrees of freedom) controllers such as the Mixed Reality controllers, HTC Vive or Oculus Touch, you can destroy them using a light sword or with banana guns! 🙂
Here’s a video showing all possible gameplays:
It all started during the Junction 2017 hackathon. I was participating as a Microsoft coach and co-creator of Babylon.js to help people building cool stuff on top of WebVR. One of the participant asked me to help her building a small Fruit Ninja like game using free glTF assets from Remix3D. I’ve then shown her the complete workflow to create such a game. After building a small prototype, it turned out that people were having fun playing with a stupid cylinder mesh attached to the VR controllers crushing some apples moving in front of them!
I’ve then decided to continue working from time to time on this small game. It was even one of the main topics of our WebVR session at BUILD 2018: WebVR, not just Holograms in the web but powerful platform with Deltakosh.
Let’s now see the various parts of it to let you build a similar 3D experiences on your side. This is the agenda of this tutorial:
– Building the scene using glTF
– Building a loading screen using CSS animations and CSS Grid
– Drawing lines with touch/mouse/pen using pointer events and ribbons
– Testing if a line has cut an apple
– Various gameplays parameters for touch, mouse, pen & VR
– Detecting a connected VR headset
– How to crush the apples using the light sword?
– How to fire ammos from a banana gun?
– Service worker, manifest and icons to make it a PWA
– Pushing to the Microsoft Store
Building the scene using glTF
If you’re a developer without a 3D artist working near you or with poor 3D modeling skills, I’d advised you to get free or paid assets for your project. By the way, if you’re a 3D artist, we (developers) love you! And we really need your magical skills. Check out the cool stuff you can build for the web below.
There are 3 interesting repositories of 3D assets working great with WebGL engines: Sketchfab, Remix3D and Google Poly. My advice is to use the glTF standard 3D asset file format when you can. Indeed, using the glTF standard will let you easily move from an 3d engine to another or use various tools in your production chain. All models from Remix3D can be easily downloaded as glTF via Paint 3D on Windows 10 for instance. Sketchfab will auto-convert the downloadable assets to glTF if you need also and some models can also be downloaded in glTF on Google Poly.
To build the scene, you can use various free tools such as Paint 3D on Windows 10, Blender or Unity 3D. Babylon.js has a native support for .glTF/.glb files for files exported by Paint 3D (or any other 3d tools exporting glTF) but has also exporters for Blender, the Babylon.js EditorToolkit for Unity3D, Maya to Babylon, Maya to glTF, 3DS Max to Babylon and 3DS Max to glTF.
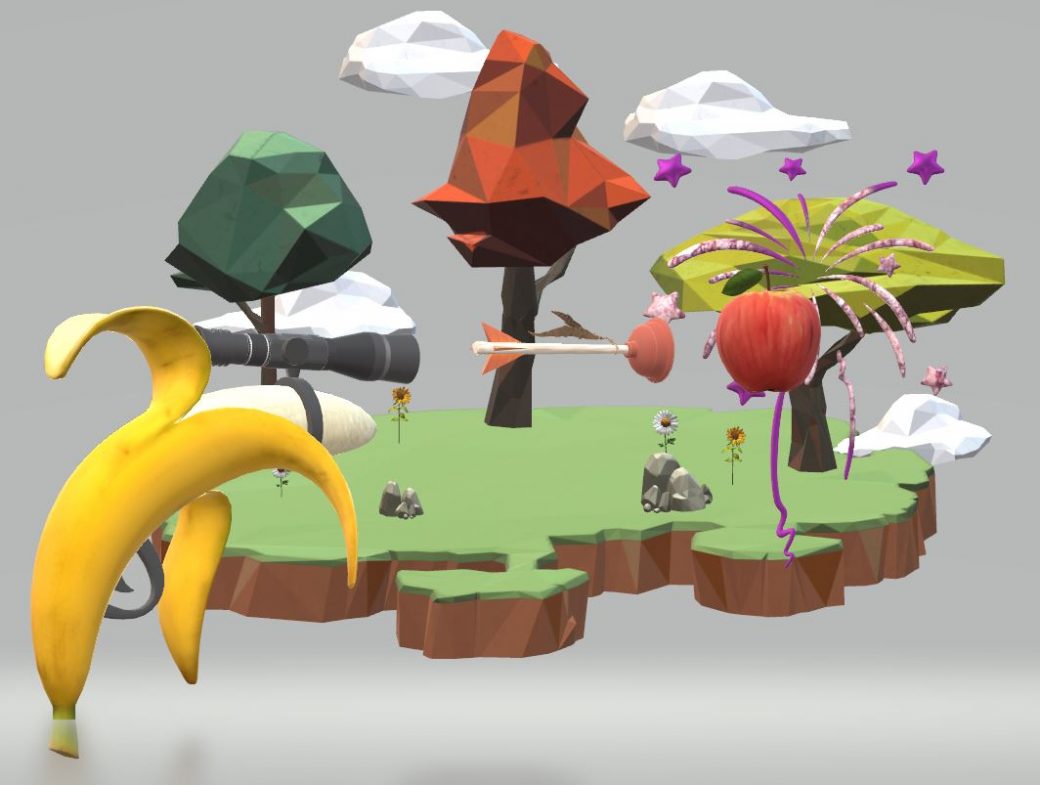
On my side, I’m often using Paint 3D as it’s so simple for what I’d like to build. For instance, I’ve imported the following low poly assets: island, sunflower, daisy, rocks, cloud, tree 1, tree 2, tree 3.
To create this:

I’ve then exported the scene to .GLB. You can download it: ApplesCrusherBackground.glb and drag’n’drop it in our Sandbox tool: https://sandbox.babylonjs.com.
Display the inspector (pressing the middle button on the bottom right) and find the 4 cloud meshes to display their bounding boxes. Note their ids.

We can now load this glTF asset in Babylon.js, find the 4 cloud meshes and animate them to bring a bit of life to our background scene.
Go to our playground: https://playground.babylonjs.com/, click on “Examples” and search for glTF:

This is the basic code to load a glTF file into the current scene. Now we need to get the reference to the 4 meshes thanks to their ID and animate them. Check our documentation to discover how to animate meshes: http://doc.babylonjs.com/babylon101/animations or search in the playground in the “Examples” section using the “animation” keyword. In our case, we’re just going to animate the position.x property.

Mixing all those samples together, you should obtain this solution / sample code: http://playground.babylonjs.com/#694VT1#1

Using a similar approach, I’m loading those 2 models: a light sword and a banana gun to replace the default VR controllers while in-game and this Apple to act as the terrible enemies to be destroyed!
Building a loading screen using CSS animations and CSS Grid
By default, Babylon.js is providing his loading screen with its logo being rotated via CSS animations. It can be customized but I wanted something better. Indeed, it’s important to provide a nice loading screen for the user while you’re downloading the assets. It’s also important to use as much as possible CSS for this job as the transition/animation are very often hardware accelerated and managed by a separate thread. If you’re relying only on JavaScript to create a custom animation, it could be interrupted by other loading tasks as JavaScript is still mono-threaded. Your animation could stop for a couple of ms and continued several times during the loading process which doesn’t provide a great experience.
You can find plenty of cool loading screens based on CSS animations with your favorite search engine. On my side, I really loved this one: How To Create A Custom Preloading Screen by Petr Tichy. I’ve then slightly customized to change the colors to fit my Apple’s one. I also wanted to center the logo and the animations vertically and horizontally. People used to CSS know that this simple task was quickly becoming a nightmare in the past. Hopefully, the CSS Grid specification is making this task a real simple job (which should have been this way for years honestly…). The level of support is now excellent: https://caniuse.com/#feat=css-grid

This first animation sequence is working on all devices:

Drawing lines with touch/mouse/pen using pointer events and ribbons
The initial gameplay was clearly made for a VR only usage. I had integrated a small gameplay for the mouse where you were able to click on an apple to destroy it. But it was mainly to help me debugging the game to avoid spending time inside the headset.
You can test this version here: https://playground.babylonjs.com/#22KIIK and you’ll see that it’s far from being optimal to play with mouse and even less using touch. While discussing about this with Jeff Burtoft, he advised me to rather draw lines to cut the fruits. I’ve then started working on that.
First, let’s talk briefly about pointer events. We’re using it intensively inside Babylon.js. If all our demos on our main site and samples on the playground are multi-touches compatible, this is thanks to pointer events. This specification is, to my point of view, the best one to address mouse, touch and pen across devices. And it’s not because Microsoft initially made it ![]()
It’s really well made and starts to be fairly well supported by browsers: https://caniuse.com/#search=pointer%20events.

If you don’t know this great API yet, I’d suggest you to start reading one of my previous article on it: Unifying touch and mouse: how Pointer Events will make cross-browsers touch support easy.
As you can see on “Can I Use”, some browsers haven’t implemented it yet. That’s why, we’re using the jQuery PEP polyfill to cover those. Using it is quite simple. Simply reference the library from their CDN and add the “touch-action” HTML property on the HTML element that will receive the multi-touches event (the HTML canvas in our case). This property is a way to replace the “touch-action” CSS property as polyfilling CSS is complex.
Now that we know how to manage the various types of input, we need to find a way to draw lines/curves in our 3D canvas. Those lines will also have to generate hit testing against the targets to check if we manage to cut them or not.
First, we need to find a way to draw those lines. I’ve decided to use the ribbon feature of Babylon.js. It’s a way to build parametric shapes which can build very complex meshes if needed such as illustrated by this sample. But in our case, we’ll build simple flat shape that will act as our lines.
To understand how it works, I’ve built this full commented sample: https://playground.babylonjs.com/#LRGL8M.

Simply read the code and you should better understand the approach.
You’ll note that in this sample, we’re not limiting the size of the lines we’re drawing. This would mean that the player could press the canvas and keep drawing like mad to destroy the apples. In the final code, I’ve added a distance computation to limit the size of the lines. You can check that by reviewing the code of the next section.
Testing if a line has cut an apple
We need to know if under the line you’re drawing, there’s some apples. For that, we need to send rays in this direction and check if one of those rays is intersecting the mesh of an apple. If so, you’ve touched an apple and it should be destroyed.
Let’s start by reviewing the initial mouse gameplay where you were able only to click on an apple to destroy it. As a reminder, the code is there: https://playground.babylonjs.com/#22KIIK
Go to line 471 of this first sample where we’re registering some code to handle the pointerdown event. We’re using the picking feature of Babylon.js described in our documentation: Babylon101 – Picking Collisions.
We’re using a predicate to filter the meshes tested to only the collection of apples. If we’ve got a hit, we’re calling our collision handler function giving it the picked mesh as a parameter.
This collision handler is doing the magic by playing a sound to indicate you’ve crushed the apple. Then, it takes the position of the apple crushed to put instead a particles emitter and activate it for 250 ms to achieve the awesome special effect. Check our documentation to know more about how particles work: http://doc.babylonjs.com/babylon101/particles. Finally, the apple mesh is hidden and put back in the collection, ready to be destroyed again!
Now, we can use this click logic to extend it to the lines used to cut the apples. Review this updated gameplay in this new sample: https://playground.babylonjs.com/#PKQ6JV#1
First, as you have seen, the lines have a vertical thickness. So, during each pointerdown / move event raised, we need to do a hit testing at the exact coordinates where you’ve clicked/touched but also above and under this point on the Y axis to consider the thickness. This is the job of the testApplesCollisionAround() function. You can review its code at line 679.
But doing that on each pointer move is not enough. Indeed, based on the speed of your pointer move, you could miss your target between 2 events. The coordinates of the first pointer move could be just on the left of the apple you’re targeting and the coordinates of the second pointer just on its right. Visually, the line would cover the apple, but our hit testing approach would miss it which could frustrate the user.
To try to avoid that, I’m then computing the distance between two pointer moves. If it’s bigger that a specific threshold, I’m creating intermediate linear pointers coordinates to achieve hit testing on it. This is the job of the testApplesCollisionBetween() function available for review at line 693.

Various gameplays parameters for touch, mouse, pen & VR
To be able to dynamically adapt the gameplay for the various types of inputs, I’m simply using a JSON object to configure a couple of properties as you can see in the code: https://github.com/davrous/applescrusher/blob/master/js/applecrushervr.js#L78
Basically, this is defining:
– the size of the apple. For instance, in VR, the size needs to be smaller, specially against the laser saber to have a better experience. It’s bigger with the banana guns as it’s too difficult to target them otherwise. At least, the size is bigger in touch mode rather than in mouse mode.
– The deltaX, Y, Z properties indicate where the apple could potentially pop in front of you. This really impact the VR mode as for instance, if the apple pop too high, you won’t be able to touch it using the light sword.
– At last, there’s some properties for the ribbons drawn: maximum distance per ribbon and its thickness.
To switch between each of them, I’m registered a detectPointerType function on the pointerDown event. This function simply checks the type of input which has triggered a pointer down on the canvas DOM element: mouse, touch or pen. It then changes the gameplay accordingly. In VR, this gameplay switch is done when you click on the one of the options just before starting the game: https://github.com/davrous/applescrusher/blob/master/js/applecrushervr.js#L870
Detecting a connected VR headset
If your browser doesn’t support WebVR or if you don’t have a VR headset connected, the starting screen will be this one:

However, as soon as you’ll connect a VR headset, it will now display this:

Clicking on this “Play in VR” button will not start the game immediately but will first ask WebVR to enter the VR/immersive mode. To do that, rather than using the default Babylon.js VR button of the VRHelper, we’re just asking in the options to use a custom button instead: https://github.com/davrous/applescrusher/blob/master/js/applecrushervr.js#L642
Then, inside your VR headset, you’ll be able to click on the “Play” button using one of your controllers. It will enter VR thanks to this line: https://github.com/davrous/applescrusher/blob/master/js/applecrushervr.js#L857
And if you’re disconnecting the VR headset, it will switch back to the first screen, and it will switch the gameplay options to the mouse one. How can you manage that in your code?
First, you need to register your code to the onVRDisplayChangedObservable like that: https://github.com/davrous/applescrusher/blob/master/js/applecrushervr.js#L740. This event is triggered by WebVR when you’re plugging/unplugging a VR headset and exposed by the Babylon.js engine. If a VR display is connected, we’re updating the text of the button from “Play” to “Play in VR”.
To be sure that the game is ready to be played in VR, we’re also monitoring the onVRRequestPresentComplete event triggered by WebVR: https://github.com/davrous/applescrusher/blob/master/js/applecrushervr.js#L768. If the rendering inside the headset worked, we’re good to go.
How to crush the apples using the light sword?
To know that the light sword has cut an apple, we need to do a collision test. We need to know that the mesh of the light sword is intersecting the mesh of one of the apples. We could do that with some custom code in the game rendering loop. On each frame rendered, we could test ourselves if there’s an intersection between on of the two light swords and one of the 10 apples. Doing this could be a boring task and potentially complex if you’re not a guru in math.
Hopefully, there’s a very simple way to do this in Babylon.js using the actions and the actions manager. In the documentation: http://doc.babylonjs.com/how_to/how_to_use_actions, there’s a trigger which is interesting for our task:
“BABYLON.ActionManager.OnIntersectionEnterTrigger: Raised when the mesh is in intersection with a specific mesh. Raised just once.”
We then need to use this trigger and register an action on the light sword for each apple. The action is to execute code if the condition is fulfilled and this code is simply the same collision handler we’ve used before when we were cutting apples by drawing lines. It’s the same logic to be used: get the position of the apple touched, display the particles system at this very same position and remove the apple from the screen.
You can check how these actions registrations are done in the createAndSetupVRHelper() function: https://github.com/davrous/applescrusher/blob/master/js/applecrushervr.js#L671
How to fire ammos from a banana gun?
First, let’s see how to fire some bullets/ammos from the banana guns. I’ve decided to use this Remix3d model to act as the ammo: the Plunger of DEATH!!! ![]()
To simplify the job of getting the position from where it will be launched, I’ve imported the model in Paint3D to place it exactly where I wanted to on top of the banana pistol:

This simplify a lot the job for our code. When loading the model, I then hide the plunger. The mesh will only act as a reference be used later.
Now, we need to monitor the trigger button of the VR controller. If it’s pressed enough, we’re activating our firing logic. This logic consists of getting the current position of the hidden ammo on the banana pistol, clone the object and its rotation, detach it from its parent (the banana) and moving it forward.
The animation is done by code in the game render loop. It checks if there’s some ammos in a specific dedicated collection and move them forward. I must confess that the current trajectory is very simple and not very realistic, I was too lazy to do better. Well, destroying some apples with a plunger launched from a banana pistol is not THAT realistic anyway ![]() . We could have used the animations engine of Babylon.js to use an easing function instead to have something more natural. Even better: if you’re really motivated, you can search on the web ballistic equations and try to implement them. In the meantime, my awesome equation will do the job.
. We could have used the animations engine of Babylon.js to use an easing function instead to have something more natural. Even better: if you’re really motivated, you can search on the web ballistic equations and try to implement them. In the meantime, my awesome equation will do the job.
Now, we need to understand how to check the collisions between those bullets and the apples. This one is a bit trickier. We could first think to reuse the same approach as the light sword. But this time, testing the intersection on each frame will probably fail. To be honest, it could also fail with the light sword even if it has few chance to do so.
The reason behind is because we’re living in a quantum world with real-time 3d. We’re updating all our objects every tick, provided by requestAnimationFrame in JavaScript/WebGL games. In non-VR, the optimal tick will happen every 16ms to achieve 60fps (as most of the screens have a refresh rate of 60hz). In VR, it should be every 11ms to achieve 90fps.
There’s a high chance that between 2 ticks, the ammo will be just before the apple, just about to go through it and then, just after the apple. It means that the ammo trajectory will cut the apple but using a tick approach to test the intersection, we could miss it.
To better understand, look at those 2 screenshots:


If the animation is slow enough, the ammo would collide with the apple and the logic being used with the light swords would work. But let’s imagine that the animation is too fast, and the first frame looks like the first screenshot followed by a new frame 11ms later that looks like the second screenshot. The arrow has gone through the apple, but the action’s trigger wouldn’t be raised.
The solution is to cast rays in front of the ammo to check if this ray is intersecting with the apple, this would mean that the ammo is about to cut the apple.
I’ve built the sample code for you: https://playground.babylonjs.com/#WDLE60. To make it works, launch this playground link, click on the VR button to enter VR and press the second button of your VR controller (menu button on Mixed Reality headset) to switch from the default controller model to the banana pistol. Press the trigger to launch an ammo. If you’re correctly targeting of the boxes, the ammo will make it disappear if it’s on its trajectory.
Check the castRay() function to understand how this works which is the same one as used in the game.
Service worker, manifest and icons to make it a PWA
Progressive Web App or PWA enables web developers to create web apps that can’t be distinguished from native apps. The web platform is now offering so many features and great performances that a lot of scenarios / apps could be done using web technologies without any issue.
Regarding games, we have a direct access to the GPU using WebGL 1.0/2.0, 3D spatial audio using Web Audio, Gamepad API, WebVR, touch support and so on. We’re then covered to create great cross-platforms games! On the 3D rendering side, we can really achieve great performance with high quality rendering. People are often surprised to see the quality & the performance of our Babylon.js demos but most of them just don’t know that WebGL is simply a subset of OpenGL exposed in the browser. We’re discussing with the GPU directly via shaders, a C like programming language compiled to native code for the GPU.
To be honest, the only remaining bottleneck is JavaScript. JS engines are really super impressive on the job they’re doing to jit the code on the fly. ASM.js & Web Assembly could even sometime go a step further. But at the end, JavaScript is mono-threaded and unfortunately the web workers won’t help much on this. For games, with our game loop that must do all its job in 16ms, this could be quickly an issue. For instance, a lot of features are CPU based like physics engines, collisions & picking. If we had access to threads, we could do much more in 16ms. Still, even with those constraints, we can push the browser to the limits and create awesome experiences! Moreover, those issues are very specifics to a gaming approach. Business apps will have much less risks to hit those walls. And even for games, as you see with this one or other available on the web using various WebGL engines, you can already create very performant experiences.
Let’s go back to PWA. If you don’t know yet what it is, here are some resources I’d recommend you reviewing first:
– Building Progressive Web Apps during BUILD 2018 by Jeff Burtoft
– Progressive Web Apps on Google Developers
– Progressive web apps on MDN
A PWA has to be served using HTTPS, expose a manifest and use a service worker.
The web app manifest is a JSON file describing how the web app should behave when pinned on your home screen or exposed via a apps store. Store apps developers won’t be surprised to discover properties such as the orientation you’d like to force (or not), the background color, a splash screen, etc. You also have to provide various icons resolutions.
To help you building quickly this, we have done PWA Builder. It allows you to edit / generate the manifest and will save you a lot of time generating the various icons by automatically converting a provided reference image.
Navigate to PWA Builder: https://preview.pwabuilder.com/ and enter the URL of the game: https://david.azureedge.net/applescrusher/index.html

You can see I’m forcing a landscape orientation, setting a specific background color (for the splash screen) and asking the remove the chrome of the browser if the web app is pinned by using the standalone value for the display property. This was the easy part.
Now, to enable a full PWA, you need to provide a meaningful service worker. It can either boost the performance of the loading phase and enable offline. PWA Builder is providing various service workers ready to be used. But to be honest, it’s difficult to provide a service worker generically working for any purpose. You will probably have to tune the service worker code to perfectly match your needs.
My goal for my PWA game was to be ready to go offline as soon as the game has been loaded at least once. Indeed, there’s no dynamic part in my game. As long as you’ve downloaded all the assets such as glTF files, sounds & music and of course the classical CSS, HTML & JS file, you shouldn’t have to download them again from the web server to execute the game a second time. The objective was then to navigate to the PWA, wait for the game to be ready and go to airplane mode immediately.
To illustrate that, let me show you how the “cache-first network” wasn’t good for my scenario.
I’ve first tested to put all my resources inside the precacheFiles array:

which sounded as a good idea. But using Chrome F12 to look at network requests simulating a Fast 3G connection, it clearly shows it’s far from being a good idea:

We can see that my resources are downloaded twice! The XHR request is done by Babylon.js to query the various .GLB assets specified in our code. In background, the service worker is querying via a fetch the very same resources specified in the precacheFiles array. Indeed, Babylon.js is not aware that a service worker is being installed to precache the files. Anyway, the service worker wouldn’t be ready to catch the network requests of Babylon.js. That’s why, we’re double requesting the files. The first load takes the equivalent of loading twice the site.
After this process, my goal was in a way reached as I can immediately go offline. All the files will be in the service worker cache and future XHR requests from Babylon.js will go through the SW cache first. But downloading two times the files is not a good approach. A possible solution would be to wait for the service worker to finish its precaching installation process and notify the main JS code to start the downloading after that. However, this would break my progressing downloading % bar as I wouldn’t know the current download status of the SW. I also wanted something simpler and more transparent.
I’ve then decided to have a look to this service worker provided by Google. I liked the approach of having 2 caches: PRECACHE and RUNTIME. My idea was then to put in the PRECACHE the minimum needed files for my web app to load: the HTML page, CSS and the various JS code & libs. Then, as soon as the SW would be installed, it would catch the XHR requests of Babylon.js to put it in the RUNTIME cache. Problem: to enable offline, you need to load at least 2 times the site. The first time, the PRECACHE cache will be built and the service worker will be registered. However, it won’t have time to catch the XHR request of Babylon.js. The second time you’ll load it, the SW will get the files from the PRECACHE and will start to populate the RUNTIME cache by catching the XHR requests. Again, a possible solution would be to wait for the SW to be installed and ready to catch XHR requests. It would mean to send a message to my game logic via a postMessage from the SW as soon as it will be ready to do its job.
Fortunately, we have another last option that I decided to implement. Some years ago, I’ve built an IndexedDB layer in Babylon.js to enable offline scenarios. I even wrote an article about it: Using IndexedDB to handle your 3D WebGL assets: sharing feedbacks & tips of Babylon.JS.
It was done before the service workers were created, but you’ll see it’s still perfectly valid and useful!
We’re going to continue the second solution using the SW with the 2 caches. However, this time, we’re going to ask to Babylon.js to download the resources and store them in IndexedDB. As explained in the documentation, it’s quite easy. You just have to create .manifest files associated to your resources. Those .manifest files must be part of the PRECACHE collections as they are requested by Babylon.js to check the offline options. Indeed, if we want to go immediately offline after the first load, those files must be in the cache.
As a conclusion, here’s the final workflow:
– The service worker preinstalls in the PRECACHE cache all minimum files (HTML, CSS, JS and .manifest)
– Babylon.js is querying via XHR the glTF assets and store them in IndexedDB
– The SW is ready to cache non-vital files for a first offline usage such as the VR assets: controllers’ models, light sword and banana pistol.
If you go immediately offline after the first load, Babylon.js will query the .manifest files and knows it has to get the glTF files from its IndexedDB table. We’ve reached our goal. The game can be played in offline immediately after the first load!
You can check the service worker code on github: https://github.com/davrous/applescrusher/blob/master/pwabuilder-sw.js
Note: I had to slightly add a final tune by using the {ignoreSearch: true} option. Babylon.js is generating timestamps after the URL to bypass the browser cache to get the .manifest files. Each request was considered different by the service worker if this option is not enabled and would break the offline mode then.
Pushing to the Microsoft Store
On Windows 10, PWA is a first class citizen to publish in the Microsoft Store. The submission process is described in this article.
Once hosted in the Microsoft Store, running on Windows 10, your PWA can call WinRT APIs to embrace the philosophy of the OS and the design languages of UWP. You can for instance create tiles, toast notifications, accessing Bluetooth devices, etc.
On my side, I’ve simply use of one the Windows sample provided by PWA Builder: https://www.pwabuilder.com/windows to change the app title bar color. By default, my app was hosted in a container using the default grey app bar color. This was breaking the launch sequence to my point of view and it wasn’t using the 3 mains colors of my theme (taken from the apple 3d object):


I’ve then copy/pasted the code provided by PWA Builder. Then, I added a feature detection in my web app to check if my code was executed inside a Windows 10 store app by checking the window.Windows object. If it’s true, I’m calling the configureWindows10StoreApp() function which calls some Windows APIs to change the colors of the app bar. Now, the app bar uses the same color as the splash screen and the foreground color is the same one as the yellow used for the circle and % text. The color for the button hovering is also one of my colors’ theme.


Finally, I also decided to use PWA Builder to generate the Visual Studio solution for me. I could have downloaded the APPX file to submit directly to the store, but I wanted to do a final customization.
As my game can be launched in the Windows Mixed Reality Portal for people having VR headsets, I wanted to better integrate this environment. For that, you can create a 3D launcher icon to be positioned in your VR world. The full process is explained in the documentation: Create 3D models for use in the home. You also check this cool video from #ifdef which explains the steps in a fun way.
I’ve then used the glTF Toolkit to process my Apple 3d asset to make it ready for the MR portal. Then, I’ve updated by Visual Studio package.appxmanifest file to tell it to load my converted model:

Thanks to that, you’ll be able to place my apple in your cliff house. Clicking on it will launch my app.


If you’ve running on Windows 10, please try download and play with the game from the store: https://www.microsoft.com/p/apples-crucher/9pl4cf3hx9dg
I had fun building this experiment which combines lot of great features of the web platforms and I’ve learned a lot. I hope this will help you building similar cross-platforms experiences.
David
Thanks David! This is a wonderful walk-thru tutorial! I hope you’ve been well.
This is really great – I’m an ICU doctor and looking to develop effectively a Virtual Sim centre – because social distancing has reeked havoc with our Simulation training. I’m keen on PWA and VR (and bringing VR Sim to as many people – ie, platform pretty much independent). A lot seems to be changing in this arena – any advice on where to start/platform/pitfalls… Great work…