During our last PWA Builder release, we recently announced a new feature to generate from your PWA a signed APK. It’s fully generated from the cloud, no need to install anything on your machine such as Android Studio and it’s ready to be published directly to the Play Store!
Let me show how easy it is. In a couple of minutes, you will be able to submit your PWA to the Google Play Store.
But before that, first question you may ask: why would I publish my PWA in a Store? Isn’t the beauty of PWAs to potentially replace native applications from apps stores by being installed directly from the browser? Yes, indeed! But as an app developer, you should try to reach all possible users, wherever they are and go.
Users often search for a specific application through the store of their device. Publishing a PWA in apps’ stores, either in the Microsoft Store, the Samsung Galaxy Store or the Play Store, offers the following advantages: discoverability, trustworthiness, easy install and business insights as you will be able to get some analytics from the stores dashboards. View it as another way to distribute your PWA. Your users will be able to find your app directly from a browser via a link, from a search engine or from the apps stores! You will target all those channels with a unique code base and unique hosting of your PWA.
Before jumping into the steps of generating your package for the Play Store, let me first explain you what a Trusted Web Activities (TWA) is. What the heck?!? Yet, another acronym! Don’t panic, the concept is simple. It’s a way to publish your PWA as an APK to the Play Store. Once you’ll click the “Install” button from the store, you will have an identical behavior as if you would have installed your PWA directly from the browser. In order to prove you’re the owner of the PWA / website published in the Play Store, you must create a digital asset link associated to the submitted APK at the root of your website, under a specific folder. You can read more about this: Using Trusted Web Activities. PWA Builder is going to simplify a lot this process!
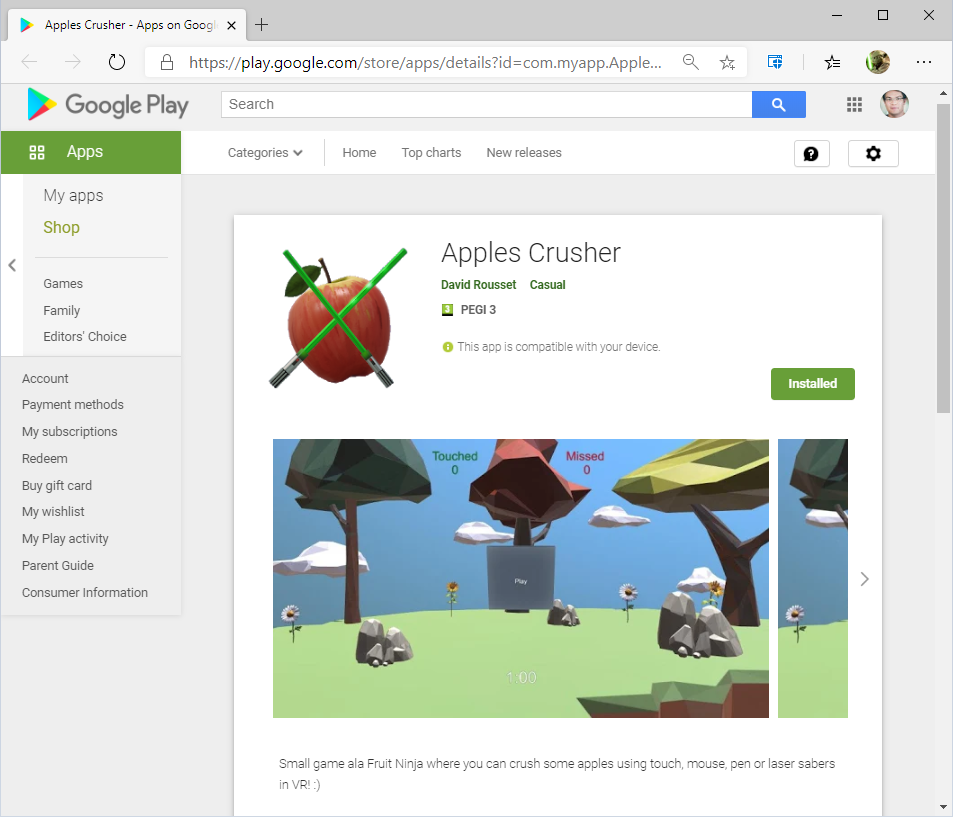
On my side, I’ve followed those steps to publish my small PWA game Apples Crusher into the Play Store. Don’t hesitate to install it on your Android phone to check how this works. By the way, I’ve already blogged about how I’ve made this game: Using WebGL and PWA to build an adaptive game for touch, mouse and VR devices. But any PWA will work.
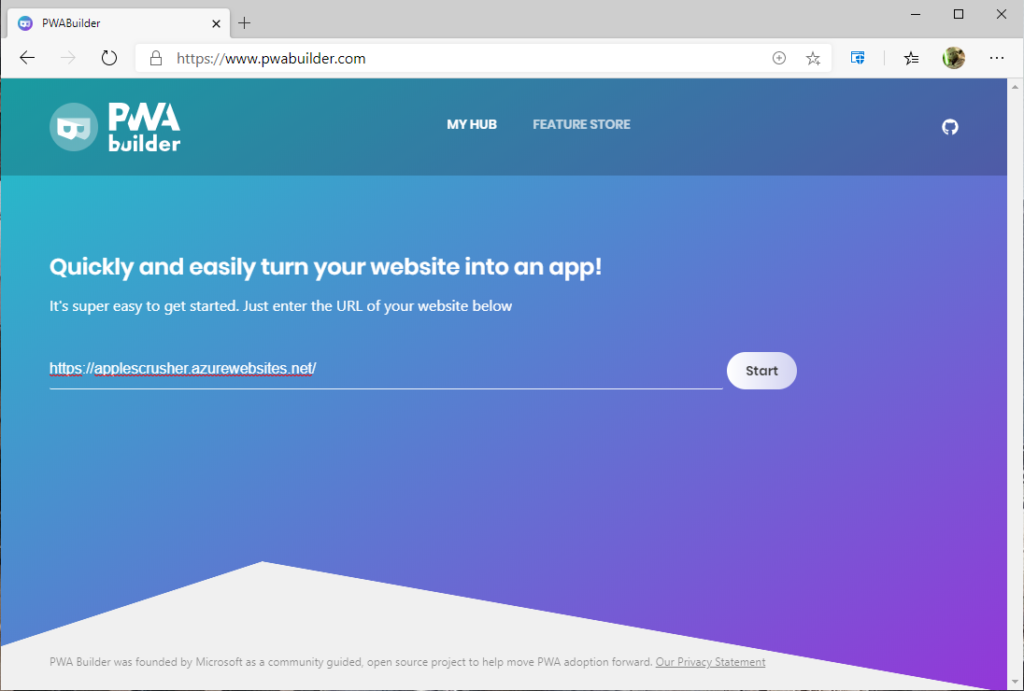
Step 1: submit your PWA URL to PWA Builder
Navigate to https://www.pwabuilder.com, enter the URL of your PWA and click “Start”:
We will then analyze your PWA and suggest possible enhancement if needed for your manifest or service worker.
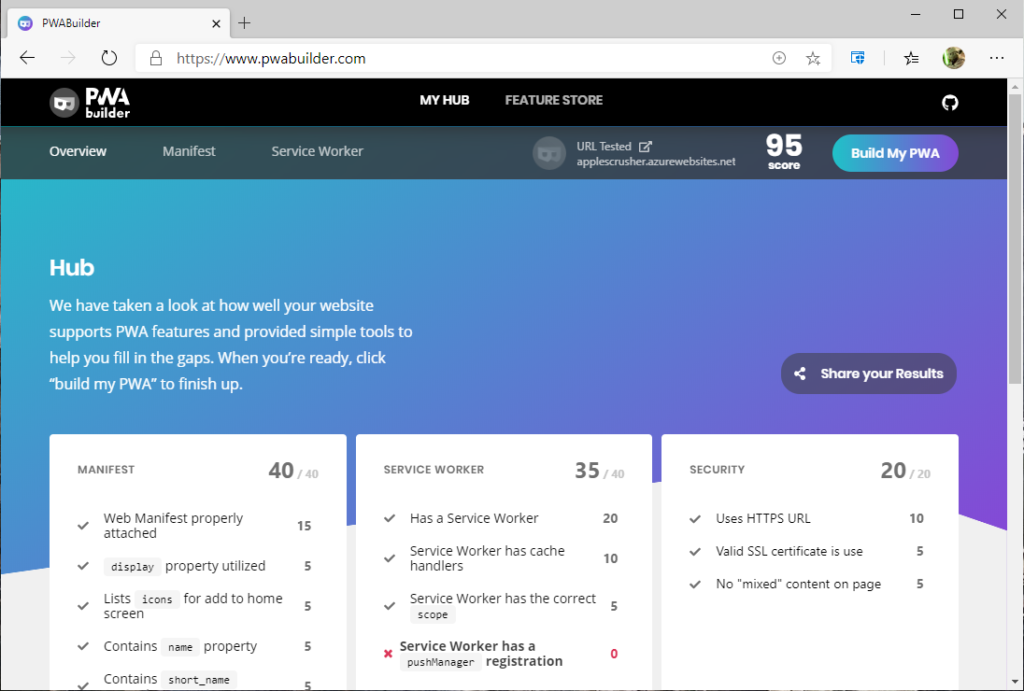
If your score is already high enough, you can click on “Build My PWA”.
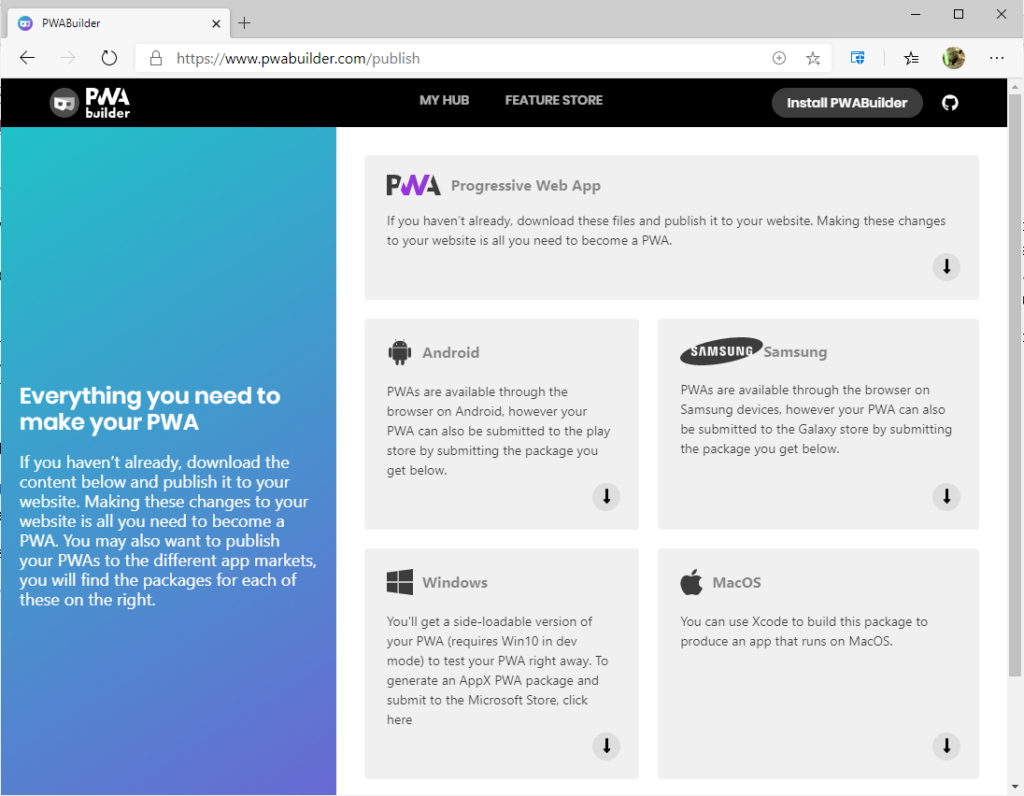
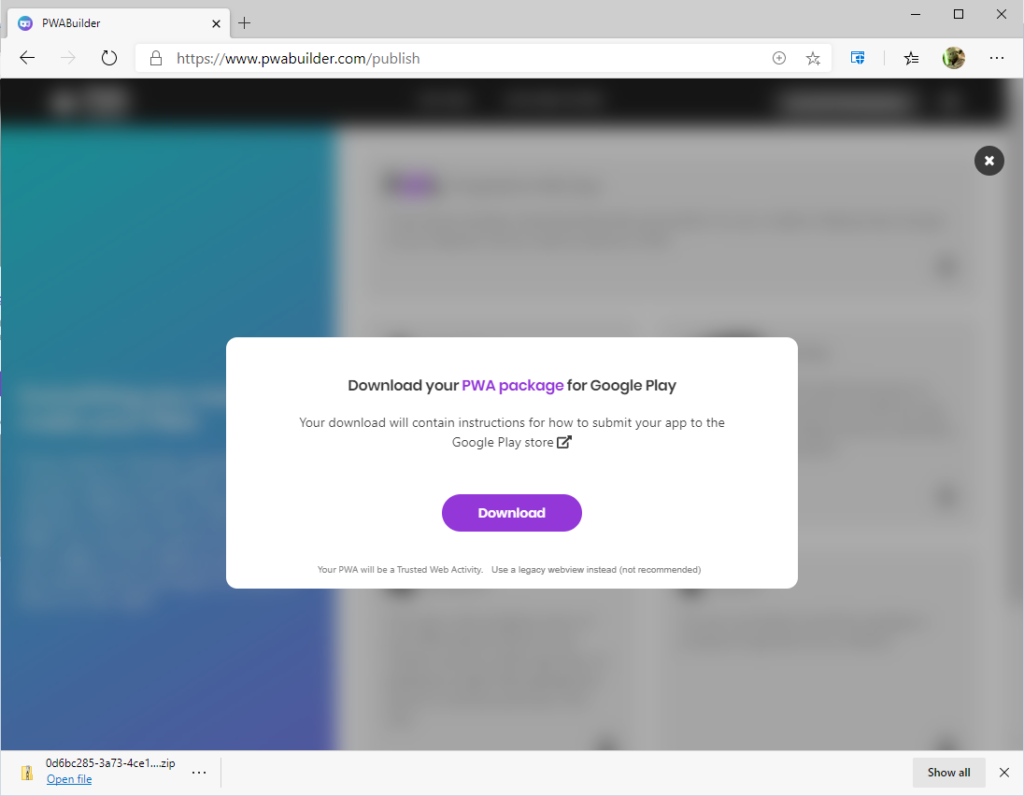
Then choose the Android platform and click “Download”. It will start the building process of our signed APK on our servers and once done, you’ll be able to explore the downloaded ZIP archive.
Step 2: test your APK on your Android phone
First, you will have to enable the developer mode on your phone and also allow the installation of apps from unknown sources in your settings.
Then, you have 2 ways to proceed. If you’ve generated the signed APK from a desktop machine, copy your downloaded signed APK on your Android phone via USB and install it.
But you’ve got an even better solution than USB… Simply do everything on your Android device via the browser and PWA Builder! Look at this video to see how I’m packaging our own PWA as an APK and install it directly from my phone:
You can even submit this APK to the Store still from your mobile. How cool is that? 😊
Step 3: create the digital assets link and put in on your webserver
As you may have noticed in the previous video, once our generated APK is launched, the PWA is shown with the address bar. Obviously, this is something you’d like to remove in order to have a full app like experience. For that, you need to prove you’re the owner of the PWA and associate it to your signed APK.
When you will download our ZIP archive from our site containing the signed APK, you’ll find also the next steps in the “Next-steps.md” file pointing to: Creating your asset link file. In a nutshell, you need to:
- Download & launch this Android app from the Play Store: Peter’s Asset Link Tool
- Select your installed signed APK containing your PWA
- Generate the Digital Asset Link and copy the content into a file named assetslinks.json under a folder named .well-known at the root of your PWA.
In the case of my PWA Apples Crusher game, it’s living here: https://applescrusher.azurewebsites.net/.well-known/assetlinks.json
Step 4: publish to the Play Store
You’re ready to publish your APK to the Play Store! For that simply follow the Google documentation: Upload an app.
You will have a couple of screenshots to provide, to answer some questions about your app category, policy and so on. Please note you will have a warning after having uploaded our signed APK. It will say it’s not optimized. You can discard this warning; it won’t prevent you to publish.
A couple of hours – days later, once your PWA will have been validated by Google, it will be in the Play Store, congrats!
Please reach out either via our official Twitter account or on our github for any feedback.
Feel free to have a look to other platforms we’re building for as well as to the various components that could improve your PWA.
Hello, I hope you are doing great.
I generated the app using the PWA Builder and uploaded the apk to the play store using my dev console. And used the “Let Google manage and protect your app signing key.” Now my app is live now but it is showing the loading/status bar. Is there any way to fix the issue? My store is built using Shopify and it doesn’t allow access – .well-known at the root level.
need some alternative options to verify digital asset links for SAS based e-commerce platforms like Shopify that doesn’t provide the root access to the users.
Please help, my app is live 🙁
My store is built using Shopify.
Waiting for a positive response soon.
Can you make these all steps into a video tutorial.
Yes, please make a video.
Would be great
Ok, I’ll do that in the upcoming days.
Thank you David. Wonderful article. Yet I gave a question: when I create the app in Google Play Store, do I opt-in ‘Play Store App Signing?’
Thanks for the feedback! As we have already signed the package for you on PWABuilder.com, you have to opt-out for the automatic Play Store Signing.
Thanks!
hi, i can’t work with service worker, i have a wordpress site, and i don’t know where to insert the JS generated files and where to copy the code …
the APK file generates it anyway, but the internet address bar is always present, I can’t make it disappear …
Thanks
Bruno
Hi, is your WordPress site hosted on WordPress or other managed service? If so, I’m afraid you won’t be able to put in place our service worker nor the digital asset link file to remove the address bar. There are some plug-ins to enable Service Worker on WordPress. I’m using SuperPWA on this blog for instance. But I do control the hosting so I can do whatever I like with WordPress.
Hi, thanks for the reply, I installed the SuperPwa and it works, but the address bar remains.
My site is hosted on Aruba.
Thanks for everything you have been very helpful.
Bruno
You’re welcome. You have to put the assetslinks.json file (associated to the right key of your signed APK) under a folder named .well-known at the root of your PWA web server. You should contact Aruba support if you don’t know how to do it.
Just to let you know. I used the service, and it worked very smoothly. No effort on my part. Before that, I had used pwa2apk, yet I got stuck. Then I attempted to do it by myself, with Android Studio and the boilerplate app, and I got stuck too. Finally things worked after I found your article. Thanks a bunch.
Hi, David!
Thanks for so useful manual.
One more thing, could you recommend some articles or resources on how to set up push notification in this type of PWA?
Thanks in Advance,
Hi, I have a question, what if I have an existing app published on play store, created using web2app and android studio. Can I update that existing app with this pwa app. Basically I don’t want to loose the previous app users who already installed that app, I want to make an update so that existing users update my new pwa app over the previous one. Hiw is that possible?
There is no documentation at all.
When I’m instructed to upload to my site the file of the generated bundle I’m not given any instruction:
I have access to my hosting file manager, but at least someone should tell me “where”, “in what folders” should I upload the files.
I’ve tried to download the pc app of the service but there is no download button.
I would be more than happy to pay something for something that works, with well made documentation.
Are you talking about the Digital Asset Link? If so, in my tutorial I said “copy the content into a file named assetslinks.json under a folder named .well-known at the root of your PWA”
Hi, thanks for the great article, I have managed to publish my app successfully because of your instructions!
One problem I don’t know how to solve. Google requires that all apps listed in the Play Store accept payments using the Store. My Web app uses Stripe for payments. Is it even possible to comply with this requirement? Is it possible for a Web App to detect that it runs as a TWA and redirect its payments to the Play Store API?
Hello, thanks for your feedback. Yes you can be compliant using the Digital Goods API: https://developer.chrome.com/docs/android/trusted-web-activity/receive-payments-play-billing/
PWA Builder supports it also.
Thank you very much for a quick and useful reply, you’re the best!
Hello,
Thank you very much for this tutorial and for everything!
I have a question, how do I get rid of the “running on chrome” message at the very beginning of the application launch? Because I noticed that this message is not showing on the “apples crusher” application
thank you so much !
You can’t hide this message today. It should only be shown once during the first launch of the app to warn the user of the current browser engine used to host the app.
After setting up the digital assets link file, do I need to show my custom add to home screen popup, or it will automatically be added as the app.
This is not related. The digital assets link file is there to prove you’re both the owner of the web app and the store app, to remove the URL bar in the app. The add to home screen feature should still behave the same in the regular web app. But it won’t be shown when your PWA will be installed directly from the Play Store.
Hi. Thanks for the tool. I’ve built an app following your instructions exactly but can get the app launched on a Samsung Galaxy S7. After installing the APK and opening the app on an Android device, it crashes immediately. The APK runs fine in Android Emulator. Do you have any advice?
Hi! It usually means you’re not managing offline correctly or you have an issue with your digital asset links file. You can open an issue on the Google Bubblewrap repo to ask for help. Thanks!
A great article and made the whole process simple. thank you.
I don’t know why I can’t build the package to run on MacOS? Kindly reply
Thanks! Because of non clarity of Apple Store policies, we removed the support for iOS and MacOS for now. We’re working on restoring them in the upcoming months. We’re evaluating several technical solutions boosting your chances to be accepted in the Apple App store.
Hello David,
I follow your tutorials. Please I want to know how to sell PWA in play store.
How can I implement the payment request API to to sell my PWA, if I am using PwaBuilder to publish the app?