Through this tutorial, we’re going to learn the basics of collisions, physics & bounding boxes by playing with the WebGL Babylon.js engine and a physics engine companion named oimo.js.
Here’s the demo we’re going to build together: Babylon.js Espilit Physics demo with Oimo.js
You can launch it in a WebGL compatible browser like Edge, Firefox, Chrome, Opera or Safari. Then, move inside the scene like in an-FPS game. Press the “s” key to launch some spheres/balls and the “b” key to launch some boxes. Using your mouse, you can click on one of the spheres or boxes to apply some impulse force on it also.
Note: tutorial updated on 21/03/2017 to reflect changes to our physics engine usage in Babylon.js 2.4+. You can read our official documentation on physics: http://doc.babylonjs.com/overviews/using_the_physics_engine
Understanding collisions
Looking at the Wikipedia Collision detection definition, we can read that: “Collision detection typically refers to the computational problem of detecting the intersection of two or more objects. While the topic is most often associated with its use in video games and other physical simulations, it also has applications in robotics. In addition to determining whether two objects have collided, collision detection systems may also calculate time of impact (TOI), and report a contact manifold (the set of intersecting points).[1] Collision response deals with simulating what happens when a collision is detected (see physics engine, ragdoll physics). Solving collision detection problems requires extensive use of concepts from linear algebra and computational geometry.”
Let’s project that into this cool 3D scene we have on our website: http://www.babylonjs.com/index.html?ESPILIT that will act as our starting base for this tutorial.
You can move into this great museum without going through the floor, you cannot go through the walls neither. At last, as you’re supposed to be a human, you’re stuck on the floor. You can’t fly. We’re then simulating gravity. All of that seems pretty obvious but requires a bunch of computation to simulate that in a 3D virtual world. The first question we need to resolve when we think about collisions detection is how complex it should be? Indeed, testing if 2 complex meshes are colliding could cost a lot of CPU, even more with a JavaScript engine where it’s complex to offload that on something else that the UI thread.
To better understand how we’re managing this complexity, navigate into the Espilit museum near this desk:

You’re blocked by the table even if there seem to be some space available on the right. Is it a bug in our collision algorithm? No, it’s not (babylon.js is free of bugs! ;-)). It’s because Michel Rousseau, the 3D artist who has built this scene, has done this choice. To simplify the collision detection, he has used a specific collider.
What’s a collider?
Rather than testing the collisions against the complete detailed meshes, you can put them into simple invisible geometries. Those colliders will act as the mesh representation and will be used by the collision engine instead. Most of the time, you won’t see the differences but it will allow us to use much less CPU as the math behind that is much simpler to compute.
Every engine supports at least 2 types of colliders: the bounding box and the bounding sphere. You’ll better understand by looking at this picture:

Extracted from: Computer Visualization, Ray Tracing, Video Games, Replacement of Bounding Boxes
This beautiful yellow deck is the mesh to be displayed. Rather than testing the collisions against every of it faces, we can try to insert it into the best bounding geometry. In this case, a box seems a better choice than a sphere to act as the mesh impostor. But the choice really depends of the mesh itself.
Let’s go back to the Espilit scene and let’s display the invisible bounding element in a semitransparent red color:

You can now understand why you can’t move by the right of the desk. It’s because you’re colliding (well, the Babylon.js camera is colliding) with this box. If you’d like to do so, simply change its size by lowering the width to perfectly fit the width of the desk.
Note: if you’d like to start learning Babylon.js, you can follow our Free MVA training course. For instance, you can jump directly to the “Introduction to WebGL 3D with HTML5 and Babylon.js – Using Babylon.js for Beginners” where we’re covering this collision part of Babylon.js. You can also have a look at the code inside our interactive playground tool: Babylon.js playground – Collisions sample
Based on the complexity of the collision or physics engine, there are other types of colliders available: the capsule and the mesh for instance.

Extracted from: Getting Started with Unity – Colliders & UnityScript
Capsule is useful for humans or humanoids as it better fits our body than a box or a sphere. The Mesh one is almost never the complete mesh itself. It’s rather a simplified version of the original mesh you’re targeting but still much more precise than a box, a sphere or a capsule.
Loading the starting scene
To load our Espilit scene, download it from our github: https://github.com/BabylonJS/Samples/tree/master/Scenes/Espilit and follow this module of our MVA course to understand how to load a .babylon scene: Introduction to WebGL 3D with HTML5 and Babylon.js – Loading Assets. Basically, you need to host the assets and the Babylon.js engine into a web server and set the proper MIME types for the .babylon extension to “application/babylon”.
Here is the code to load our scene:
/// <reference path="/scripts/babylon.js" />
var engine;
var canvas;
var scene;
document.addEventListener("DOMContentLoaded", startGame, false);
function startGame() {
    if (BABYLON.Engine.isSupported()) {
        canvas = document.getElementById("renderCanvas");
        engine = new BABYLON.Engine(canvas, true);
        BABYLON.SceneLoader.Load("Espilit/", "Espilit.babylon", engine, function (loadedScene) {
            scene = loadedScene;

            // Wait for textures and shaders to be ready
            scene.executeWhenReady(function () {
                // Attach camera to canvas inputs
                scene.activeCamera.attachControl(canvas);

                // Once the scene is loaded, just register a render loop to render it
                engine.runRenderLoop(function () {
                    scene.render();
                });
            });
        }, function (progress) {
            // To do: give progress feedback to user
        });
    }
}
Using this material, you will only benefit from the embedded collision engine of Babylon.js. Indeed, we’re making a difference between our collision engine and a physics engine. The collision engine is mostly dedicated to the camera interacting with the scene. You can enable gravity or not on the camera, you can enable the “checkCollision” option on the camera and on the various meshes. The collision engine can also help you to know if two meshes are colliding. But that’s all (this is already a lot in fact!). The collision engine won’t generate actions, force or impulse after two Babylon.js objects are colliding. You need a physics engine for that to bring life to the objects.
The way we’ve been integrating physics in Babylon.js is via a plug-in mechanism. You can read more about that here: Adding your own physics engine plugin to Babylon.js. We’re currently supporting two open-source physics engine: cannon.js and oimo.js. You can read more about the differences between the two in our documentation: http://doc.babylonjs.com/overviews/using_the_physics_engine
Then, you need to download Oimo.js from our github: https://github.com/BabylonJS/Babylon.js . It’s a slightly updated version we’ve made to better support Babylon.js.
Enabling physics support in the scene & transforming colliders into physics impostors
First thing to do is to enable physics on the scene. For that, please add this line of code:
scene.enablePhysics(new BABYLON.Vector3(0, -10, 0), new BABYLON.OimoJSPlugin());
//scene.enablePhysics(new BABYLON.Vector3(0, -10, 0), new BABYLON.CannonJSPlugin());
You’re setting up the gravity level (-10 on the Y axis in this sample code, which is more or less like what we have on Earth) and the physics engine you’d like to use. We’ll use Oimo.js but the commented line shows how to use cannon.js.
Now, we need to iterate through all non-visible colliders used by the collision engine and activate physics properties on it. For that, you simply need to find all meshes where “checkCollisions” is set to true but not visible in the scene:
for (var i = 1; i < scene.meshes.length; i++) {
    if (scene.meshes[i].checkCollisions && scene.meshes[i].isVisible === false) {
        scene.meshes[i].physicsImpostor = new BABYLON.PhysicsImpostor(
            scene.meshes[i],
            BABYLON.PhysicsImpostor.BoxImpostor, { mass: 0, friction: 0.5, restitution: 0.7},
            scene);
        meshesColliderList.push(scene.meshes[i]);
    }
}
Please declare the meshesColliderList also:
var meshesColliderList = [];
And we’re done! We’re ready to throw some objects in our scene and put a lot of mess in this beautiful but way-to-calm museum.
Creating spheres & boxes with physics states
We’re now going to add some spheres (with an Amiga texture) and some boxes (with a wood texture) to the scene. This meshes will have physics state set. For instance, this means that they will bounce on the floor if you launch them in the air, bounce between them after a collision has been detected and so on. The physics engine needs to know which kind of impostor you’d like to use for the mesh (plane, sphere or box today), the mass and friction properties.
You can download the 2 textures here: physicsassets.zip
Add this code to your project:
function CreateMaterials() {
    materialAmiga = new BABYLON.StandardMaterial("amiga", scene);
    materialAmiga.diffuseTexture = new BABYLON.Texture("assets/amiga.jpg", scene);
    materialAmiga.emissiveColor = new BABYLON.Color3(0.5, 0.5, 0.5);
    materialAmiga.diffuseTexture.uScale = 5;
    materialAmiga.diffuseTexture.vScale = 5;

    materialWood = new BABYLON.StandardMaterial("wood", scene);
    materialWood.diffuseTexture = new BABYLON.Texture("assets/wood.jpg", scene);
    materialWood.emissiveColor = new BABYLON.Color3(0.5, 0.5, 0.5);
}
function addListeners() {
    window.addEventListener("keydown", function (evt) {
        // s for sphere
        if (evt.keyCode == 83) {
            for (var index = 0; index < 25; index++) {
                var sphere = BABYLON.Mesh.CreateSphere("Sphere0", 10, 0.5, scene);
                sphere.material = materialAmiga;
                sphere.position = new BABYLON.Vector3(0 + index / 10, 3, 5 + index / 10);
                sphere.physicsImpostor = new BABYLON.PhysicsImpostor(
                    sphere,
                    BABYLON.PhysicsImpostor.SphereImpostor,
                    { mass: 1, restitution: 0.9 }, scene);
            }
        }
        // b for box
        if (evt.keyCode == 66) {
            for (var index = 0; index < 10; index++) {
                var box0 = BABYLON.Mesh.CreateBox("Box0", 0.5, scene);
                box0.position = new BABYLON.Vector3(0 + index / 5, 3, 5 + index / 5);
                box0.material = materialWood;
                box0.physicsImpostor = new BABYLON.PhysicsImpostor(
                    box0,
                    BABYLON.PhysicsImpostor.BoxImpostor,
                    { mass: 4 }, scene);
            }
        }
    });
}
You see that boxes are heavier by 4 than the spheres.
Note: if you need to understand how material works in Babylon.js, jump to this module: Introduction to WebGL 3D with HTML5 and Babylon.js – Understanding Materials and Inputs or play with our dedicated Playground sample: Babylon.js Playground – Materials sample
Add these 2 lines of code after the scene.enablePhysics line:
CreateMaterials();
addListeners();
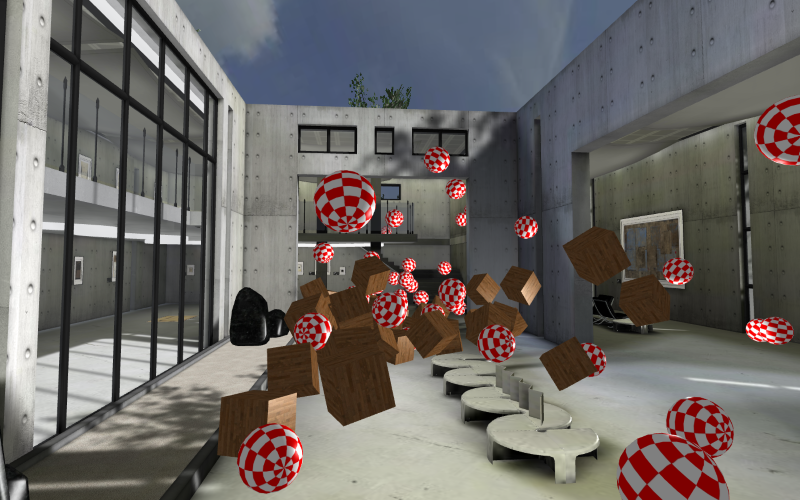
And launch the web project. Navigate to the center of the museum and press rather the “s” or “b” keys. You’ll obtain this fun result:

Adding picking support to click on meshes
Let’s add another cool feature. Let’s now imagine you’d like to click on one of the objects to throw them away. For that, you need to send a ray from the 2D coordinates of the mouse inside the 3D scene, check if this ray touches one of the interesting meshes and if so, apply an impulse force on it to try to move it.
Note: to understand how picking works, please view this MVA module: Introduction to WebGL 3D with HTML5 and Babylon.js – Advanced Features or play with our online sample: Babylon.js Playground – Picking sample
Add this code into the addListeners() function:
scene.onPointerDown = function (evt, pickResult) {
    if (pickResult.pickedMesh.name.indexOf("Sphere0") === -1 &&
        pickResult.pickedMesh.name.indexOf("Box0") === -1) {
        return;
    }
    if (pickResult.hit) {
        var dir = pickResult.pickedPoint.subtract(scene.activeCamera.position);
        dir.normalize();
        pickResult.pickedMesh.applyImpulse(dir.scale(5), pickResult.pickedPoint);
    }
}
Launch again your code into your favorite browser. You can now click on your physic meshes to play with them.
Displaying the bounding boxes to better understand the whole story
We’re finally going to create a debug scene to let you displaying/hiding the colliders and activating/deactivating the physics properties on them.
We’re going to inject the UI into this div:
<div id="lcContainer">
    <ul id="listColliders">
    </ul>
</div>
And we’ll use this function to handle the UI:
function CreateCollidersHTMLList() {
    var listColliders = document.getElementById("listColliders");
    for (var j = 0; j < meshesColliderList.length; j++) {
        var newLi = document.createElement("li");

        var chkVisibility = document.createElement('input');
        chkVisibility.type = "checkbox";
        chkVisibility.name = meshesColliderList[j].name;
        chkVisibility.id = "colvis" + j;

        var chkPhysics = document.createElement('input');
        chkPhysics.type = "checkbox";
        chkPhysics.name = meshesColliderList[j].name;
        chkPhysics.id = "colphysx" + j;

        (function (j) {
            chkVisibility.addEventListener(
             "click",
             function (event) {
                 onChangeVisibility(j, event);
             },
             false
           );
            chkPhysics.addEventListener(
            "click",
            function (event) {
                onChangePhysics(j, event);
            },
            false
            );
        })(j)

        newLi.textContent = meshesColliderList[j].name + " visibility/physx ";
        newLi.appendChild(chkVisibility);
        newLi.appendChild(chkPhysics);
        listColliders.appendChild(newLi);
    }
    function onChangeVisibility(id, event) {
        if (!meshesColliderList[id].isVisible) {
            meshesColliderList[id].isVisible = true;
            meshesColliderList[id].material.alpha = 0.75;
            meshesColliderList[id].material.ambientColor.r = 1;
        }
        else {
            meshesColliderList[id].isVisible = false;
        }

    }
    function onChangePhysics(id, event) {
        if (!meshesColliderList[id].checkCollisions) {
            meshesColliderList[id].checkCollisions = true;
            meshesColliderList[id].physicsImpostor =
                new BABYLON.PhysicsImpostor(meshesColliderList[id],
                            BABYLON.PhysicsImpostor.BoxImpostor,
                            { mass: 0, friction: 0.5, restitution: 0.7 },
                            scene);
        }
        else {
            meshesColliderList[id].checkCollisions = false;
            meshesColliderList[id].physicsImpostor.dispose();
        }
    }
}
I know, it generates a very ugly UI but I was too lazy to spend more time on it. Feel free to improve it! 😛
Call this new function and launch the web project. Now, for instance, display the colliders 12 & 17:

You can also with the second checkbox enable/disable the physics properties. For instance if you’re disabling the physics properties on collider 12 and launch the spheres, they will now go through this wall! On the following screenshot, this is for instance the case of the sphere surrounded by the red square:

You can play with this debugging sample directly in your browser here: Babylon.js Espilit Physics debug demo if you’d like.
Please also have a look at this awesome demo built by Samuel Girardin that also use Oimo.js on some funny characters:

Hope you’ve enjoyed this tutorial! Feel free to ping me on Twitter: http://twitter.com/davrous to comment it.
David
Thanks for sharing. It would also be nice if Microsoft open-sourced XNA and contributed to MonoGame to enable the WebGL target faster.
Support your own framework (XNA), your partner ecosystem (Xamarin) and your own language (C#) please. Scripting with a weak dynamic language is not a way to go.
visualstudio.uservoice.com/…/3725445-xna-5
I've also enjoyed a lot XNA but when I read "Scripting with a weak dynamic language is not a way to go" -> well, I will obviously disagree with you: blogs.msdn.com/…/the-web-the-next-game-frontier.aspx
Moreover, Babylon.JS is written in TypeScript.
Thanks for your work.
Your work is a wonderful gift to the world. Do you have any plans to speak in the Boston area?
Hi SirFizX! Thanks for your feedback. For US talk, please contact David Catuhe, the other developer: blogs.msdn.com/eternalcoding or email: davca at microsoft dot com. He's living in the US.
Thanks David for this wonderful work. I will try to contribute to the engine.
I really like your writing style, excellent info , thankyou for putting up : D.
Hi, i think that i saw you visited my blog thus i came to “return the favor”.I am attempting to find things to enhance my web site!I suppose its ok to use a few of your ideas!!
Just One question. If we create plane and ball in blender. And If plane has plane or box collider and ball sphere collider. If we define colliders in blender (blender checkbox and collider type). When we export in .Babylon. If we in Code add ball sphere collider. Does ball have than two sphere colliders one defined in blender and another defined in Code. What is preferred way defined only in blender or only in Code? What is different?