 I’d to like to share with you how I’ve learned to build what’s known as a “3D soft engine” through a series of tutorials. “Software engine” means that we will use only the CPU to build a 3D engine in an old school way (remember Doom on your 80386 ?). I’ll share with you the C#, TypeScript and JavaScript versions of the code. In this list, you should then find your favorite language or at least something near your favorite one. The idea is to help you transposing the following samples & concepts on your favorite platform. You’ll find the Visual Studio 2012 C#/TS/JS solutions to download at the end also.
So why building a 3D soft engine? Well, it’s simply because it really helps understanding how modern 3D works with our GPUs. Indeed, I’m currently learning the basics of 3D thanks to internal workshops delivered within Microsoft by the awesome David Catuhe. He’s been mastering 3D for many years now and matrices operations is hard-coded in his brain. When I was young, I was dreaming to be able to write such engines but I had the feeling it was too complex for me. Finally, you’ll see that this is not – that – complex. You simply need someone that will help you understanding the underlying principles in a simple way.
Through this series, you will learn how to project some 3D coordinates (X, Y, Z) associated to a point (a vertex) on a 2D screen, how to draw lines between each point, how to fill some triangles, to handle lights, materials and so on. This first tutorial will simply show you how to display 8 points associated to a cube and how to move them in a virtual 3D world.
This tutorial is part of the following series:
1 – Writing the core logic for camera, mesh & device object (this article)
2 – Drawing lines and triangles to obtain a wireframe rendering
3 – Loading meshes exported from Blender in a JSON format
4 – Filling the triangle with rasterization and using a Z-Buffer
4b – Bonus: using tips & parallelism to boost the performance
5 – Handling light with Flat Shading & Gouraud Shading
6 – Applying textures, back-face culling and WebGL
If you’re following the complete series, you will know how to build your own 3D software engine!
Your engine will then start by doing some wireframe rendering, then rasterization followed by gouraud shading and lastly by applying textures like demonstrated in this sample: http://david.blob.core.windows.net/html5/SoftEngineProgression/wireframe/index.html
It’s demonstrating the various stage we’ll cover during this series going from wireframe to textures.
By properly following this first tutorial, you’ll learn how to rotate the 8 points of a cube to obtain the following result at the end:
Disclaimer: some of you are wondering why I’m building this 3D software engine rather than using GPU. It’s really for educational purposes. Of course, if you need to build a game with fluid 3D animations, you will need DirectX or OpenGL/WebGL. But once you will have understood how to build a 3D soft engine, more “complex” engine will be simpler to understand. To go further, you definitely should have a look to the BabylonJS WebGL engine built by David Catuhe and I. More details & tutorials here: https://doc.babylonjs.com
Check the MVA video training version: with David Catuhe, we’ve made a free 8 modules course to let you learn the basics of 3D, WebGL and Babylon.js. The first module is containing a 40 min video version of this tutorial series: Introduction to WebGL 3D with HTML5 and Babylon.js

Reading prerequisites
I’ve been thinking on how to write these tutorials for a long time now. And I’ve finally decided not to explain each required principle myself. There is a lot of good resources on the web that will explain those important principles better than I. But I’ve then spent quite some time browsing the web for you to choose, according to myself, the best one to read:
– World, View and Projection Matrix Unveiled
– Tutorial 3 : Matrices that will provide you an introduction to matrices, the model, view & projection matrices.
– Cameras on OpenGL ES 2.x – The ModelViewProjection Matrix : this one is really interesting also as it explains the story starting by how cameras and lenses work.
– Transforms (Direct3D 9)
– A brief introduction to 3D: an excellent PowerPoint slides deck ! Read at least up to slide 27. After that, it’s too linked to a technology talking to GPU (OpenGL or DirectX).
– OpenGL Transformation

Read those articles by not focusing on the technology associated (like OpenGL or DirectX) or on the concept of triangles you may have seen in the figures. We will see that later on.
By reading those articles, you really need to understand that there is a series of transformations done that way:
– we start by a 3D object centered on itself
– the same object is then moved into the virtual 3D world by translation, scaling or rotation operations via matrices
– a camera will look at this 3D object positioned in the 3D world
– the final projection of all that will be done into a 2D space which is your screen
All this magic is done by cumulating transformations through matrices operations. You should really be at least a bit familiar with those concepts before running through these tutorials. Even if you don’t understand everything by reading them the first time. You should read them first. You will probably go back to those articles later on while writing your own version of this 3D soft engine. This is completely normal, don’t worry! 😉 The best way to learn 3D if by experimenting and doing mistakes.
We won’t neither spend some times on how matrix operations works. The good news is that you don’t really need to understand matrices. Simply view it as a black box doing the right operations for you. I’m not a master of matrices but I’ve managed to write a 3D soft engine by myself. So you should also succeed in doing so.
We will then use libraries that will do the job for us: SharpDX, a managed wrapper on top of DirectX, for C# developers and babylon.math.js written by David Catuhe for JavaScript developers. I’ve rewritten it in TypeScript also.
Software prerequisites
We will write a WinRT/XAML Windows Store Apps in C# and/or a HTML5 application with TypeScript/JavaScript. So if you want to use the C# samples as-is, you need to install:
1 – Windows 8
2 – Visual Studio 2012 Express for Windows Store Apps. You can download it for free: http://msdn.microsoft.com/en-US/windows/apps/br211386
If you choose to use the TypeScript samples, you need to install it from: http://www.typescriptlang.org/#Download . All samples have been updated and tested successfully with TypeScript 0.9.
You will find the plug-in for Visual Studio 2012 but there are other options available: Sublime Text, Vi, Emacs: TypeScript enabled! On my side, I’ve learned TypeScript by porting the C# version of my code to TypeScript. If you’re also interested in learning TypeScript, a first good introduction is this webcast: Anders Hejlsberg: Introducing TypeScript . Please install also Web Essentials 2012 which had a full support for TypeScript preview and compilation.
If you choose JavaScript, you just need your favorite IDE and a HTML5 compatible browser. 🙂
Please create a project named “SoftEngine” targeting the language you’d like to use. If it’s C#, add the “SharpDX core assembly” by using NuGet on your solution:

If it’s TypeScript, download babylon.math.ts. If’ it’s JavaScript download babylon.math.js. Add a reference to those files in both cases.
Back buffer & rendering loop
In a 3D engine, we’re rendering the complete scene during each frame with the hope of keeping an optimal 60 frames per second (FPS) to keep fluid animations. To do our rendering job, we need what we call a back buffer. This could be seen as 2 dimensional array mapping the screen/window size. Every cell of the array is mapped to a pixel on the screen.
In our XAML Windows Store Apps, we will use a byte[] array that will act as our dynamic back buffer. For every frame being rendered in the animation loop (tick), this buffer will be affected to a WriteableBitmap acting as the source of a XAML image control that will be called the front buffer. For the rendering loop, we’re going to ask to the XAML rendering engine to call us for every frame it will generate. The registration is done thanks to this line of code:
CompositionTarget.Rendering += CompositionTarget_Rendering;
In HTML5, we’re going to use of course the <canvas /> element. The canvas element has already a back buffer data array associated to it. You can access it through the getImageData() and setImageData() functions. The animation loop will be handled by the requestAnimationFrame() function. This one is much more efficient that an equivalent of a setTimeout(function() {], 1000/60) as it’s handled natively by the browser that will callback our code only when it will be ready to draw.
Note: in both cases, you can render the frames in a different resolution that the actual width & height of the final window. For instance, you can have a back buffer of 640×480 pixels whereas the final display screen (front buffer) will be in 1920×1080. In XAML and thanks to CSS in HTML5, you will then benefit from “hardware scaling”. The rendering engines of XAML and of the browser will stretch the back buffer data to the front buffer window by even using an anti-aliasing algorithm. In both cases, this task is done by the GPU. This is why we call it “hardware scaling” (hardware is the GPU). You can read more about this topic addressed in HTML5 here: Unleash the power of HTML 5 Canvas for gaming . This approach is often used in games for instance to boost the performance as you have less pixels to address.
Camera & Mesh objects
Let’s start coding. First, we need to define some objects that will embed the details needed for a camera and for a mesh. A mesh is a cool name to describe a 3D object.
Our Camera will have 2 properties: its position in the 3D world and where it’s looking at, the target. Both are made of 3D coordinates named a Vector3. C# will use SharpDX.Vector3 and TypeScript & JavaScript will use BABYLON.Vector3.
Our Mesh will have a collection of vertices (several vertex or 3D points) that will be used to build our 3D object, its position in the 3D world and its rotation state. To identify it, it will also have a name.
To resume, we need the following code:
// Camera.cs & Mesh.cs
using SharpDX;

namespace SoftEngine
{
    public class Camera
    {
        public Vector3 Position { get; set; }
        public Vector3 Target { get; set; }
    }
    public class Mesh
    {
        public string Name { get; set; }
        public Vector3[] Vertices { get; private set; }
        public Vector3 Position { get; set; }
        public Vector3 Rotation { get; set; }

        public Mesh(string name, int verticesCount)
        {
            Vertices = new Vector3[verticesCount];
            Name = name;
        }
    }
}
//<reference path="babylon.math.ts"/>
module SoftEngine {
    export class Camera {
        Position: BABYLON.Vector3;
        Target: BABYLON.Vector3;

        constructor() {
            this.Position = BABYLON.Vector3.Zero();
            this.Target = BABYLON.Vector3.Zero();
        }
    }
    export class Mesh {
        Position: BABYLON.Vector3;
        Rotation: BABYLON.Vector3;
        Vertices: BABYLON.Vector3[];

        constructor(public name: string, verticesCount: number) {
            this.Vertices = new Array(verticesCount);
            this.Rotation = BABYLON.Vector3.Zero();
            this.Position = BABYLON.Vector3.Zero();
        }
    }
}
var SoftEngine;
(function (SoftEngine) {
    var Camera = (function () {
        function Camera() {
            this.Position = BABYLON.Vector3.Zero();
            this.Target = BABYLON.Vector3.Zero();
        }
        return Camera;
    })();
    SoftEngine.Camera = Camera;
    var Mesh = (function () {
        function Mesh(name, verticesCount) {
            this.name = name;
            this.Vertices = new Array(verticesCount);
            this.Rotation = BABYLON.Vector3.Zero();
            this.Position = BABYLON.Vector3.Zero();
        }
        return Mesh;
    })();
    SoftEngine.Mesh = Mesh;
})(SoftEngine || (SoftEngine = {}));
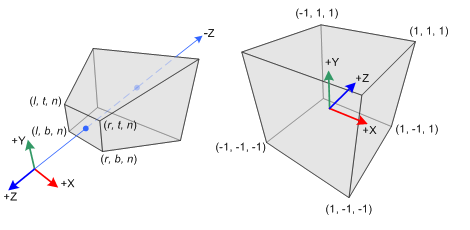
For instance, if you want to describe a cube using our Mesh object, you need to create 8 vertices associated to the 8 points of the cube. Here are the coordinates on a cube displayed in Blender:

With a left-handed world. Remember also that when you’re creating a mesh, the coordinates system is starting at the center of the mesh. So, X=0, Y=0, Z=0 is the center of the cube.
This could be created via this kind of code:
var mesh = new Mesh("Cube", 8);
mesh.Vertices[0] = new Vector3(-1, 1, 1);
mesh.Vertices[1] = new Vector3(1, 1, 1);
mesh.Vertices[2] = new Vector3(-1, -1, 1);
mesh.Vertices[3] = new Vector3(-1, -1, -1);
mesh.Vertices[4] = new Vector3(-1, 1, -1);
mesh.Vertices[5] = new Vector3(1, 1, -1);
mesh.Vertices[6] = new Vector3(1, -1, 1);
mesh.Vertices[7] = new Vector3(1, -1, -1);
The most important part: the Device object
Now that we have our basic objects and we know how to build 3D meshes, we need the most important part: the Device object. It’s the core of our 3D engine.
In it’s rendering function, we will build the view matrix and the projection matrix based on the camera we will have defined before.
Then, we will iterate through each available mesh to build their associated world matrix based on their current rotation and translation values. Finally, once done, the final transformation matrix to apply is:
var transformMatrix = worldMatrix * viewMatrix * projectionMatrix;
This is the concept you absolutely need to understand by reading the previous prerequisites resources. Otherwise, you will probably simply copy/paste the code without understanding anything about the magic underneath. This is not a very big problem for further tutorials but again, it’s better to know what’s you’re coding.
Using this transformation matrix, we’re going to project each vertex of each mesh in the 2D world to obtain X,Y coordinates from their X,Y,Z coordinates. To finally draw on screen, we’re adding a small clip logic to only display visible pixels via a PutPixel method/function.
Here are the various versions of the Device object. I’ve tried to comment the code to help you understanding it as much as possible.
Note: Microsoft Windows is drawing using the BGRA color space (Blue, Green, Red, Alpha) whereas the HTML5 canvas is drawing using the RGBA (Red, Green, Blue, Alpha) color space. That’s why, you will notice some slight differences in the code between C# and HTML5.
using Windows.UI.Xaml.Media.Imaging;
using System.Runtime.InteropServices.WindowsRuntime;
using SharpDX;

namespace SoftEngine
{
    public class Device
    {
        private byte[] backBuffer;
        private WriteableBitmap bmp;

        public Device(WriteableBitmap bmp)
        {
            this.bmp = bmp;
            // the back buffer size is equal to the number of pixels to draw
            // on screen (width*height) * 4 (R,G,B & Alpha values).
            backBuffer = new byte[bmp.PixelWidth * bmp.PixelHeight * 4];
        }

        // This method is called to clear the back buffer with a specific color
        public void Clear(byte r, byte g, byte b, byte a) {
            for (var index = 0; index < backBuffer.Length; index += 4)
            {
                // BGRA is used by Windows instead by RGBA in HTML5
                backBuffer[index] = b;
                backBuffer[index + 1] = g;
                backBuffer[index + 2] = r;
                backBuffer[index + 3] = a;
            }
        }

        // Once everything is ready, we can flush the back buffer
        // into the front buffer.
        public void Present()
        {
            using (var stream = bmp.PixelBuffer.AsStream())
            {
                // writing our byte[] back buffer into our WriteableBitmap stream
                stream.Write(backBuffer, 0, backBuffer.Length);
            }
            // request a redraw of the entire bitmap
            bmp.Invalidate();
        }

        // Called to put a pixel on screen at a specific X,Y coordinates
        public void PutPixel(int x, int y, Color4 color)
        {
            // As we have a 1-D Array for our back buffer
            // we need to know the equivalent cell in 1-D based
            // on the 2D coordinates on screen
            var index = (x + y * bmp.PixelWidth) * 4;

            backBuffer[index] = (byte)(color.Blue * 255);
            backBuffer[index + 1] = (byte)(color.Green * 255);
            backBuffer[index + 2] = (byte)(color.Red * 255);
            backBuffer[index + 3] = (byte)(color.Alpha * 255);
        }

        // Project takes some 3D coordinates and transform them
        // in 2D coordinates using the transformation matrix
        public Vector2 Project(Vector3 coord, Matrix transMat)
        {
            // transforming the coordinates
            var point = Vector3.TransformCoordinate(coord, transMat);
            // The transformed coordinates will be based on coordinate system
            // starting on the center of the screen. But drawing on screen normally starts
            // from top left. We then need to transform them again to have x:0, y:0 on top left.
            var x = point.X * bmp.PixelWidth + bmp.PixelWidth / 2.0f;
            var y = -point.Y * bmp.PixelHeight + bmp.PixelHeight / 2.0f;
            return (new Vector2(x, y));
        }

        // DrawPoint calls PutPixel but does the clipping operation before
        public void DrawPoint(Vector2 point)
        {
            // Clipping what's visible on screen
            if (point.X >= 0 && point.Y >= 0 && point.X < bmp.PixelWidth && point.Y < bmp.PixelHeight)
            {
                // Drawing a yellow point
                PutPixel((int)point.X, (int)point.Y, new Color4(1.0f, 1.0f, 0.0f, 1.0f));
            }
        }

        // The main method of the engine that re-compute each vertex projection
        // during each frame
        public void Render(Camera camera, params Mesh[] meshes)
        {
            // To understand this part, please read the prerequisites resources
            var viewMatrix = Matrix.LookAtLH(camera.Position, camera.Target, Vector3.UnitY);
            var projectionMatrix = Matrix.PerspectiveFovRH(0.78f,
                                                           (float)bmp.PixelWidth / bmp.PixelHeight,
                                                           0.01f, 1.0f);

            foreach (Mesh mesh in meshes)
            {
                // Beware to apply rotation before translation
                var worldMatrix = Matrix.RotationYawPitchRoll(mesh.Rotation.Y,
                                                              mesh.Rotation.X, mesh.Rotation.Z) *
                                  Matrix.Translation(mesh.Position);

                var transformMatrix = worldMatrix * viewMatrix * projectionMatrix;

                foreach (var vertex in mesh.Vertices)
                {
                    // First, we project the 3D coordinates into the 2D space
                    var point = Project(vertex, transformMatrix);
                    // Then we can draw on screen
                    DrawPoint(point);
                }
            }
        }
    }
}
///<reference path="babylon.math.ts"/>

module SoftEngine {
    export class Device {
        // the back buffer size is equal to the number of pixels to draw
        // on screen (width*height) * 4 (R,G,B & Alpha values).
        private backbuffer: ImageData;
        private workingCanvas: HTMLCanvasElement;
        private workingContext: CanvasRenderingContext2D;
        private workingWidth: number;
        private workingHeight: number;
        // equals to backbuffer.data
        private backbufferdata;

        constructor(canvas: HTMLCanvasElement) {
            this.workingCanvas = canvas;
            this.workingWidth = canvas.width;
            this.workingHeight = canvas.height;
            this.workingContext = this.workingCanvas.getContext("2d");
        }

        // This function is called to clear the back buffer with a specific color
        public clear(): void {
            // Clearing with black color by default
            this.workingContext.clearRect(0, 0, this.workingWidth, this.workingHeight);
            // once cleared with black pixels, we're getting back the associated image data to
            // clear out back buffer
            this.backbuffer = this.workingContext.getImageData(0, 0, this.workingWidth, this.workingHeight);
        }

        // Once everything is ready, we can flush the back buffer
        // into the front buffer.
        public present(): void {
            this.workingContext.putImageData(this.backbuffer, 0, 0);
        }

        // Called to put a pixel on screen at a specific X,Y coordinates
        public putPixel(x: number, y: number, color: BABYLON.Color4): void {
            this.backbufferdata = this.backbuffer.data;
            // As we have a 1-D Array for our back buffer
            // we need to know the equivalent cell index in 1-D based
            // on the 2D coordinates of the screen
            var index: number = ((x >> 0) + (y >> 0) * this.workingWidth) * 4;


            // RGBA color space is used by the HTML5 canvas
            this.backbufferdata[index] = color.r * 255;
            this.backbufferdata[index + 1] = color.g * 255;
            this.backbufferdata[index + 2] = color.b * 255;
            this.backbufferdata[index + 3] = color.a * 255;
        }

        // Project takes some 3D coordinates and transform them
        // in 2D coordinates using the transformation matrix
        public project(coord: BABYLON.Vector3, transMat: BABYLON.Matrix): BABYLON.Vector2 {
            // transforming the coordinates
            var point = BABYLON.Vector3.TransformCoordinates(coord, transMat);
            // The transformed coordinates will be based on coordinate system
            // starting on the center of the screen. But drawing on screen normally starts
            // from top left. We then need to transform them again to have x:0, y:0 on top left.
            var x = point.x * this.workingWidth + this.workingWidth / 2.0 >> 0;
            var y = -point.y * this.workingHeight + this.workingHeight / 2.0 >> 0;
            return (new BABYLON.Vector2(x, y));
        }

        // drawPoint calls putPixel but does the clipping operation before
        public drawPoint(point: BABYLON.Vector2): void {
            // Clipping what's visible on screen
            if (point.x >= 0 && point.y >= 0 && point.x < this.workingWidth
                                             && point.y < this.workingHeight) {
                // Drawing a yellow point
                this.putPixel(point.x, point.y, new BABYLON.Color4(1, 1, 0, 1));
            }
        }

        // The main method of the engine that re-compute each vertex projection
        // during each frame
        public render(camera: Camera, meshes: Mesh[]): void {
            // To understand this part, please read the prerequisites resources
            var viewMatrix = BABYLON.Matrix.LookAtLH(camera.Position, camera.Target, BABYLON.Vector3.Up());
            var projectionMatrix = BABYLON.Matrix.PerspectiveFovLH(0.78,
                                                  this.workingWidth / this.workingHeight, 0.01, 1.0);

            for (var index = 0; index < meshes.length; index++) {
                // current mesh to work on
                var cMesh = meshes[index];
                // Beware to apply rotation before translation
                var worldMatrix = BABYLON.Matrix.RotationYawPitchRoll(
                        cMesh.Rotation.y, cMesh.Rotation.x, cMesh.Rotation.z)
                        .multiply(BABYLON.Matrix.Translation(
                            cMesh.Position.x, cMesh.Position.y, cMesh.Position.z));

                var transformMatrix = worldMatrix.multiply(viewMatrix).multiply(projectionMatrix);

                for (var indexVertices = 0; indexVertices < cMesh.Vertices.length; indexVertices++) {
                    // First, we project the 3D coordinates into the 2D space
                    var projectedPoint = this.project(cMesh.Vertices[indexVertices], transformMatrix);
                    // Then we can draw on screen
                    this.drawPoint(projectedPoint);
                }
            }
        }
    }
}
var SoftEngine;
(function (SoftEngine) {
    var Device = (function () {
        function Device(canvas) {
            // Note: the back buffer size is equal to the number of pixels to draw
            // on screen (width*height) * 4 (R,G,B & Alpha values).
            this.workingCanvas = canvas;
            this.workingWidth = canvas.width;
            this.workingHeight = canvas.height;
            this.workingContext = this.workingCanvas.getContext("2d");
        }

        // This function is called to clear the back buffer with a specific color
        Device.prototype.clear = function () {
            // Clearing with black color by default
            this.workingContext.clearRect(0, 0, this.workingWidth, this.workingHeight);
            // once cleared with black pixels, we're getting back the associated image data to
            // clear out back buffer
            this.backbuffer = this.workingContext.getImageData(0, 0, this.workingWidth, this.workingHeight);
        };

        // Once everything is ready, we can flush the back buffer
        // into the front buffer.
        Device.prototype.present = function () {
            this.workingContext.putImageData(this.backbuffer, 0, 0);
        };

        // Called to put a pixel on screen at a specific X,Y coordinates
        Device.prototype.putPixel = function (x, y, color) {
            this.backbufferdata = this.backbuffer.data;
            // As we have a 1-D Array for our back buffer
            // we need to know the equivalent cell index in 1-D based
            // on the 2D coordinates of the screen
            var index = ((x >> 0) + (y >> 0) * this.workingWidth) * 4;


            // RGBA color space is used by the HTML5 canvas
            this.backbufferdata[index] = color.r * 255;
            this.backbufferdata[index + 1] = color.g * 255;
            this.backbufferdata[index + 2] = color.b * 255;
            this.backbufferdata[index + 3] = color.a * 255;
        };

        // Project takes some 3D coordinates and transform them
        // in 2D coordinates using the transformation matrix
        Device.prototype.project = function (coord, transMat) {
            var point = BABYLON.Vector3.TransformCoordinates(coord, transMat);
            // The transformed coordinates will be based on coordinate system
            // starting on the center of the screen. But drawing on screen normally starts
            // from top left. We then need to transform them again to have x:0, y:0 on top left.
            var x = point.x * this.workingWidth + this.workingWidth / 2.0 >> 0;
            var y = -point.y * this.workingHeight + this.workingHeight / 2.0 >> 0;
            return (new BABYLON.Vector2(x, y));
        };

        // drawPoint calls putPixel but does the clipping operation before
        Device.prototype.drawPoint = function (point) {
            // Clipping what's visible on screen
            if (point.x >= 0 && point.y >= 0 && point.x < this.workingWidth
                                             && point.y < this.workingHeight) {
                // Drawing a yellow point
                this.putPixel(point.x, point.y, new BABYLON.Color4(1, 1, 0, 1));
            }
        };

        // The main method of the engine that re-compute each vertex projection
        // during each frame
        Device.prototype.render = function (camera, meshes) {
            // To understand this part, please read the prerequisites resources
            var viewMatrix = BABYLON.Matrix.LookAtLH(camera.Position, camera.Target, BABYLON.Vector3.Up());
            var projectionMatrix = BABYLON.Matrix.PerspectiveFovLH(0.78,
                                           this.workingWidth / this.workingHeight, 0.01, 1.0);

            for (var index = 0; index < meshes.length; index++) {
                // current mesh to work on
                var cMesh = meshes[index];
                // Beware to apply rotation before translation
                var worldMatrix = BABYLON.Matrix.RotationYawPitchRoll(
                    cMesh.Rotation.y, cMesh.Rotation.x, cMesh.Rotation.z)
                     .multiply(BABYLON.Matrix.Translation(
                       cMesh.Position.x, cMesh.Position.y, cMesh.Position.z));

                var transformMatrix = worldMatrix.multiply(viewMatrix).multiply(projectionMatrix);

                for (var indexVertices = 0; indexVertices < cMesh.Vertices.length; indexVertices++) {
                    // First, we project the 3D coordinates into the 2D space
                    var projectedPoint = this.project(cMesh.Vertices[indexVertices], transformMatrix);
                    // Then we can draw on screen
                    this.drawPoint(projectedPoint);
                }
            }
        };
        return Device;
    })();
    SoftEngine.Device = Device;
})(SoftEngine || (SoftEngine = {}));
Putting it all together
We finally need to create a mesh (our cube), create a camera and target our mesh & instantiate our Device object.
Once done, we will launch the animation/rendering loop. In optimal cases, this loop will be called every 16ms (60 FPS). During each tick (call to the handler registered to the rendering loop), we will launch the following logic every time:
1 – Clear the screen and all associated pixels with black ones (Clear() function)
2 – Update the various position & rotation values of our meshes
3 – Render them into the back buffer by doing the required matrix operations (Render() function)
4 – Display them on screen by flushing the back buffer data into the front buffer (Present() function)
private Device device;
Mesh mesh = new Mesh("Cube", 8);
Camera mera = new Camera();

private void Page_Loaded(object sender, RoutedEventArgs e)
{
    // Choose the back buffer resolution here
    WriteableBitmap bmp = new WriteableBitmap(640, 480);

    device = new Device(bmp);

    // Our XAML Image control
    frontBuffer.Source = bmp;

    mesh.Vertices[0] = new Vector3(-1, 1, 1);
    mesh.Vertices[1] = new Vector3(1, 1, 1);
    mesh.Vertices[2] = new Vector3(-1, -1, 1);
    mesh.Vertices[3] = new Vector3(-1, -1, -1);
    mesh.Vertices[4] = new Vector3(-1, 1, -1);
    mesh.Vertices[5] = new Vector3(1, 1, -1);
    mesh.Vertices[6] = new Vector3(1, -1, 1);
    mesh.Vertices[7] = new Vector3(1, -1, -1);

    mera.Position = new Vector3(0, 0, 10.0f);
    mera.Target = Vector3.Zero;

    // Registering to the XAML rendering loop
    CompositionTarget.Rendering += CompositionTarget_Rendering;
}

// Rendering loop handler
void CompositionTarget_Rendering(object sender, object e)
{
    device.Clear(0, 0, 0, 255);

    // rotating slightly the cube during each frame rendered
    mesh.Rotation = new Vector3(mesh.Rotation.X + 0.01f, mesh.Rotation.Y + 0.01f, mesh.Rotation.Z);

    // Doing the various matrix operations
    device.Render(mera, mesh);
    // Flushing the back buffer into the front buffer
    device.Present();
}
///<reference path="SoftEngine.ts"/>

var canvas: HTMLCanvasElement;
var device: SoftEngine.Device;
var mesh: SoftEngine.Mesh;
var meshes: SoftEngine.Mesh[] = [];
var mera: SoftEngine.Camera;

document.addEventListener("DOMContentLoaded", init, false);

function init() {
    canvas = <HTMLCanvasElement> document.getElementById("frontBuffer");
    mesh = new SoftEngine.Mesh("Cube", 8);
    meshes.push(mesh);
    mera = new SoftEngine.Camera();
    device = new SoftEngine.Device(canvas);

    mesh.Vertices[0] = new BABYLON.Vector3(-1, 1, 1);
    mesh.Vertices[1] = new BABYLON.Vector3(1, 1, 1);
    mesh.Vertices[2] = new BABYLON.Vector3(-1, -1, 1);
    mesh.Vertices[3] = new BABYLON.Vector3(-1, -1, -1);
    mesh.Vertices[4] = new BABYLON.Vector3(-1, 1, -1);
    mesh.Vertices[5] = new BABYLON.Vector3(1, 1, -1);
    mesh.Vertices[6] = new BABYLON.Vector3(1, -1, 1);
    mesh.Vertices[7] = new BABYLON.Vector3(1, -1, -1);

    mera.Position = new BABYLON.Vector3(0, 0, 10);
    mera.Target = new BABYLON.Vector3(0, 0, 0);

    // Calling the HTML5 rendering loop
    requestAnimationFrame(drawingLoop);
}

// Rendering loop handler
function drawingLoop() {
    device.clear();

    // rotating slightly the cube during each frame rendered
    mesh.Rotation.x += 0.01;
    mesh.Rotation.y += 0.01;

    // Doing the various matrix operations
    device.render(mera, meshes);
    // Flushing the back buffer into the front buffer
    device.present();

    // Calling the HTML5 rendering loop recursively
    requestAnimationFrame(drawingLoop);
}
var canvas;
var device;
var mesh;
var meshes = [];
var mera;

document.addEventListener("DOMContentLoaded", init, false);

function init() {
    canvas = document.getElementById("frontBuffer");
    mesh = new SoftEngine.Mesh("Cube", 8);
    meshes.push(mesh);
    mera = new SoftEngine.Camera();
    device = new SoftEngine.Device(canvas);

    mesh.Vertices[0] = new BABYLON.Vector3(-1, 1, 1);
    mesh.Vertices[1] = new BABYLON.Vector3(1, 1, 1);
    mesh.Vertices[2] = new BABYLON.Vector3(-1, -1, 1);
    mesh.Vertices[3] = new BABYLON.Vector3(-1, -1, -1);
    mesh.Vertices[4] = new BABYLON.Vector3(-1, 1, -1);
    mesh.Vertices[5] = new BABYLON.Vector3(1, 1, -1);
    mesh.Vertices[6] = new BABYLON.Vector3(1, -1, 1);
    mesh.Vertices[7] = new BABYLON.Vector3(1, -1, -1);

    mera.Position = new BABYLON.Vector3(0, 0, 10);
    mera.Target = new BABYLON.Vector3(0, 0, 0);

    // Calling the HTML5 rendering loop
    requestAnimationFrame(drawingLoop);
}

// Rendering loop handler
function drawingLoop() {
    device.clear();

    // rotating slightly the cube during each frame rendered
    mesh.Rotation.x += 0.01;
    mesh.Rotation.y += 0.01;

    // Doing the various matrix operations
    device.render(mera, meshes);
    // Flushing the back buffer into the front buffer
    device.present();

    // Calling the HTML5 rendering loop recursively
    requestAnimationFrame(drawingLoop);
}
If you’ve managed to follow properly this first tutorial, you should obtain something like that:
If not, download the solutions containing the source code:
– C# : SoftEngineCSharpPart1.zip
– TypeScript : SoftEngineTSPart1.zip
– JavaScript : SoftEngineJSPart1.zip or simply right-click –> view source on the embedded iframe
Simply review the code and try to find what’s wrong with yours. 🙂
In the next tutorial, we’re going to learn how to draw lines between each vertex & the concept of faces/triangles to obtain something like that:

See you in the second part of this series: Tutorial part 2: learning how to write a 3D soft engine from scratch in C#, TS or JS – drawing lines & triangles
Hi !
Thanks for this great introduction on how to make a soft 3D engine ! It's really easy to read, I think it's good to offer these three languages because it allows us to see several methods. Another big thanks, I can't wait for the next =)
Hello,
The JS demo doesn't work with firefox, error "requestAnimationFrame is not defined"
Try the following:
TypeScript:
window.requestAnimationFrame = (function(){
return window.requestAnimationFrame ||
( window).webkitRequestAnimationFrame ||
( window).mozRequestAnimationFrame ||
( window).oRequestAnimationFrame ||
( window).msRequestAnimationFrame ||
function(/* function */ callback, /* DOMElement */ element){
window.setTimeout(callback, 1000 / 60);
};
})();
JavaScript:
window.requestAnimationFrame = (function () {
return window.requestAnimationFrame ||
window.webkitRequestAnimationFrame ||
window.mozRequestAnimationFrame ||
window.oRequestAnimationFrame ||
window.msRequestAnimationFrame ||
function (/* function */ callback, /* DOMElement */ element) {
window.setTimeout(callback, 1000 / 60);
};
})();
For the TypeScript code didn’t show up properly on the comments. So, I will try again:
window.requestAnimationFrame = (function(){
return window.requestAnimationFrame ||
(<any> window).webkitRequestAnimationFrame ||
(<any> window).mozRequestAnimationFrame ||
(<any> window).oRequestAnimationFrame ||
(<any> window).msRequestAnimationFrame ||
function(/* function */ callback, /* DOMElement */ element){
window.setTimeout(callback, 1000 / 60);
};
})();
Hello Orhan. Thanks for the feedback. I'll fix that asap.
David
This is THE best article I’ve read!
Ps: Please update the links, some of them are not working!
for JS :
It should be added at the beginning of this script main.js file (for three examples):
// shim layer with setTimeout fallback
window.requestAnimationFrame = (function () {
return window.requestAnimationFrame ||
window.webkitRequestAnimationFrame ||
window.mozRequestAnimationFrame ||
function (callback) {
window.setTimeout(callback, 1000 / 60);
};
})();
Hi guys, well, the shim for RAF was already in place. So which version of Firefox are you using?
Le problème ne vient pas de ton site "david.blob.core.windows.net/softengine3d" qui fonctionne (testé sur Maxthon 3, IE9, chrome 27, FirexFox 15.0.1, 16.0.2 et 21.0) mais de tes zip pour javascript.
Pour preuve, il parle d'un problème avec la fonction "requestAnimationFrame" (requestAnimationFrame(drawingLoop);) alors que celle que tu utilises sur ton site s'appelle "requestAnimFrame" (c'est grâce à IE que j'ai pu récupérer justement le script manquant dans le main.js en faisant une comparaison de code).
Ah ok. Je comprends mieux. 🙂 Bon, je modifie les archive ZIP alors. Merci pour l'info.
I've updated the .ZIP files containing the JavaScript code to include requestAnimationFrame prefixed for Firefox & iDevices.
Really good work David. I really like your approach – writing engine from scratch even with front end part where You put pixels on screen.
I'm wondering – if it's possible to write it in C# in VS2010 under win 7? Without using XAML and whole "web environment" ?
SharpDX is useful for vectors and matrix operations – but how do I "link" it with my project under VS 2010? Also what should I use rather than XAML image control?
I would be really grateful for some advices 😉
Take care
Lucas
Hi Lucas. Thanks for your feedback! Yes, you can. I know some people who has already port the tutorials in C#/Winform, in Java and even Under Windows CE.
You can download the SharpDX version working with Win7 desktop project: http://sharpdx.org/
David
Super !
J'ai enfin fini les prérequis et donc cette première partie. J'ai adoré. Par contre, je suis frustré car je n'ai toujours pas compris, au sens mathématique, pourquoi pour construire la matrice de projection il faut diviser les composantes x et y des points par leur composante z. Mais bon, on peut vivre sans avoir compris ça et au pire je le reprendrai plus tard.
Encore merci et vivement la suite 🙂
@Lucas : I'm also on a Win7 environement, and I made a WPF project so David's code is 99% compatible. The only difference is that WriteableBimap has no "PixelBuffer" property. The workaround is the WritePixels() method.
So my Present() method contains only the following code :
_bitmap.WritePixels(new System.Windows.Int32Rect(0, 0, _bitmap.PixelWidth, _bitmap.PixelHeight), _backBuffer, _bitmap.PixelWidth * 4, 0);
The other difference is in the init of the WritableBitmap :
var bmp = new WriteableBitmap(640, 480, 96, 96, PixelFormats.Bgra32, null);
96 is the "dpi" for x and y, I've found the value somewhere on the web and I guess it's the default dpi for a screen but I don't know if it's supposed to vary depending on the screen. Anyway the code works great !
Hi Lucas,
How did you get around the lack of Invalidate() on WriteableBitMap in wpf?
For anyone else that is currently wondering about this. This is how I did it in WPF:
public void Present(Image image)
{
bmp.WritePixels(new System.Windows.Int32Rect(0, 0, bmp.PixelWidth, bmp.PixelHeight), backBuffer, bmp.PixelWidth * 4, 0);
image.Source = bmp;
}
I have an Image on the main page that I pass to this method. bmp is still a WriteableBitmap. My image is 1920×1080 and it writes in less than a millisecond with my setup.
@Hastur
thank you for information 🙂
Can You tell me something about performance of yours solution? I'm not sure but I've heard that WritePiexels() method is not very fast 😉
Oops, sorry Lucas but I didn't see you answered something until now. So if you come by here again, here is my answer : I was at 60fps with the cube on an Intel G870 CPU (my workstation), and still almost at 60fps with the textured monkey of the last tuto.
I tried to access directly the WriteableBitmap's backbuffer like David, using unsafe code like in this link : stackoverflow.com/…/how-to-edit-a-writablebitmap-backbuffer-in-non-ui-thread
I was like "Wow ! I'm using unsafe code ! I'm a reel demomaker, it's gonna be über fast !!". XD
And, big surprise, it was awfully slow.
So to my experience, WritePixels() is way more efficient than direct memory access to the backbuffer, but maybe it exists another method I haven't heard about.
My problem is in the device.prototype.project() in the javascript solution in the following lines,
var x = point.x * this.workingWidth + this.workingWidth / 2.0 >> 0;
var y = -point.y * this.workingHeight + this.workingHeight / 2.0 >> 0;
I don't understand the multiplication with workingHeight and width. This may be pretty trivial, but i am stuck 🙁 any help would be much appreciated 🙂
Great, simply great !
I've been trying to add another camera, without success, if anyone wants to give it a try.
I'm actively working on those tutorials, and would like to extend them into another blog/discussion for a deeper approach/explanation if I'm allowed to.
Anyway very good job. (See you at the tech days.)
@Saad : take a look at the two first graphics of the "Reading Prerequisites" chapter.
After all transformations and cliping, and just before the transformation to "window space", all coordinates are "normalized", which means they are between -1 and 1.
So the code you pasted makes sure the final coordinates are between 0 and respectively layer's width and height.
Bonjour Mr. Rousset,
Petite question, est-il possible de développer une application 3D autre qu'un jeu avec ce moteur. J'ai eu utiliser SilverlightXNA qui permettait de faire des interfaces avec tout les contrôles habituels et de plsu y ajouter la 3D.
Qu'en est-il aujourd'hui ?
Merci
Bonjour Yannick,
Bah comme tout moteur 3d, il n'y a rien de spécifique au jeu dans ce moteur. Vous pouvez tout à fait l'utiliser sur autre chose que du jeu pour modéliser des graphiques ou toutes autres choses "plus sérieuses" 🙂
Qu'imaginez-vous réaliser?
Bye,
David
Bonjour.
J'ai réussi (c'était une erreur de positionnement en Xaml, ca n'est pas ma tasse de Csharp 😉 à ajouter une deuxième caméra qui montre les modèle simultanément sous un autre angle, donc… C'est super sympa à voir )
Je suis sous VS2010. Mon appli est en Wpf, (la même quasi).
Si quelqu'un souhaite l'avoir je l'enverrai avec plaisir : mistralkriss at jaimeil (gmail) point com )
Cool! 🙂 N'hésites pas à mettre ta solution en téléchargement quelque part.
Hi! Thanks for a great tutorial. Made a lot of sense!
When I implemented the code everything works perfectly except that the x-axis is mixed up. If I plot two pixels A=[0,0,0] and B[1,0,0] I would expect B to be to the right of A, but it draws to the left of it. Is this expected or have I missed something?
I implemented this with Javascript
Thanks!
Hi David,
Firstly, many thanks for this excellent series of posts! Unfortunately, I've fallen at the first hurdle and hope you might be able to help me up :). I had assumed that the call to TransformCoordinate() in Project() would return normalised X/Y co-ordinates in the range [-1,1], however the range is actually [-0.5, 0.5]! I've looked at the SharpDX code that builds the projection matrix and to my untrained eyes it looks like it should generate X & Y coordinates in the range [-1,1] after the perspective divide – but it doesn't! Do you know why this isn't the case? Also what's the range of the z-value?
Thank you!
This is just to clarify my eariler post. There are two things I'm not quite getting about the mapping to screen space:
1) I thought that the clip/perspective matrix generated by the call below would map camera space z-values to -1 at the near clip plane and 1 at the far clip plane; however I've found that changing the far clip plane parameter (e.g. to 100) has no effect on the transformed point. Can you tell me why this is?
var projectionMatrix = Matrix.PerspectiveFovRH(0.78f,
(float)bmp.PixelWidth / bmp.PixelHeight,
0.01f, 1.0f);
2) I was also under the impression that the same matrix would map x and y screen space values to the range [-1, 1] (-1 at left and bottom clip planes, 1 at top and bottom), but unless I'm mistaken the code below assumes values in the range [-0.5, 0.5]:
var x = point.X * bmp.PixelWidth + bmp.PixelWidth / 2.0f;
var y = -point.Y * bmp.PixelHeight + bmp.PixelHeight / 2.0f;
I really want to understand this stuff in order to move onto the next tutorial in the series, therefore please can you let me know why the expectations above proved wrong?
Many thanks,
James
babylon.math.js. Add a reference to those files in both cases. (how do you add this file into visual studio library with out breaking the file structure) add it?
Hi Max,
I didn't understand your question. Can you please clarify what your problem is?
Thanks,
David
It's the best computer graphic (polygonal modeling) guide I've ever found and it have examples exactly in the languages that I using to learn it. But there are some points disturbing me. First of all it is using additional libraries like Babylon. During learning I would like to reinvent all possible wheels including matrix operations and JSON parsing. Also WinRT is good, but while I know only WinForms I prefer going through the WPF for beginning. And why do you use such insane nested way to create object in JS? Has it any advantages before defining constructor-like function and using "new" statement?
Nice one
Hello and thanks for the amazing series. It is very well written and everything is well explained. Do you have any plans of adding C++ examples?
Everything works fine until I let the camera fly through a meshe's origin. Then everything is displayed mirrored but it shouldn't be visible. Is there a way to fix that?
Given the formulat:
var x = point.X * bmp.PixelWidth + bmp.PixelWidth / 2.0f;
var y = -point.Y * bmp.PixelHeight + bmp.PixelHeight / 2.0f;
The point [1, 0] will be mapped to [1.5*bmp.PixelWidth, bmp.PixelHeight / 2.0f], so the point will not be draw?
Hi.
Thanks David for the tut ! It really makes things simple to understand.
For this particular one, I've used notepad++ and Javascript.
the 8 points animate well in google, firefox; However in ie11, i get the canvas without animation.
I'm still checking out what went wrong…Any suggestion ?
Hi,
Thank you for the tutorial. Is there a problem with the first pre-requistes link "World, View and Projection Matrix Unveiled"? does anyone have the correct link or the tutorial itself?
Khalid, you can view the article using the internet archive.
web.archive.org/…/world-view-projection-matrix-unveiled
This link should be edited into the article, if the author is reading this comment.
Thanks for sharing the archive article. I've updated the article.
Very nice, although I would really like it if this was a bit more language agnostic. I'd rather build everything from the ground up than use libraries.
Hi.
I created a Windows Store App, writing in C# in Visual Studio Pro 2013 Update4 on Windows8.1. Pro.
Starting the run, I receive error messages: "frontBuffer" (in the Page_Loaded section) is an unknown name to the project SoftEngine.Windows as is the component "Sharp.DX.D3DCompiler" which is referred to. I think, all references shown in the tutorial are added in my solution.
In the object catalogue I could not find the references for eliminating the error messages.
Can anyone help to fix this?
Thanks in advance.
Rudi
I’m having this issue too. Did you find a fix for it?
I had the same issue. You should define in your MainPage.xaml file
This tutorial is great! Big thanks!
var viewMatrix = Matrix.LookAtLH(camera.Position, camera.Target, Vector3.UnitY);
var projectionMatrix = Matrix.PerspectiveFovRH(0.78f, (float)bmp.PixelWidth / bmp.PixelHeight, 0.01f, 1.0f);
The first one is using left-hand coordinate system method and the second one is using right-hand, is it mistake?
remembers me 1998! 🙂 the starting point for everyone interested in 3d graphic 🙂
public void Present()
I am trying to run this code in C# WPF I am stuck here’. It doesn’t seem to like “PixelBuffer” or “Invalidate” I know it has to do with WritableBitmap in WPF
Any ideas ? By the way awesome tutorial.
{
using (var stream = bmp.PixelBuffer.AsStream())
{
// writing our byte[] back buffer into our WriteableBitmap stream
stream.Write(backBuffer, 0, backBuffer.Length);
}
// request a redraw of the entire bitmap
bmp.Invalidate();
}
I asked the question about this code and WPF. After more reading and some head banging I got it to work. Now Im ready to move on.
Thanks.
Hi, i skipped over your code and i found a few things confusing. First, your Model_View_Projection(MVP) matrix is calculated in the opposite order i am used to. I don’t really know how the library you’re using works but this seems a little bit confusing. As a follow up the project() function is even more confusing and i think its mainly due to what
var point = Vector3.TransformCoordinate(coord, transMat);
is really doing and maybe this is connected with the confusion of the construction or your MVP matrix. At this point i would expect that this line transforms from object space -> camera space -> normalized screen space in the range from [-1,1]. You would then do the perspective divide and the transformation to raster space [0, screen_width] … but nothing of this happens in your code. No perspective divide and a confusing mapping that suggests that point (the result of the confusing TransformCoordinate function) is within the range of [-0.5, 0.5]. I’ve never seen this before and i think its due to how Babylon works (never used it). Maybe you should clarify on that point because this seems to be very special in how Babylon works and is just very confusing if one would implement your code without Babylon maybe in another language.
best regards, Matt
Hi Davrous, I am coding this in vb.net and have just installed SharpDX using NuGet onto Visual Studio 2015. My program is perfectly happy importing SharpDX, however when I try use Vector3 it does not recognise this… any suggestions? There seems to be no Vector3 on there?
I had this same issue, to solve it add “using SharpDX.Mathematics;” to your code, leave everything else as is.
Hello,
That did not solve the issue for me.
You have used NuGet to install both the core SharpDX and SharpDX.Mathematics?
Hello,
Thank you for your response. I initially used NuGet to download SharpDX. I attempted to use Mathematics extension from that and did not realize I had to also download the NuGet SharpDX.Mathematics first.
For any one interested in a updated sample code i just ported the project over to UWP and Visual Studio 2017 and published to GitHub:
https://github.com/threezool/SoftEngineUWP
Added branches for the different parts
Part 1:
https://github.com/threezool/SoftEngineUWP/tree/Step1
Part 2:
https://github.com/threezool/SoftEngineUWP/tree/Step2
Part 3:
https://github.com/threezool/SoftEngineUWP/tree/Step3
Hi, I’ve implemented your project with a back buffer of 640*480. But I found that the cube would be stretched into a cuboid. It is weird so I really wonder how to solve this problem.
Thanks so much,
Jia
I also made branches for the first few parts of the guide.
Part 1:
https://github.com/threezool/SoftEngineUWP/tree/Step1
Part 2:
https://github.com/threezool/SoftEngineUWP/tree/Step2
Part 3:
https://github.com/threezool/SoftEngineUWP/tree/Step3
thx so much! I am trying to implement it.
Came across your tutorials about two thirds of the way through a very similar project but using vb.net (winforms). Though I took some different approaches e.g. I used Bresenham’s line drawing algorithm for example. It was still very informative. Especially your description of the Z-buffer.
So thank you.
Great! Thanks for your feedback 🙂
Hi David, your tutorial is an absolute treasure.
I am trying to do the exact same thing as you, I mean, to learn 3D from bare C# using maths and Winforms GDI+. Except my work was based on the excellent site of Song Ho (http://www.songho.ca/opengl/index.html) and his nice C++ projects.
I managed to reach a high level of satisfaction seeing anithing running so smooth… Except for the rasterization part when trying to deal with lights. Suddenly, GDI polygons show their limits whenyou must modify inside.
The rasterisation part you explain is exactly what I was looking for, and drawing a line by myself directly in a byte[] buffer was something I did not even dare 🙂
I cannot wait to try this backbuffer technique and implement direct byte[] drawing for triangles. Then, using TPL and peppering AggressiveInlines where it needs to.
I cannot thank you enough for sharing your work !
Bonjour,
Je ne sais pas si c’est le bon endroit pour poser ma question mais je la pose là :
J’ai suivi il y a quelques années déjà vos tutoriels sur comment faire un softengine 3d en javascript
mais je ne suis pas réellement allé plus loin que le cube, ma question (je sais que c’est possible avec babylon js),
mais en terme de code je suis un peu perdu entre celui-ci et les premières versions de babylon à l’actuelle sur github en typescript avec ses nombreuses possibilités.
Je voudrais faire un premier moteur 3d pour CPU et non pas GPU en js avec un nombre de frame par second entre 1 et 60, voir plutôt 15 à 40 en faite en laissant la possibilité à l’utilisateur de choisir le FPS,
Le FPS ça je sais faire, ma question c’est le tutoriel va de l’espace world XYZ au clipboard bref à l’écran utilisateur et pas de la souris XY à à l’espace XYZ, j’ai cherché sur internet ils disent de faire l’inverse d’une matrix là je suis un peu perdu,
avec les les versions de babylon.math.js, les matrix world, view, projection, comment les multiplier entre elles et en faire l’inverse à la fin ?
Existe il un tutoriel pour cela avec le soft engine ? Sinon dans quel(s) dossiers de babylon puis-je trouver cela ? Les fichiers scenes et math ?
Merci par avance si vous avez un peu de temps pour me répondre.
Jérémie ROUSSEAU
https://www.babylonjs.com/
Bonjour,
Il faut regarder du côté de la manière dont la fonction pick() a été implementée sur l’objet Scene: https://github.com/BabylonJS/Babylon.js/blob/de5a6aabbf29b240684d431ba78861c9fc9a98e2/packages/dev/core/src/scene.ts#L5520
N’hésitez pas à aller sur le forum pour poser la question si vous êtes perdu.
Bonjour David, j’ai eu beaucoup de plaisir à parcourir ce tutoriel.
Je partage ce que j’ai écris en apprenant : https://github.com/Larry57/Soft3D4Net
Bonjour Larry, merci beaucoup pour le partage!