You’ve probably already heard the magic word: “shader” before. But what exactly is it? How does it help to draw beautiful & fast pixels?
This article is following: Frame & (variable) refresh rates or why Tesla is responsible for the 60 fps war where you can learn why we’re targeting 60 fps on most monitors, what is Vsync, what are the physiological limits of the human eyes to process motion and why variable refresh rate was the solution we were waiting for.
Most of the time, I’ll try to share live samples that will run in your browser to help you better understand, whatever the device, thanks to the power of WebGL and Babylon.js. We will even have a small tutorial to play with.
Before the GPU era (pre-3DFX)
Before we all had a powerful GPU to render 3D, everything was computed by the CPU. I’ve dedicated a whole series on how to create a 3D software engine from scratch: Tutorial series: learning how to write a 3D soft engine from scratch in C#, TypeScript or JavaScript that many cool people have ported to C++, WPF, Java, etc. If you’re a developer, it should help you understand the basics of 3D and will help you understand the following parts. But even if you are not a developer, it might help you help you understanding the various passes needed to render 3D by just looking at the different rendering images.
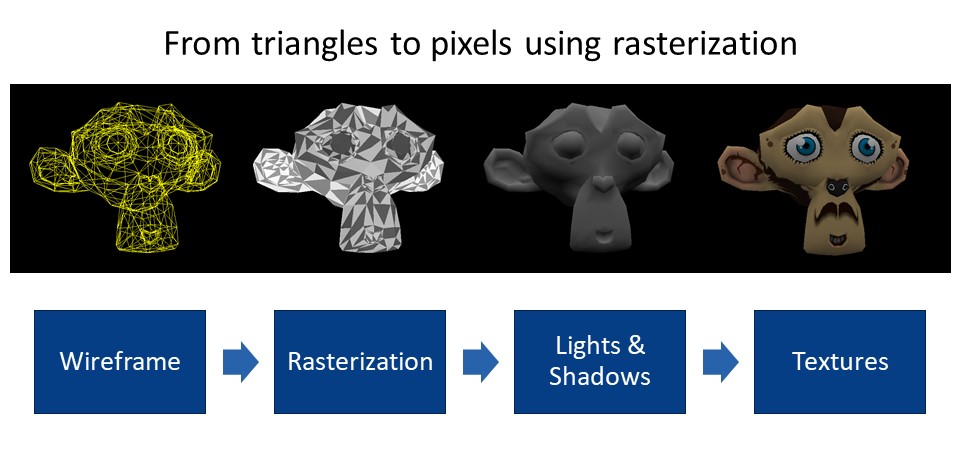
In a nutshell, 3D engines are generating triangles (polygons) that will surface the geometry of the 3D objects to be rendered. By the way, we’re calling a 3D object a mesh. Each of the triangles are composed of 3 points having 3 coordinates (x,y,z). A 3D point is named a “vertex” and several of them are named “vertices”. To project this 3D world onto your 2D flat screen, we’re using several matrix computations described in the first article of the series. Then, we’re filling those triangles by drawing lines inside it. This process is known as the rasterization.
During this process, we can apply several refinements such as computing the lightning of each face (using a normal vector), the shadow applied on it, the potential environment reflection and so on. Some of the most basics ones are described in the tutorial such as the flat shading, gouraud shading or texture mapping.
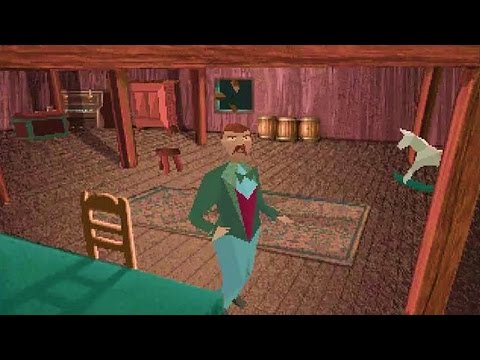
Alone in the Dark was one of the first real-time 3D engine ever released in a game in 1992 and was using flat shading in a pre-computed environment:
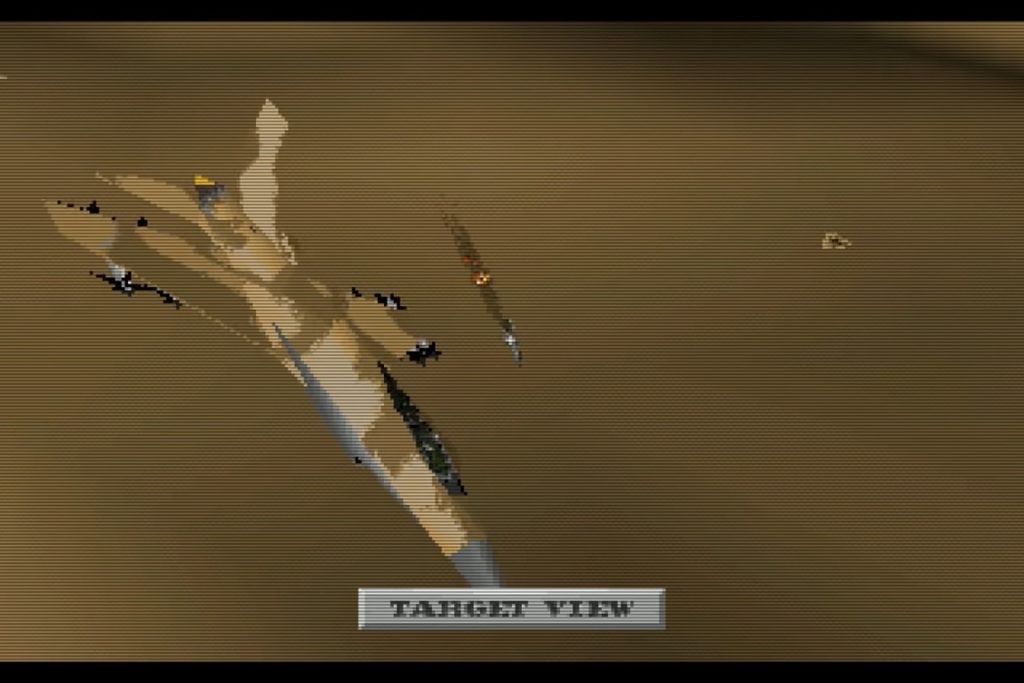
In 1993, Strike Commander was using textured gouraud shading and was killing almost any 80486 CPU machine at that time 😊
ID Software with Quake, as well as the original release of the very first Tomb Raider in 1996 were the top of the art 3D engines running only on a CPU.
But you’d quickly understand why this approach became too heavy and complex for the CPU, especially on higher resolutions. That’s why, we needed the GPU to go further. The first generations were basically boosting the triangles generation. But quickly an awesome and powerful new toy arrived: the “Shader”.
GPU and their Shaders
Historically, there’s been 2 important types of Shaders:
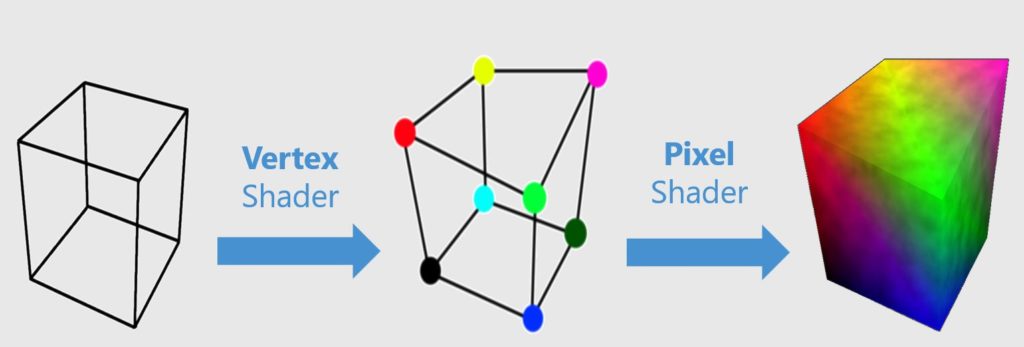
- the Vertex Shader acting on each vertex (3D point) will have an impact on each triangle / geometry.
- the Pixel Shader, also known as Fragment Shader, is dedicated to the rasterization process, choosing precisely how each pixel should be drawn (color & transparency) based on your specific lightning algorithm.
More recently, geometry and tessellation shaders were available, but we won’t cover them in this article.
A shader is a small piece of program, written in a low-level language that looks like C, compiled into a native binary executed by the GPU. Two languages are used today GLSL (for OpenGL Shader Language) and HLSL (for High Level Shader Language used by DirectX).
To have a better overview of how those 2 shaders work, I’d recommend you reading those great introductions:
- Our Babylon.js documentation: Introduction to Shaders
- The awesome Learn OpenGL site: https://learnopengl.com/Getting-started/Shaders
- Building Shaders With Babylon.js on Smashing Magazine by David Catuhe
- Writing HLSL Shaders in Direct3D 9
The order of execution is the following one:
A more detailed schema found in GPU Performance for Game Artists will help you better understanding the complete process:

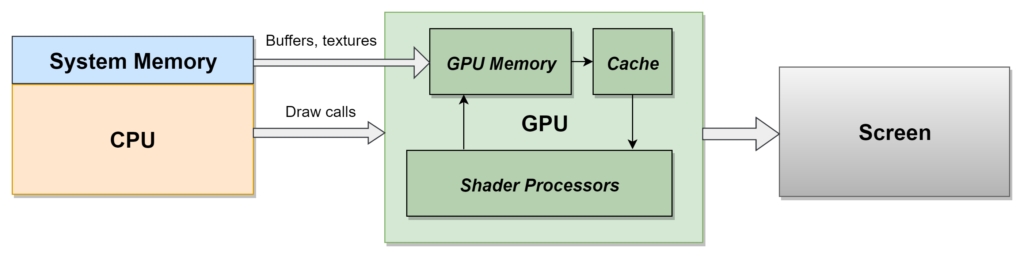
Still, this is important to understand that in 3D engines, a lot of the job is also done on the CPU side. That’s why, as discussed in the previous article, the low performance of rendering is often due to CPU-Bound scenarios. Alongside the game logic (AI, input, animations), the CPU is also doing the matrix computation to update the 3D positions of every objects as well as preparing the textures to send to the GPU memory. Again, GPU Performance for Game Artists gives us a simple diagram to understand what’s going on:
I highly recommend you reading the complete article. It explains in great details the various optimization tricks we’re using in today modern video games.
Draw calls are often a very important metric to pay attention to. It’s the number of orders the CPU is sending to the GPU to update the screen. Too many draw calls will put a high pressure on the CPU and will lower down the frame rate. There are various optimizations to be done to reduce the draw calls explained in the article. A 3D artist must understand this while creating his assets. But let’s go back to the GPU world and do a small tutorial.
Small tutorial to let you modify your first shader
You’ll need to run this on a desktop machine rather than on a smartphone (even if it should work 😉).
Let’s try to play with it using a tool named CYOS (Create Your Own Shader) written by my friend David Catuhe. It’s going to help us understanding those magic shaders.
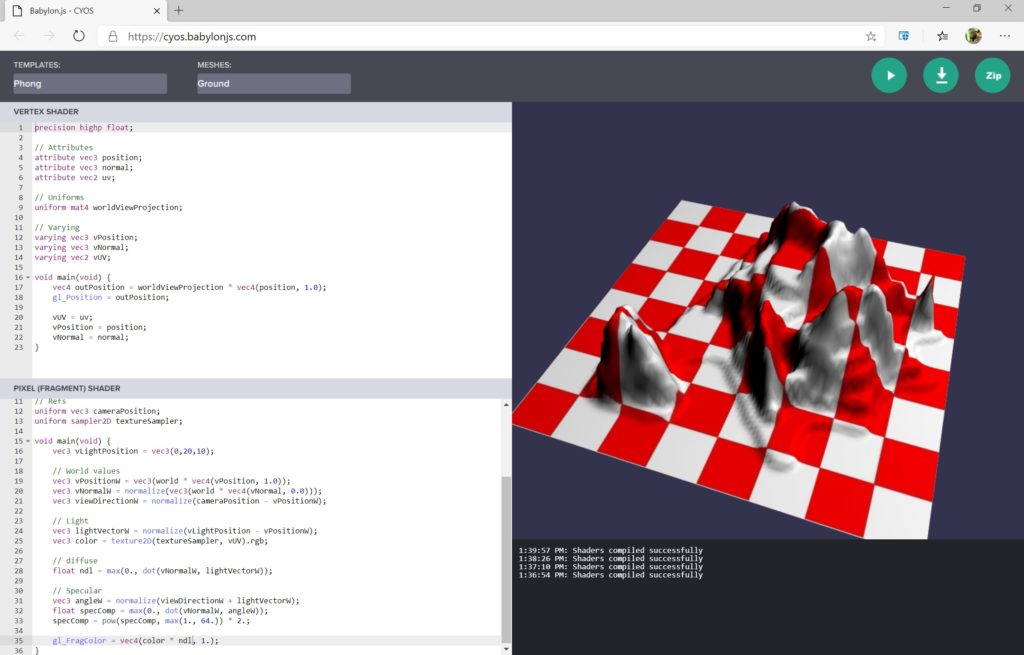
- Navigate to: http://cyos.babylonjs.com/ and change the template to “Basic” and meshes to “Ground”
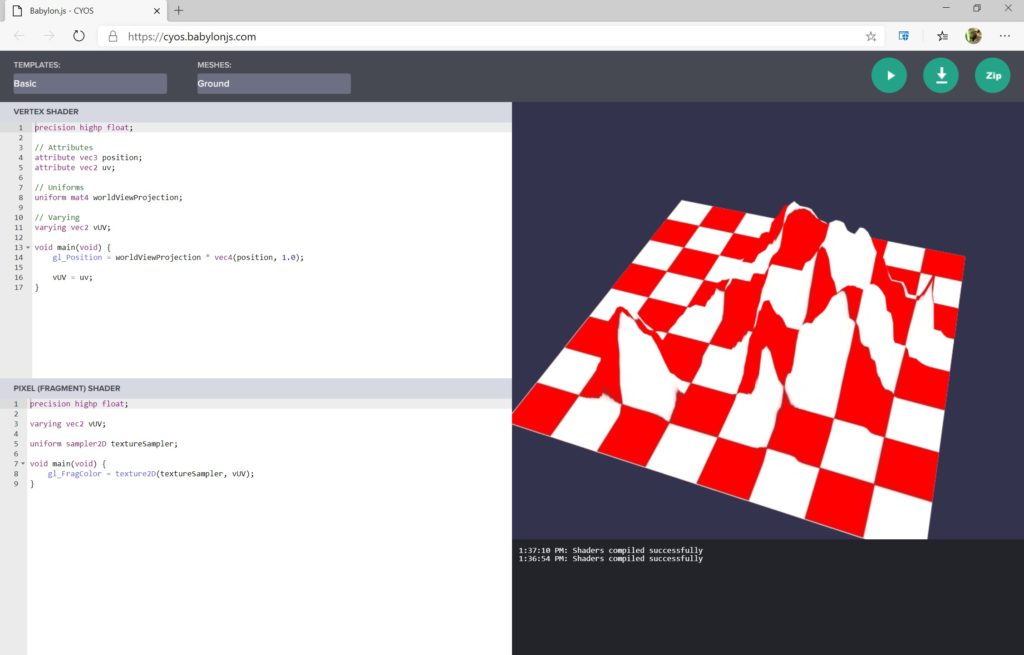
- You see that the Pixel Shader only takes the color of the texture as-is without any other computation. To have a more realistic rendering, you need to take into account the light and its position. Switch the template to “Phong”
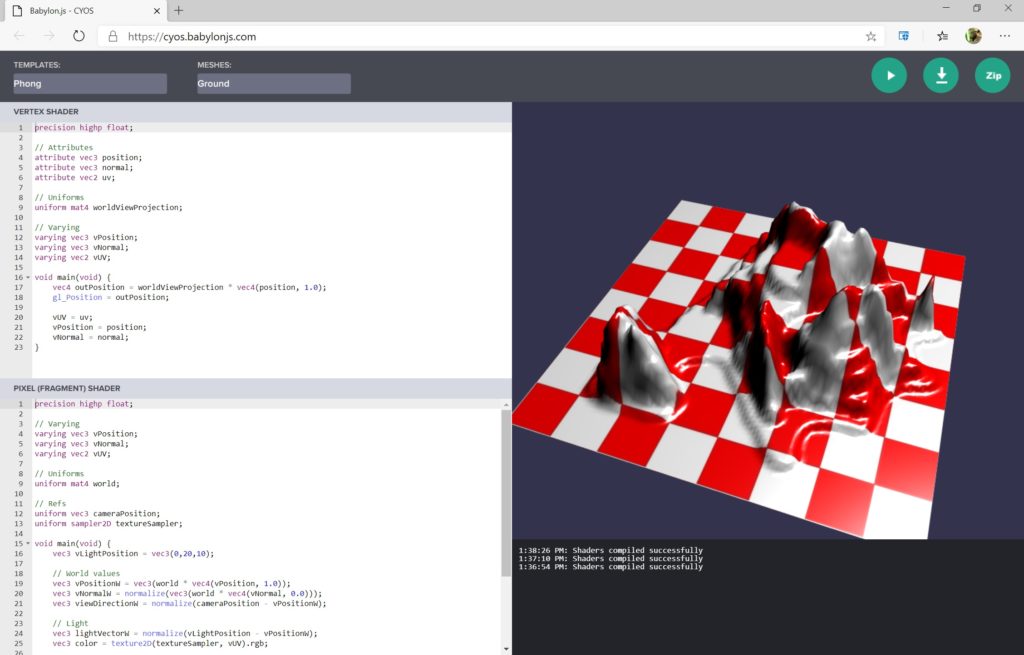
- You now see that the lightning is considered to compute the color of each pixel to know how much light we should apply (between 0 and 1) as well as computing the specular highlight.
- Change the line “gl_FragColor = vec4(color * ndl + vec3(specComp), 1.);” by “gl_FragColor = vec4(color * ndl, 1.);” and press the play/run button. You have removed the specular effect.
- So far, we’ve played with the pixel shader, acting on the color of each pixel. Now, let’s play with the vertex shader to understand what it could do. Switch the template to “Wave”.
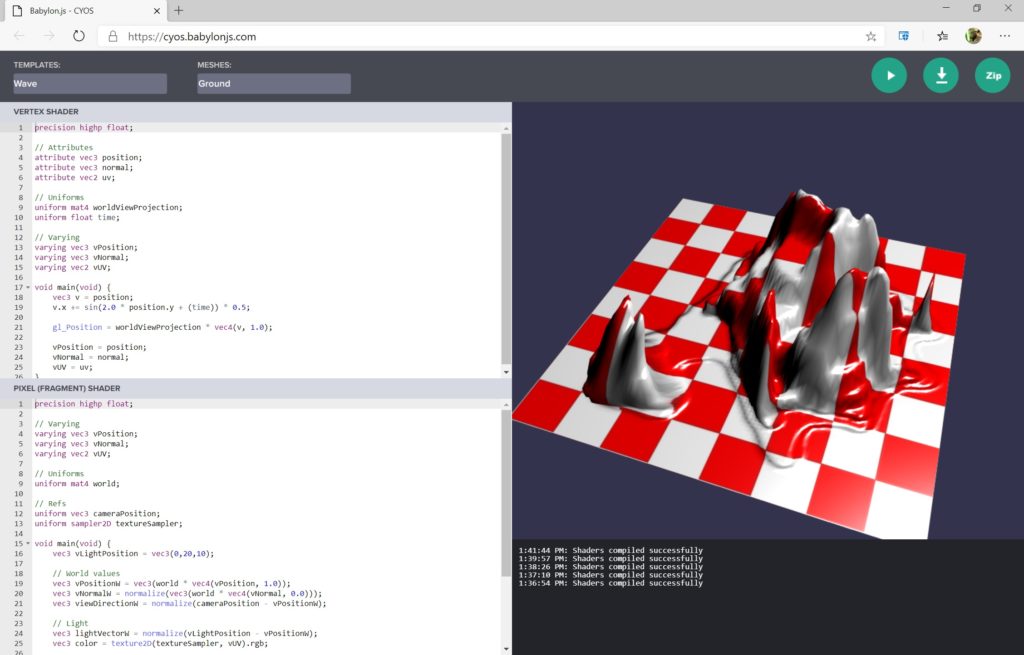
- You can now see that the mesh (3D object) is being deformed. In the vertex shader, change the line “v.x += sin(2.0 * position.y + (time)) * 0.5;” by “v.x += sin(2.0 * position.z + (time)) * 0.5;” and will see a different deformation applied
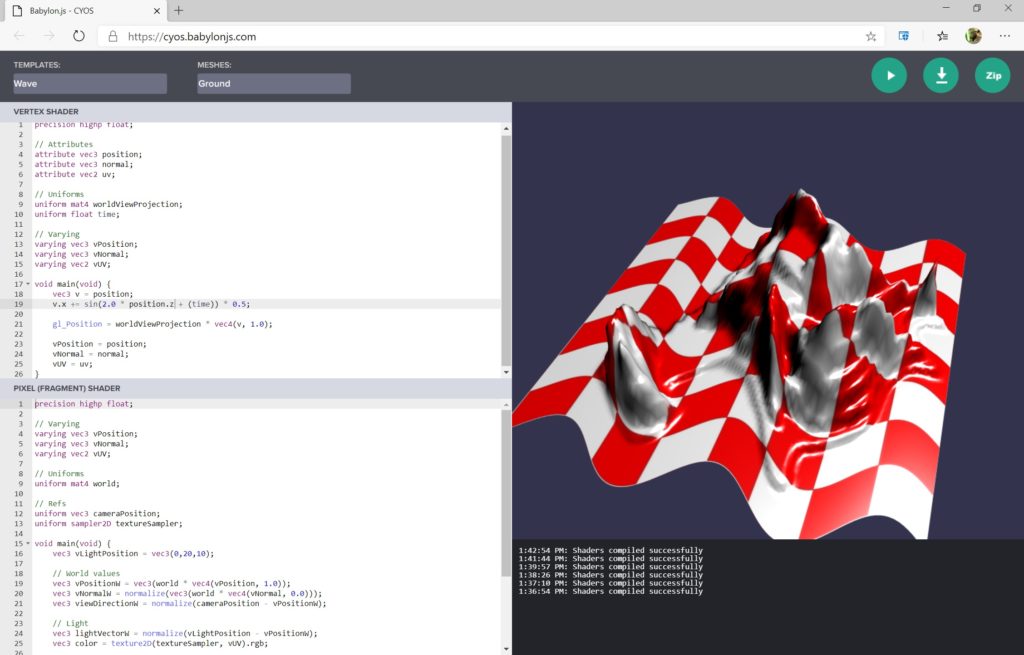
Congrats! You should now have a basic understanding on how a pixel and vertex shader work. The Vertex Shader is called first to act on the geometry and do the rasterization job. Then, the Pixel Shader takes those data as input and handle each pixel to find the right color, lighting & shadows.
If you’d like to study shaders with a graphical tool rather than with code, we recently added a very powerful tool in Babylon.js named the Node Material Editor (NME). This tool will let you create shaders via a drag’n’drop visual editor. You still need to understand the basics of 3D shared in my previous tutorial series, but it makes stuff so much simpler. A couple of cool YouTube videos to watch to learn more:
- Node Material Editor: Vertex Shader which greatly explains how to build the wave vertex shader demonstrated just before.
- Node Material Editor: Lights and Textures
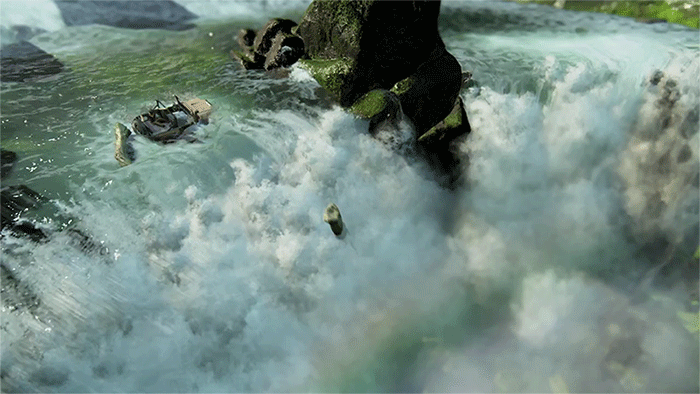
Let’s study how you can simulate water
Let’s try to go a step further by illustrating what could do a pixel shader via a concrete example: simulating water. Think about it. Simulating water is not something that easy. You need to compute the reflection, refraction, transparency, deformation of the light going through it and potentially interactions with other objects! The idea is then to approximate that based on 2 constraints: the performance we’d like to achieve and the complexity of the shader we’d like to build.
Open this sample in another tab:
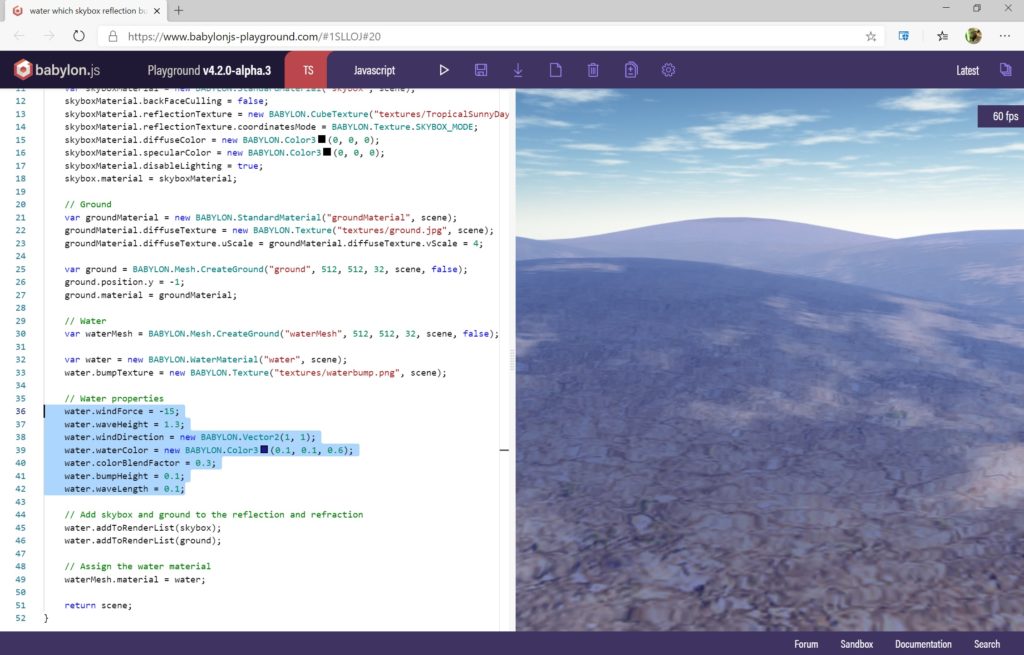
You’ll see that the waves are animated, and you’ve got the feeling that there is some volume. It’s based on the water properties selected in the text editor on the left in the screenshot. Those properties will configure the pixel shader used behind for you. Fun fact, there is no 3D geometry generated by this water material. It’s just a dead simple quad (a flat rectangle) and the pixel shader gives you this illusion. You can check it by opening the inspector as seen in the previous article and display the wireframing. Remember, I told you 3D engines were cheating with optical tricks? It’s the case here.

As said in Matrix: “There is no spoon”. The spoon deformation was probably done by changing the properties of the associated pixel shader rather than really bending it! Cheater.
This cool and simple Babylon.js water shader runs on every platform without any issue. It’s because it’s using simple enough equations for the performance as well as a set of instructions available everywhere for cross-devices compatibility (we’ll come back to these notions later). But as I told you, you can build more complex shader to achieve even better photorealistic results.
Open this sample from Shadertoy in another tab for instance.
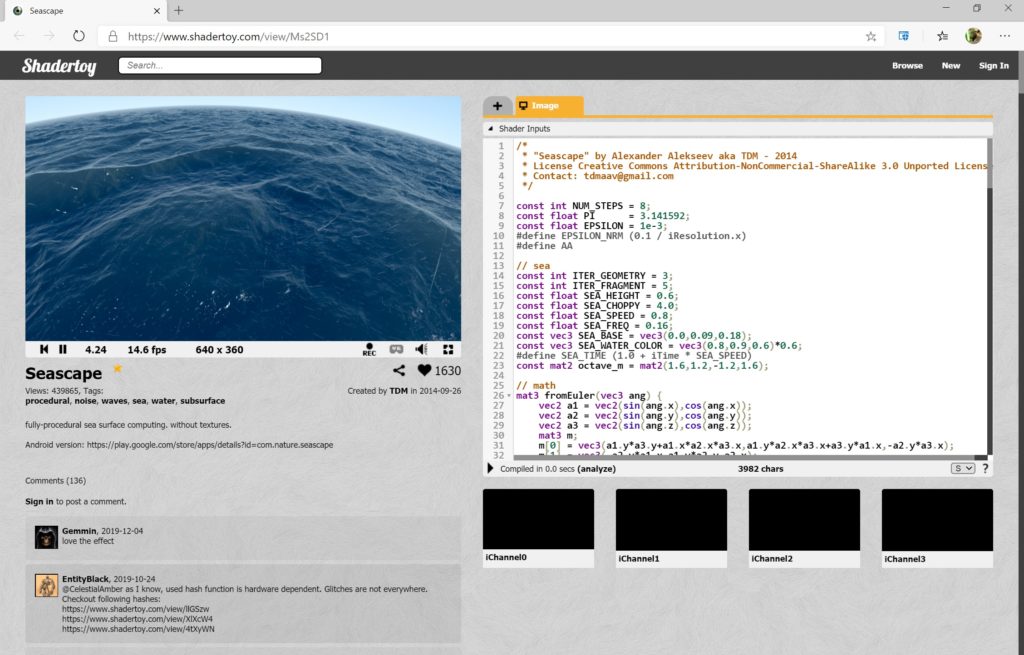
This beautiful water shader is again a pure optical illusion. It doesn’t use any texture, it’s fully procedural (generated by an algorithm). It’s “just” a pixel shader applied on a plane. But it’s much more complex & realistic than the previous one we used. That’s why, it only runs at 15 fps (not even full screen!) on my current machine whereas the previous water shader is running at a solid 60+ fps.
Shaders complexity?
Complexity is about the time needed to generate each pixel based on the equations you’re using. Obviously, the more mathematical complex & realistic computation you’ll do per pixel, the more time the pixel shader will need to be executed. This will then have a direct impact on the frame generation time.
But complexity is also about the number of instructions (lines of code if you wish) you’re using and the type of operations available. Thus, shaders have a limit on the number of instructions you can use. Those limits depend mainly on the GPU you’re using as well as the OpenGL or DirectX version you’re using. For instance, in DirectX 12, we’ve got up to version 6.0 of the shader model supported: HLSL Shader Model 6.0. If you’re using one of the new instructions of the shader model 6.0, you will lock your 3D engine to DirectX 12 compatible platforms & hardware. That’s why, 3D engines are also providing different shaders based on the platforms & hardware support. Writing cross-platforms games is definitely not a simple job. Hopefully, some middleware such as Unity or Unreal help a lot. Babylon.js is also hiding the shader complexity for you.
Water simulated with both a Vertex & Pixel shader
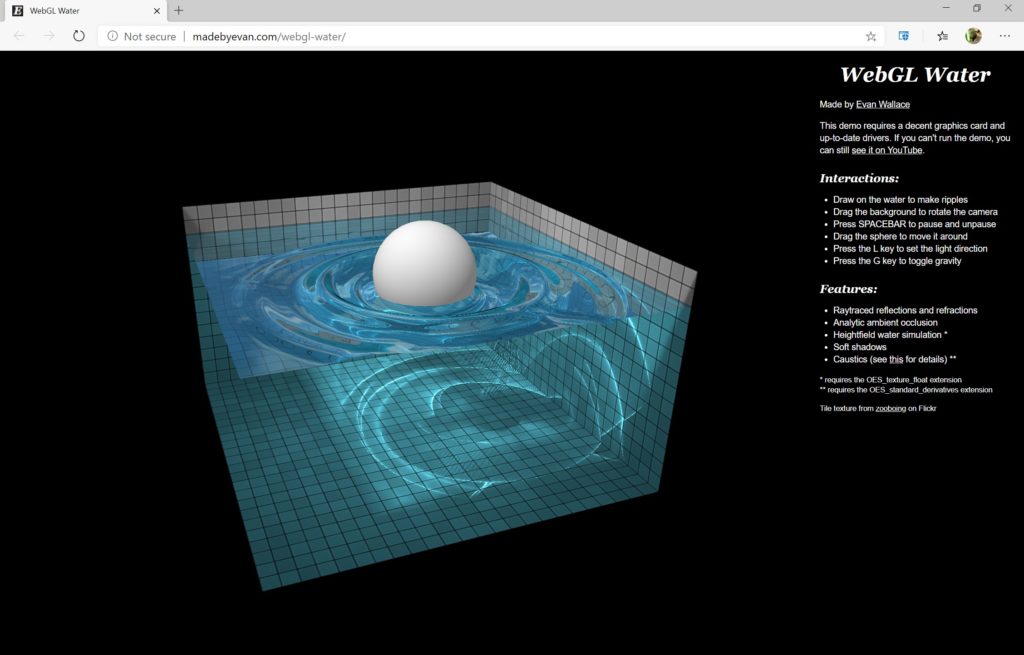
So far, only the pixel shader part was used for our water use cases. But if we need physical interaction between on object being on the water or entering the water, you need to play with the geometry. Some water effects are then also using the vertex shader for that, such as in this incredible interactive demo:
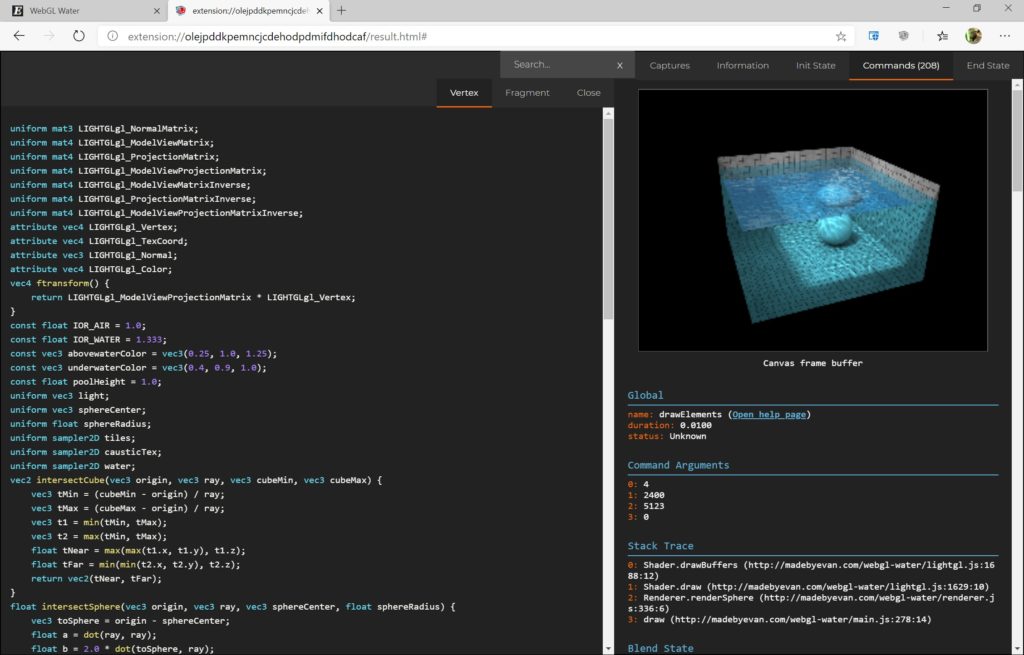
If you’re curious and would like to know more about this WebGL sample, or any other WebGL demos, you can use our Spector.js tool: https://spector.babylonjs.com/. It’s a browser extension that will inject itself into the page to trace the various WebGL commands sent to the GPU. It will let you view the various frame construction steps as well as the code of the shaders.
For instance, here’s part of the vertex shader code extracted by the Spector.js extension:
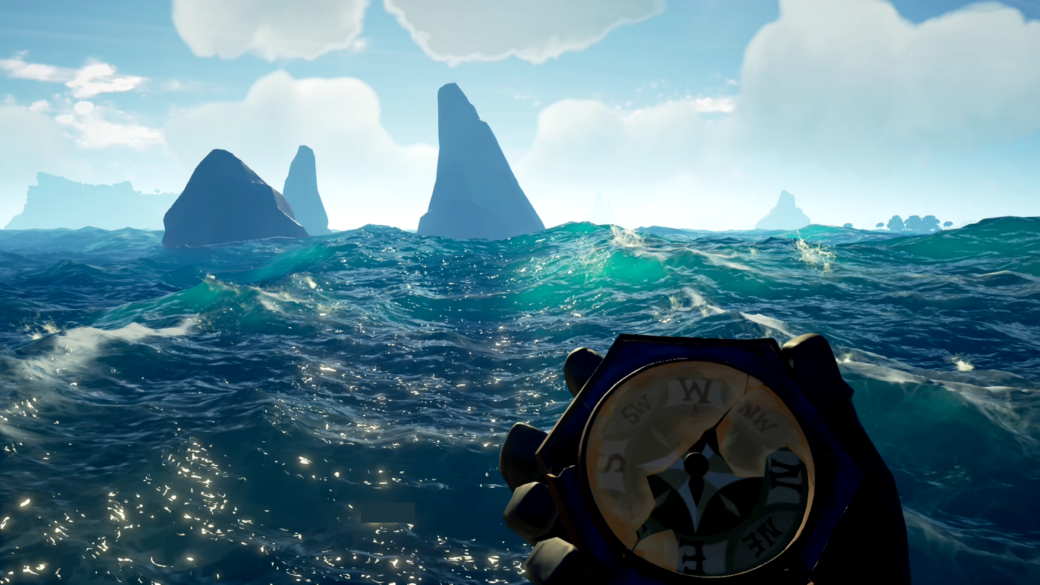
In today’s modern games, the most impressive water shaders I’ve seen where done for the Assassin’s Creed series, Uncharted 4, Batman Arkham Knight and more recently, Sea of Thieves. Look at those animated GIFs:
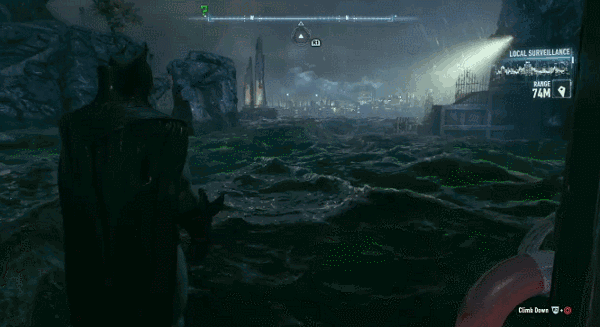


The Batman’s one is really impressive but isn’t interactive. This means that it’s probably “only” a pixel shader as it doesn’t have to physically interact with other objects. You should now have understood that in an opposite way, the Sea of Thieves water effect is using both pixel & vertex shaders as it’s completely interactive. It also uses an advanced technic named: Subsurface scattering. Should we then conclude it’s the most impressive one? 😊
Performance & PBR
Let’s recap. You want to render images in native 1080p at 60fps? You then have: 1920×1080=2073600, 2 million pixels to generate every 16ms. You want native 4K? It’s now more than 8 million of pixels to handle! 4x more pixels to draw during each loop.
This means that the Pixel Shader will have to go through those 2 or 8 million of pixels to calculate its color based on the 3D environment, lights, shadows and various effects.
That’s why, you can choose to lower the rendering resolution and use upscaling approaches to compensate that. If you can’t maintain a native 4K rendering at 30 or 60 fps, then just lower the resolution until you can reach the frame rate target. Upscaling is a process that doesn’t cost a lot of hardware power compared to the power required to process each pixel for the rendering. There is even some super smart new approach for upscaling based on AI / Deep Learning such as DLSS from nVidia. Thanks to that, you can compute a frame in 1440p and upscale it to 4K (2160p). The AI algorithm will create a 4K image almost identical to a 4K native rendering. This AI upscaling technology comes at a just the right time as real-time RayTracing will consume a lot of the GPU power.
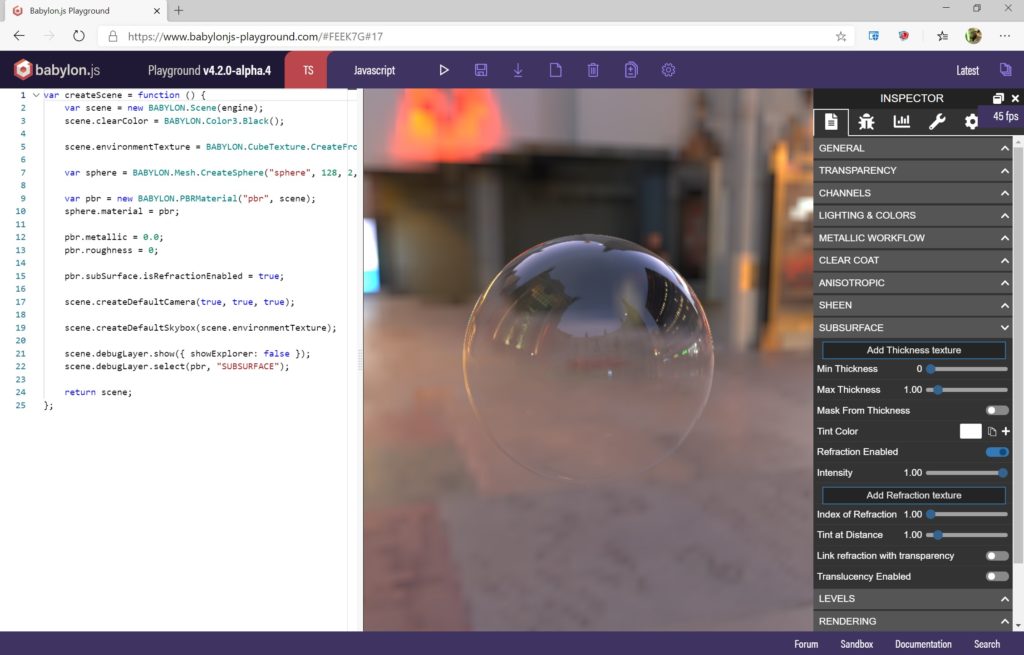
As you may have guessed, writing shaders requires very specific skills. There are used for special effects such as water as we seen together. But today, the most important usage is for the lightning process. In the past, 3D artists were trying to create realistic rendering with 3D tool more or less manually. They were choosing how much of light a specific surface will reflect or absorb for instance to try to create a realistic rendering. They were controlling the various properties exposed by the shader as seen in the Babylon.js water demo. Today, everybody is using PBR. PBR stands for Physically Based Rendering. PBR is responsible for the look of all modern video games. As its name suggests, this approach aims to simulate real life lighting (using rasterization not raytracing). You can read our documentation to know more: Start with Physically Based Rendering (PBR). Disney was one of the pioneers working on this. The idea is to have a set of predefined equations & parameters to help artists building photorealistic rendering.
Here are a couple of demos you can execute on your device to see it live (click on the image to open it):


PBR helps the 3D artist to better control the rendering and could also helps several artists to work together to have a consistent look. Even better, as almost all 3D engines support PBR today, it’s easier to switch an asset from one engine to another while keeping a very similar rendering. For instance, this page is containing links to various assets displayed in Babylon.js as well as all our WebGL competitors engines.
Again, our documentation is covering a lot of the latest effects done in PBR such as sheen, clear coat, irradiance, subsurface, energy conservation: Master Physically Based Rendering (PBR) with demos in the browser most of the time.
As you can see, most of the graphic quality and performance of video games you like comes from the shaders. They can do super complex computing to generate photorealistic rendering. Hopefully, the GPU is highly optimized for that, through huge parallel processing, to deal with millions of operations in an extremely fast way. For instance, the AMD GPU of the Xbox One X has 2560 shading units, a nVidia GTX1080ti got 3584 and the brand new Xbox Series X has 3328 units. A shading unit could act as a pixel shader or vertex shader unit. Those shader processing units are used since the release of the unified shaders architecture.
I hope this article will help some you better understand what this mysterious word “Shader” means. I also hope you will now look at video games in a different way, wondering how the magicians behind it all managed to create such amazing virtual worlds!
Amazing content , please keep up the great work.