Through this small tutorial, I’m going to share some tips I’ve recently used to build a fun demo for the //BUILD Tour. The idea was to create this small 8-bit drum machine with 8-bit sounds & graphics:
Click or touch the black drum to make some noise. It even support muli-touches.
This small web app has been used during one of our demos to illustrate how you can create easily offer a temporally offline experience when your hosted web app is losing internet connectivity. It works in all desktop browsers as well as on all smartphones (iOS, Android & Windows Mobile).
Building this drum machine sounds easy and stupid. But when you start to really think about it, this raises some interesting questions. For instance, how to handle the hit testing on the various pads of this bitmap image? How to guarantee to have the same experience across all devices & browsers around resolutions and touch support?
Options to handle the hit testing
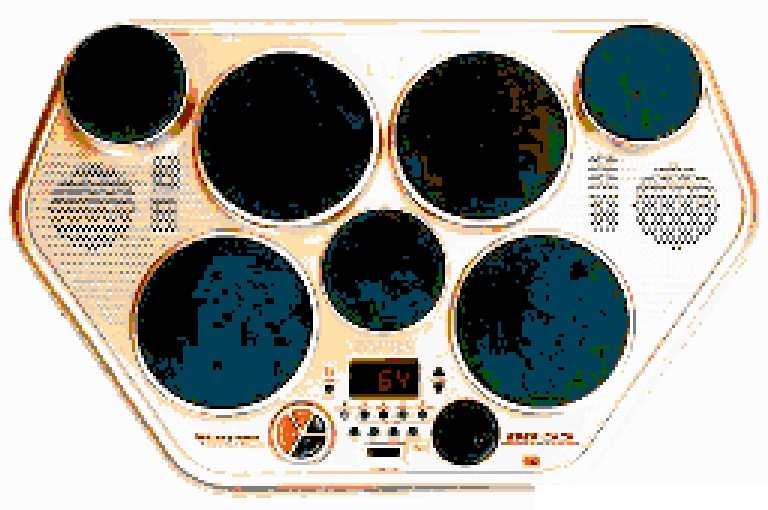
Let’s consider this image used in the demo just below. I’ve built it by intentionally degrading the original image to 8-bit as it was part of our joke. The full online experience was supposed to provide the best graphics & sounds while the offline experience is offering a degraded 8-bit version.
You can see that there are several areas you’re tempted to press to make some noise symbolized by the various black circle. Now, let’s try to figure out how to handle clicks on those parts of the image using whatever HTML feature.
For the oldest of us, we could be tempted to use an image-map via the <map> & <area> tags. You can define areas of the image with various geometrics shape including ellipses and circles. Well, this could then do the trick!
However, unfortunately, there are problems using this approach, the first one being major:
1 – This is pixel based, so it won’t scale across resolution and devices. Let’s imagine your bitmap image has a fixed size of 600x400px. If you start defining areas inside it, you’ll build them based on this 600×400 resolution. As soon as you’ll stretch/reduce the image to match the final device’s resolution, the areas won’t match anymore the image. However, there is jQuery library that compute the area coordinates dynamically for you: jQuery RWD Image Maps. But I thought it would too much to add jQuery and a library just for this simple hit testing demo! I was looking for something simpler.
2 – This feature has been originally defined to navigate to a specific URL. We’d rather like to call one of our JavaScript function to use web audio to play some sounds. Still, you can trick it by defining a href=”#” and by registering to the click event on your area.
My next idea was then to put that into a 2D canvas, that I could stretch to the current resolution using CSS. This solution could work but is really complex to implement for such a simple web app. Indeed, this would imply:
1 – to manually define some hit zone by code
2 – handle the click event on the canvas, find the exact X, Y mouse coordinates of the click and scale that to the current resolution.
3 – finally, compute ourselves the hit testing algorithm by checking if those 2D coordinates are inside one of the circles/ellipse we would have defined by code
It’s not tremendously complex but it’s a bit of math for something I thought it would have been simple to build. Another point, if you’d like to keep the aspect ratio of the image, it also implies that you’re resizing the canvas size by code computing yourself the ratio during the loading phase and inside the onresize event.
Finally, I ended up thinking about an obvious solution that is perfectly made for that. When you’re thinking about something that scale across devices, helps you to do the hit testing and handle for you the aspect ratio, you should simply consider using SVG! S stands for Scalable and you can define a viewbox with some parameters to lock the aspect ratio.
Fine, but you’re going to tell me: how is it going to help me defining my hit zone on my image? And what about the fact it’s a bitmap image and not a vector one?
Let me show you how I’ve done that. You can reproduce the very same steps for any kind of experiences you’d like to build on top of a bitmap image.
1 – Save the above 8-bit drum machine image on your machine
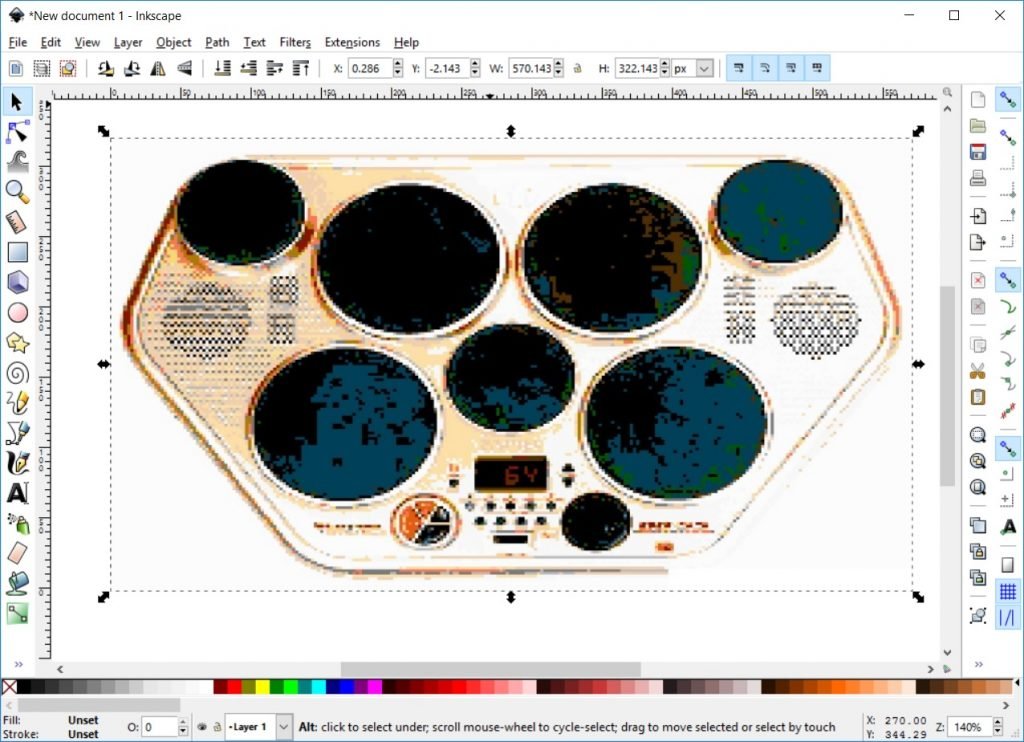
2 – use a tool that will help you generating the XML of your SVG content. I’m going to use InkScape here, a free tool you can download but you can probably do the same thing with SVG Edit inside your browser.
3 – Open Inkscape, go to “File” -> “Document Properties…” and change the “Custom size” values to 160 x 90.
4 – Go to “File” -> “Import” and choose the “8bitsdrummachine.jpg” you’ve saved before. Choose “Link” as the import type and let the other options as-is. Then, stretch the image to map our drawing zone:
5 – We’re now going to draw ellipses on top on our image. Choose the red color and make sure that your ellipses are perfectly covering the black drums:
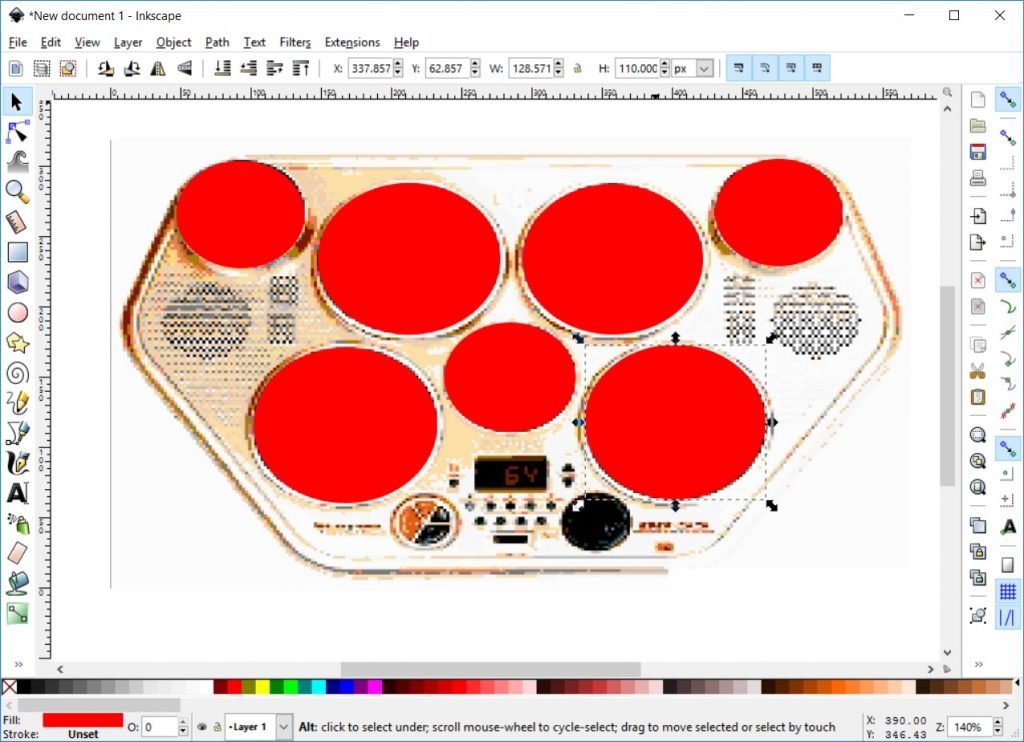
Those 7 ellipses will be our hit zones.
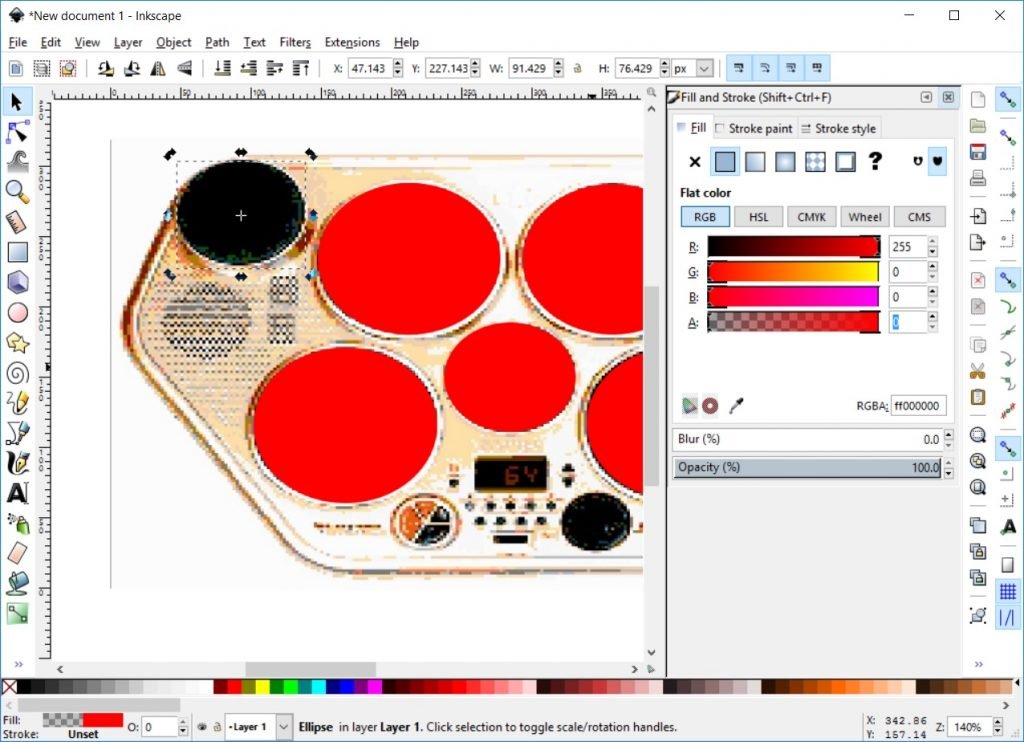
6 – To be able to find those SVG forms easily in our code, right-click on each of them, choose “Object Properties” and change their “ID” and “Label” properties to “button1..7” and “#button1…7”:

7 – Now that we have defined precisely our future hit zone, let’s make them transparent to avoid hiding the image under. Right-click on each of them and choose “Fill and Stroke” and the set the alpha value (A) to 0:
Note: we’re using simple ellipse here, but you can draw any kind of complex shapes allowed by SVG on top of your image to achieve similar results.
8 – Save the result on your hard drive via the “File” -> “Save as..” menu.
9 – Open this file with your favorite editor (Notepad++, Sublime, Visual Studio Code, whatever) and add this line of XML just after the viewBox attribute:
preserveAspectRatio="xMidYMin meet"
To understand what this SVG attribute is doing, please read this MDN documentation: preserveAspectRatio
And you’re done for this part! This piece of SVG is embedding your bitmap image, add a layer of transparent vector form you’ll click on it and it scales across resolutions keeping the aspect ratio thanks to the preserveAspectRatio attribute.
We’re now need to set the code to wire those SVG ellipses to our event handler.
What about web audio?
I’ve already deeply covered Web Audio in a previous post: Creating fun & immersive audio experiences with Web Audio. I’m reusing part of the code demonstrated in this article such as the Sound object:
var Sound = (function () {
function Sound(url, audioContext, masterGain, loop, callback) {
this.url = url;
this.audioContext = audioContext;
this.masterGain = masterGain;
this.loop = loop;
this.callback = callback;
this.gain = this.audioContext.createGain();
this.gain.connect(this.masterGain);
this.isReadyToPlay = false;
this.loadSoundFile(url);
}
Sound.prototype.loadSoundFile = function () {
if (canUseWebAudio) {
var that = this;
// make XMLHttpRequest (AJAX) on server
var xhr = new XMLHttpRequest();
xhr.open('GET', this.url, true);
xhr.responseType = 'arraybuffer';
xhr.onload = function (e) {
// decoded binary response
that.audioContext.decodeAudioData(this.response,
function (decodedArrayBuffer) {
// get decoded buffer
that.buffer = decodedArrayBuffer;
that.isReadyToPlay = true;
if (that.callback) {
that.callback();
}
}, function (e) {
console.log('Error decoding file', e);
});
};
xhr.send();
}
};
Sound.prototype.play = function () {
if (canUseWebAudio &amp;amp;&amp;amp; this.isReadyToPlay) {
// make source
this.source = this.audioContext.createBufferSource();
// connect buffer to source
this.source.buffer = this.buffer;
this.source.loop = this.loop;
// connect source to receiver
this.source.connect(this.gain);
// play
this.source.start(0);
}
};
return Sound;
})();
Then, as explained in this article, you need to handle Web Audio in a special way for iOS support to unlock the web audio context:
try {
    if (typeof AudioContext !== 'undefined') {
        audioContext = new AudioContext();
        canUseWebAudio = true;
    } else if (typeof webkitAudioContext !== 'undefined') {
        audioContext = new webkitAudioContext();
        canUseWebAudio = true;
    }
    if (/iPad|iPhone|iPod/.test(navigator.platform)) {
        this._unlockiOSaudio();
    }
    else {
        audioUnlocked = true;
    }
} catch (e) {
    console.error("Web Audio: " + e.message);
}

function unlockiOSaudio() {
    var unlockaudio = function () {
        var buffer = audioContext.createBuffer(1, 1, 22050);
        var source = audioContext.createBufferSource();
        source.buffer = buffer;
        source.connect(audioContext.destination);
        source.start(0);
        setTimeout(function () {
            if ((source.playbackState === source.PLAYING_STATE || source.playbackState === source.FINISHED_STATE)) {
                audioUnlocked = true;
                window.removeEventListener('touchend', unlockaudio, false);
            }
        }, 0);
    };
    window.addEventListener('touchend', unlockaudio, false);
}
How to handle multi-touches across all devices?
To my point of view, the best touch specification for the web is Pointer Events. I’ve already covered this specification in details: Unifying touch and mouse: how Pointer Events will make cross-browsers touch support easy. We’re going to use it to wire it our event handler to our SVG shapes.
In the code below, we’re getting a reference to each of the SVG shapes we’ve built with InkScape to which we’ve associated an id (button1, button2, etc.). Then, we’re loading the various 8-bit sounds from the web server and decoding them via our Sound object. Finally, using the pointerdown event, we’ll play each of the sounds associated to each of the SVG shapes:
var soundsCollection = [];
var buttonsCollection = [];
buttonsCollection.push(document.getElementById("button1"));
buttonsCollection.push(document.getElementById("button2"));
buttonsCollection.push(document.getElementById("button3"));
buttonsCollection.push(document.getElementById("button4"));
buttonsCollection.push(document.getElementById("button5"));
buttonsCollection.push(document.getElementById("button6"));
buttonsCollection.push(document.getElementById("button7"));
if (canUseWebAudio) {
masterGain = audioContext.createGain();
masterGain.connect(audioContext.destination);
soundsCollection.push(new Sound("./8bits_sounds/clap.wav", audioContext, masterGain, false, newSoundLoaded));
soundsCollection.push(new Sound("./8bits_sounds/cowbell.wav", audioContext, masterGain, false, newSoundLoaded));
soundsCollection.push(new Sound("./8bits_sounds/hihat1.wav", audioContext, masterGain, false, newSoundLoaded));
soundsCollection.push(new Sound("./8bits_sounds/kick1.wav", audioContext, masterGain, false, newSoundLoaded));
soundsCollection.push(new Sound("./8bits_sounds/snare1.wav", audioContext, masterGain, false, newSoundLoaded));
soundsCollection.push(new Sound("./8bits_sounds/tom1.wav", audioContext, masterGain, false, newSoundLoaded));
soundsCollection.push(new Sound("./8bits_sounds/kick3.wav", audioContext, masterGain, false, newSoundLoaded));
}
var soundsLoaded = 0;
function newSoundLoaded() {
soundsLoaded++;
if (soundsLoaded == 7) {
// Ready to rock &amp;amp; roll!
for (var i = 0; i < 7; i++) {
buttonsCollection[i].addEventListener("pointerdown", onPointerDown);
}
}
}
function onPointerDown(eventArgs) {
var buttonClicked = eventArgs.currentTarget.id;
var soundId = buttonClicked.substr(buttonClicked.length - 1) - 1;
var soundToPlay = soundsCollection[soundId];
soundToPlay.play();
}
[/sourcecode]
Thanks to this code, we’re supporting multi-touches in a very simple way! But he has only one drawback: it only works in MS Edge. ;-). To support all browsers & devices, simply use the great <a href="https://github.com/jquery/PEP#why-pointer-events">jQuery PEP polyfill</a>.
Add a reference to the file in your page:
[sourcecode language='html']
<script src="https://code.jquery.com/pep/0.4.1/pep.min.js"></script>
And add the following property to the HTML element containing the UI you’re interesting in (the body element in our demo):
touch-action="none"
Going further with synthesis
In this small demo, I’m downloading recorded samples of 8-bit sounds. But Web Audio has some great features that could help you generating the sounds via oscillators for instance has explained in this article: Synthesising Drum Sounds with the Web Audio API
I hope you’ve enjoyed this little tutorial and it will help you solving some of your issues or creating cool experiences!