We’ve discovered in the previous article some of the details on the way I’ve built the Silverlight application. Let’s now review the choice I’ve done on the Windows Azure Storage part.
Note : if you’d like to know more about Windows Azure, please have a look to the Windows Azure Platform training course: http://channel9.msdn.com/learn/courses/Azure/ and download the Windows Azure training kit here. You’ll find a specific section on the Azure storage.
My objective was to store the game levels in the cloud without needing a specific server logic doing the access control and/or acting as a proxy for the download/upload of the files. I was then looking for a solution as simple as a classical HTTP PUT on a regular Web server to save my levels in the cloud.
Choice done on the Windows Azure side
In Windows Azure, to be able to discuss with the storage zone (blob, queue, table), you need to have the primary access key available in the Windows Azure administration portal:
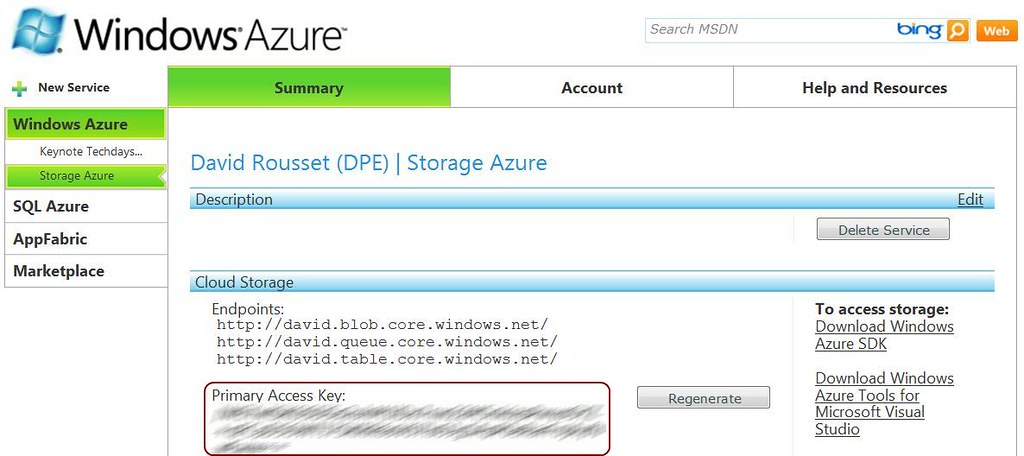
This key is very important and should be kept confidential. You shouldn’t share it with the rest of the world. 🙂 Thus, to be able to discuss directly to the Windows Azure storage from the Silverlight client application, we would need to hard code this key inside the Silverlight code. And this finally means sharing the key with the rest of the world as disassembling a Silverlight application to really easy.
So, the classic solution is to use an Azure Web Role hosting for instance an ASP.NET application. As this application is hosted inside Azure, it is safe to use the key here. Here is then the kind of architecture we’re used to see in Azure for this kind of needs:
1 – A Web Role hosted in Windows Azure
2 – This Web Role is hosting a WCF service using the primary key and the storage APIs to push the files into the Azure blobs using HTTP REST requests. This WCF service exposes some methods to retrieve information from the blogs. This service could also add some access logic control.
3 – The Silverlight client references the WCF service, authenticates and uses the read/write methods through HTTP calls.

We then have a proxy in the middle that I’d like to remove. Let’s remind you what I’d like to achieve: use the Azure storage directly from the Silverlight application without using a WCF service but without providing you my primary key neither. So: is this possible or not? Yes it is!
However, we can’t allow writing operations for everybody on an Azure Storage container. Hopefully, we can create temporally valid URLs on which we will set specific rights: allow files listing, reading the files, writing files or delete files.
This is what we call “Shared Keys”.
Resources:
– Authentication Schemes : http://msdn.microsoft.com/en-us/library/dd179428.aspx
– Cloud Cover Episode 8 – Shared Access Signatures : http://channel9.msdn.com/shows/Cloud+Cover/Cloud-Cover-Episode-8-Shared-Access-Signatures/
– This blog post is well explaining the different available options to use the Azure storage: http://blogs.msdn.com/b/eugeniop/archive/2010/04/13/windows-azure-guidance-using-shared-key-signatures-for-images-in-a-expense.aspx
– There is also an excellent blog posts series from Steve Marx on this topic: http://blog.smarx.com/posts/uploading-windows-azure-blobs-from-silverlight-part-1-shared-access-signatures . His blog should be part of your favorite links if it’s not yet the case! Steve is explaining here how to generate shared keys dynamically on the server side to let a Silverlight client application doing some multi-upload of files on his Azure storage using this special limited in time URLs.
A shared key looks like that:

To generate this key, rather than using the Azure SDK and a little piece of .NET code to do it as you can see in the downloadable Steve’s sample, I’ve chosen to do it via an awesome tool named Cloud Storage Studio. This is a commercial software written in WPF with a 30 days evaluation period. There is even a fun Silverlight application you may test online: https://onlinedemo.cerebrata.com/cerebrata.cloudstorage/ but it’s currently much more limited that the rich client application.
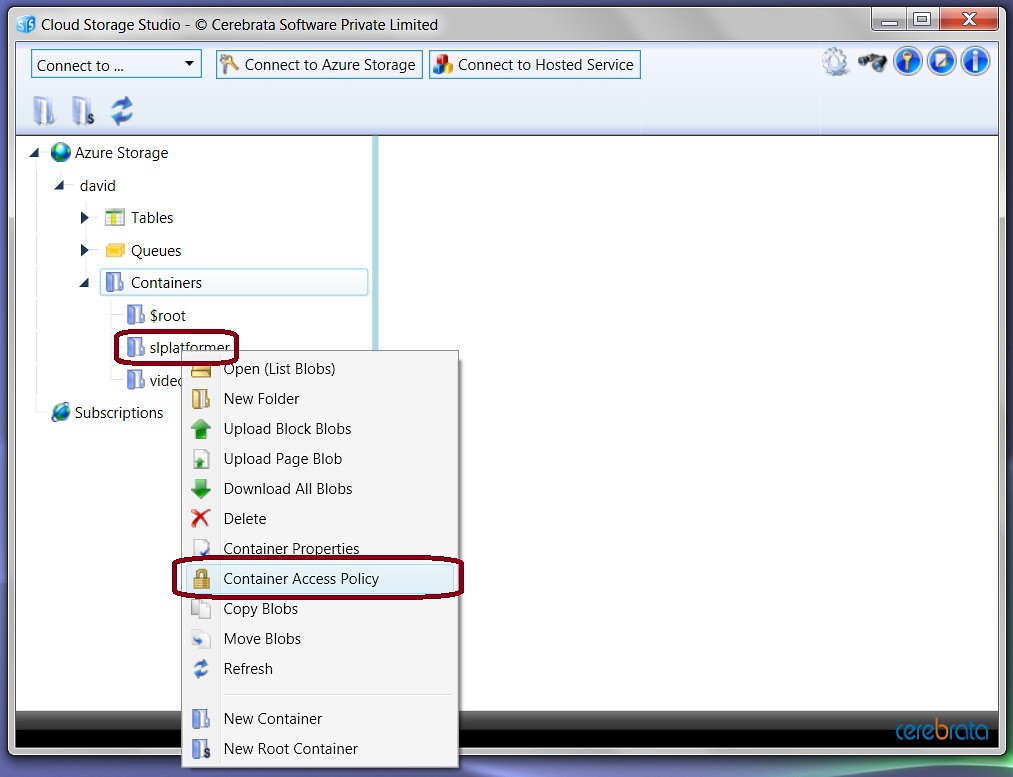
Here are the steps you need to follow to create this magical URL from this tool:
1 – On one of your Azure containers, right-click –> “Container Access Policy” to display the current rights set on it:
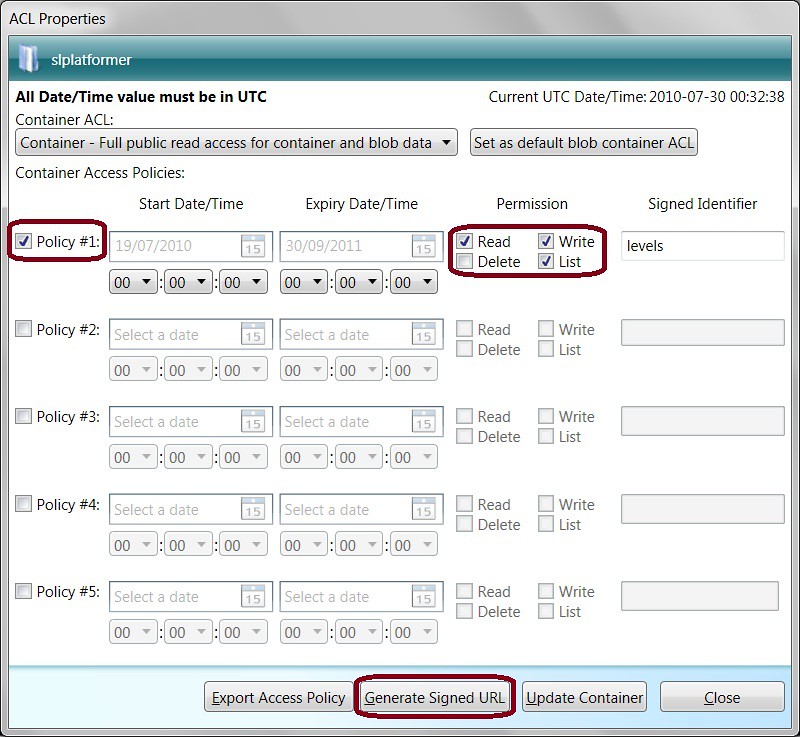
2 – Create a new temporally policy by checking the case, choosing the validity period and by choosing the various permissions to apply:
3 – After clicking on the “Generate Signed URL” button, you’ll come on this window:
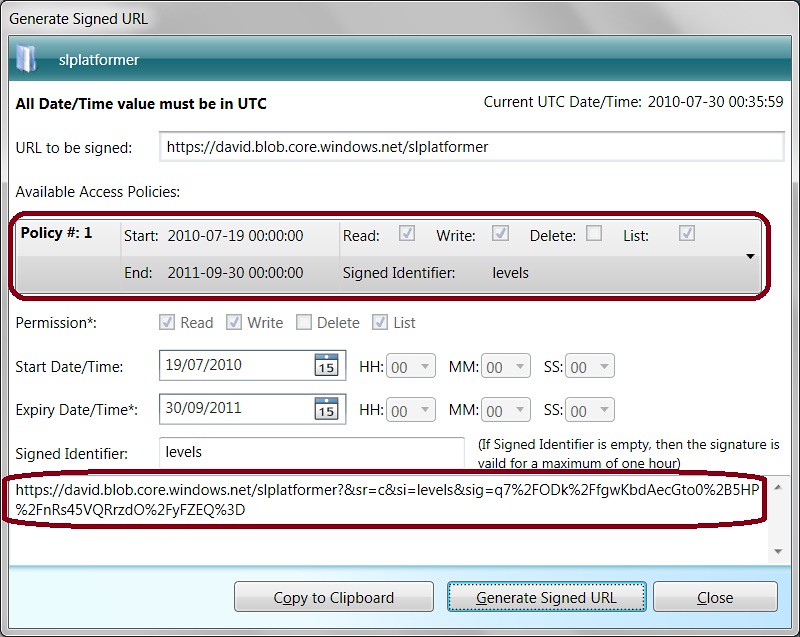
Choose in the combobox the policy you’ve just created and click on the “Generate Signed URL” button. You’ll have the same kind of URL displayed at the end of the above screenshot.
Silverlight code
There are 2 parts to handle on the Silverlight side. First of all, we need to launch an HTTP request on the Azure container to know the current available files to download. After that, we need to launch several requests to download all these files and to load in memory the associated levels.
List all the available files
This is fairly easy to list all the available files. As described in the following article from the Windows Azure SDK:
– List Blobs: http://msdn.microsoft.com/en-us/library/dd135734.aspx
You need to launch an HTTP REST request with a specific URL and we will have an XML stream sent back. For instance, there is the specific URL to query in my case: http://david.blob.core.windows.net/slplatformer?restype=container&comp=list
And here is the kind of XML feedback you’ll have:
<?xml version="1.0" encoding="utf-8" ?>
<EnumerationResults ContainerName="http://david.blob.core.windows.net/slplatformer">
  - <Blobs>
    - <Blob>
      <Name>0.txt</Name>
      <Url>http://david.blob.core.windows.net/slplatformer/0.txt</Url>
      - <Properties>
        <Last-Modified>Tue, 27 Jul 2010 18:32:03 GMT</Last-Modified>
        ...
      </Properties>
    </Blob>
    + <Blob>
      <Name>1.txt</Name>
      <Url>http://david.blob.core.windows.net/slplatformer/1.txt</Url>
      - <Properties>
        <Last-Modified>Thu, 29 Jul 2010 01:12:23 GMT</Last-Modified>
        ...
      </Properties>
    </Blob>
  </Blobs>
  <NextMarker />
</EnumerationResults>
We now just need to do a little object mapping thanks to LINQ to XML. In the sample code you can download in the previous article, we’re using the following class:
// Little class used for the XML object mapping
// during the REST list request to the Azure Blob
public class CloudLevel
{
    public string Name { get; set; }
    public string Url { get; set; }
    public int ContentLength { get; set; }
}
And here is the code to download the levels list:
string UrlListLevels = @"http://david.blob.core.windows.net/slplatformer?restype=container&comp=list";

CloudLevelsListLoader.DownloadStringCompleted += new DownloadStringCompletedEventHandler(LevelsLoader_DownloadStringCompleted);
CloudLevelsListLoader.DownloadStringAsync(new Uri(UrlListLevels));
And we’re doing the mapping thanks to this code:
// We're going to user Linq to XML to parse the result
// and do an object mapping with the little class named CloudLevel
XElement xmlLevelsList = XElement.Parse(e.Result);

var cloudLevels = from level in xmlLevelsList.Descendants("Blob")
                    .OrderBy(l => l.Element("Name").Value.ToString())
                    select new CloudLevel
                    {
                        Name = level.Element("Name").Value.ToString(),
                        Url = level.Element("Url").Value.ToString(),
                        ContentLength = int.Parse(level.Element("Properties").Element(@"Content-Length").Value)
                    };
Loading the levels
Once we have the list of files, we just need to go through it. For each file, we’re launching an asynchronous request via the WebClient object:
// For each 160 bytes file listed in XML returned by the first REST request
// We're loading them asynchronously via the WebClient object
foreach (CloudLevel level in filteredCloudLevel)
{
    WebClient levelReader = new WebClient();
    levelReader.OpenReadCompleted += new OpenReadCompletedEventHandler(levelReader_OpenReadCompleted);
    levelReader.OpenReadAsync(new Uri(level.Url), level.Name);
}
On the callback method, we’re retrieving the stream sent back and we load the level in memory:
// Once callbacked by the WebClient
// We're loading the level in memory
// The LoadLevel method is the same one used when the user loads a file from the disk
void levelReader_OpenReadCompleted(object sender, OpenReadCompletedEventArgs e)
{
    string fileName = e.UserState.ToString();
    StreamReader reader = new StreamReader(e.Result);
    LoadLevel(reader, fileName);
}
However, you’ll see that using this approach, we’re not controlling the order of the received files. Indeed, we’re launching almost simultaneously N requests via N different WebClient. The different levels won’t then systematically arrive in the expected order 0.txt, 1.txt, etc. as these requests are not serialized.
Saving the levels in Azure
We now need to save one or all of the current levels into the Windows Azure storage. For that, we need to build the magical URL we’ve seen previously with the Cloud Storage Studio tool and use it to launch a PUT request. Here is the kind of code you’ll need for that:
// Using part of the code of Steve Marx
// http://blog.smarx.com/posts/uploading-windows-azure-blobs-from-silverlight-part-2-enabling-cross-domain-access-to-blobs
private void SaveThisTextLevelInTheCloud(char[] textLevel, string levelName)
{
    // TO DO: change this 3 values to match your own account
    // You'll need also to build a blob container in Azure with a shared key allowing writing for a specific amount of time
    string account = "david";
    string container = "slplatformer";
    string sas = "&sr=c&si=levels&sig=q7%2FODk%2FfgwKbdAecGto0%2B5HP%2FnRs45VQRrzdO%2FyFZEQ%3D";
    // Building the magic URL allowing someone to write/read into an Azure Blob during a limited amount of time without
    // knowing the private main storage key of your Azure Storage
    string url = string.Format("http://{0}.blob.core.windows.net/{1}/{2}?{3}", account, container, levelName, sas);

    Uri uri = new Uri(url);

    var webRequest = (HttpWebRequest)WebRequestCreator.ClientHttp.Create(uri);
    webRequest.Method = "PUT";
    webRequest.ContentType = "text/plain";
    try
    {
        webRequest.BeginGetRequestStream((ar) =>
        {
            using (var writer = new StreamWriter(webRequest.EndGetRequestStream(ar)))
            {
                writer.Write(textLevel);
            }
            webRequest.BeginGetResponse((ar2) =>
            {
                if (ar2.AsyncState != null)
                    ((HttpWebRequest)ar2.AsyncState).EndGetResponse(ar2);
            }, null);
        }, null);
    }
    catch (Exception ex)
    {
    }
}
Silverlight Cross-Domain calls
In order to make this complete sample works, don’t forget to add the ClientAccessPolicy.xml file in the root$ folder of your storage account. Again, this operation can be easily done with the Cloud Storage Studio or with a piece of .NET code.
We’ll finally see in the next and final article the details around the Windows Phone 7 XNA game where you’ll be able to download its source code.
David
Nice article