WebVR allows you to distribute your content to the widest audience possible, whatever the headset, whatever the platform. In this tutorial, you’ll learn how to build the below WebVR experience, running cross-platforms, where I’m moving inside a 3D scene in VR via teleportation using the VR controllers and interacting with some elements:
We even have 3D spatial sound positioning thanks to Web Audio! In this tutorial, we’ll see how to create the same experience using a few lines of code.
It’s time to consider VR as a way to interact with your web page
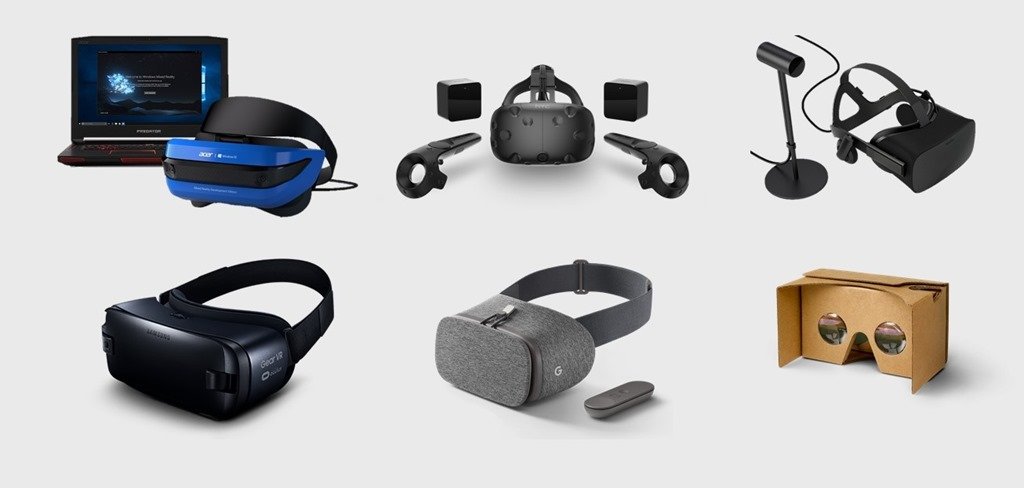
Lot of people think that VR has emerged in 2016 thanks to Oculus and Steam’s partnership with HTC Vive. But in 2017, it’s going to reach a huge number of people thanks to the variety of devices available: from the cheap & affordable cardboard, mobile solutions such as the Gear VR or Google Daydream, up to high end headsets such as the HTC Vive, Oculus Rift or Windows Mixed Reality devices. And you know what? WebVR can address all of them using a unique code base.
Indeed, soon, anybody will be able to experiment VR either on his mobile, PC or console. Addressing all those new devices using native approaches could mean a lot of work. But thanks to the beauty of the web, and more specifically thanks to the WebVR specification, you can easily push your content in VR to any device using a single code base.
Using WebVR, you could build games but also a variety of experiences that works well on the web, from ephemeral content to learning immersive courses. You’ll also gain all the benefits from the web: searchable, linkable, low-friction & sharable like perfectly explained by Megan Lindsay and Brandon Jones in their Building Virtual Reality on the Web with WebVR Google I/O session.
Even more interestingly, you can also create experiences connecting all platforms through the same web page! You could create a game or a collaborative application that will be joined by a player using an Oculus Rift in Chrome who’d play/collaborate against/with a user using a Mixed Reality device in Edge and another one using a GearVR. They could have found the link to your VR website searching content from Google/Bing, Facebook/Twitter or simply have received it by email. WebVR has a great potential to connect people in their Virtual Reality devices via the web. WebVR can offer a new way to consume your content on the web.
Platforms supported and skills required
WebVR is a standard specification managed by the W3C: https://w3c.github.io/webvr/. Its goal is to use the various VR hardware devices and associated potential extended VR controllers from a web page in the best manner possible.
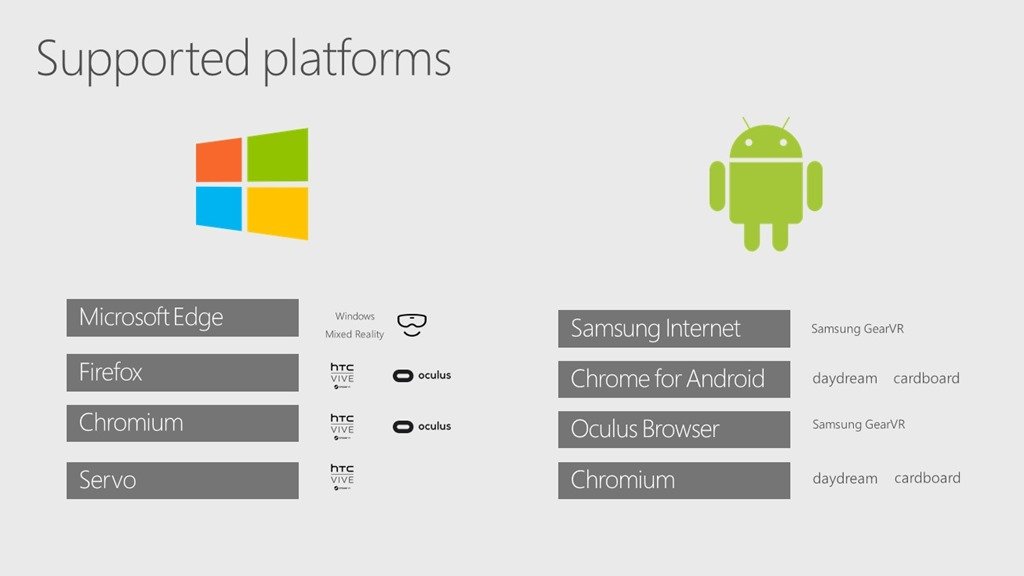
It’s currently supported on a lot of platforms and browsers:
For instance, in the desktop world, WebVR 1.1 is enabled by default in MS Edge / Windows 10 Creators Update and it will be also in Firefox 55 planned to be shipped in August 2017. It’s only available in some specific Chromium builds for now but should ship by the end of the year in the stable release of Chrome. On mobile, it’s enabled in Chrome for Android and Samsung Internet for their Gear VR solution.
Regarding WebVR, https://webvr.info/ says that: “WebVR is an open standard that makes it possible to experience VR in your browser. The goal is to make it easier for everyone to get into VR experiences, no matter what device you have”.
But to be honest, it’s not that easy for anyone to get into VR on the web as it requires a lot of skills:
– You need to master the magic of 3D, render it into WebGL and handle the left & right eyes for stereographic rendering
– You potentially need to manage the lens distortion in case of fallback for non WebVR browsers
– You need to understand and implement the WebVR specification on top of that. It’s probably the less complex part but still, it’s not that easy if you’re not used to 3D concepts
That’s why, most of you will probably end up using an engine doing all that job for you. There’s plenty of great WebGL/WebVR engines available to help you: A-Frame and React VR both based on Three.js, using a declarative way to describe your 3d content but also the famous PlayCanvas and Babylon.js, using a more regular approach with classical code.
We will see how to create content running on all devices with Babylon.js through this tutorial.
Platforms, Browsers & Tools to test WebVR
Before jumping into the code and samples, let’s review how to prepare your development machine to be able to use WebVR.
Windows is probably the best platform for VR developers and WebVR is not an exception. Regarding WebVR, the best option to have most of the available solutions supported is to run Windows 10 Creators Update. Indeed, the Edge version shipped with Windows 10 CU has WebVR 1.1 enabled by default. You can then install the proper build of Chromium from: https://webvr.info/developers/ and download Firefox 55 Beta from https://www.mozilla.org/firefox/channel/desktop/.
With such a machine, you’ll be able to test WebVR in the Oculus Rift and the HTC Vive inside Chromium or Firefox and the new Windows Mixed Reality headset in Edge. You can still use Windows 7 or 8/8.1 machines but you won’t be able to test the Mixed Reality devices.
You can start also to consider macOS High Sierra as a possible development platform thanks to job done by Mozilla: Announcing WebVR on Mac via Firefox Nightly
For mobile WebVR, only Android is supporting it today. The best option is probably a Google Daydream or a recent Samsung S7 or S8 phone. Beware that Gear VR is only supporting WebVR 1.0 for now. Hopefully, Babylon.js supports WebVR 1.1 with an automatic fallback to WebVR 1.0 if needed.
But what if you don’t have yet a headset or if you’d like to use simulators to avoid going back and forth inside the headset for debugging? I’ve found 3 interesting options.
WebVR Chrome Extension
First one is the WebVR API Emulation Chrome Extension. It works in the regular version of Chrome, you don’t need a special build of Chromium to use it. Once installed, it will emulate WebVR and will expose additional options in the F12 development tool. Let’s test it.
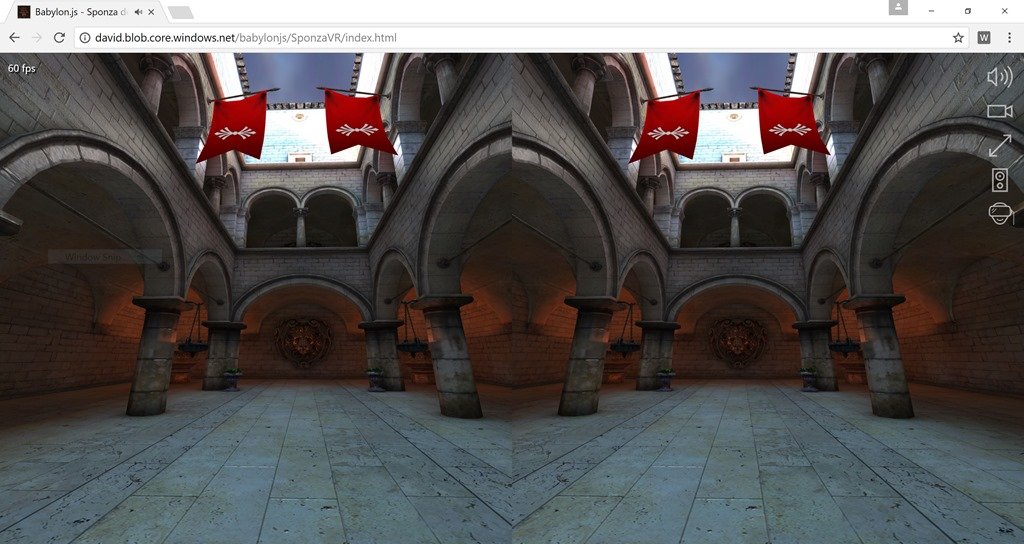
– Open this Babylon.js WebVR demo: http://aka.ms/sponzavr in Chrome with the WebVR API extension enabled
– Click on the VR button. Thanks to the extension, you should see this stereoscopic rendering:
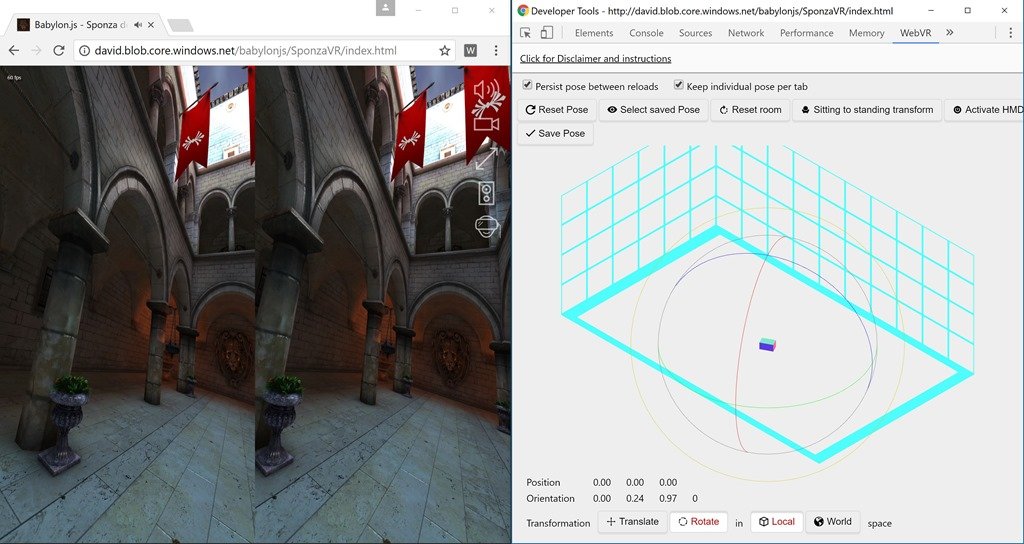
– Now, press F12 and go to the WebVR tab. You can simulate translation & rotation of the headset using the extension
The only drawback of this great tool is that it’s “only” emulating WebVR 1.0 for now and not WebVR 1.1. For instance, the samples from https://webvr.info/samples/ won’t work with it. But it works with Babylon.js as we’re supporting WebVR 1.0 as a fallback to WebVR 1.1.
Windows Mixed Reality Simulator
The second great option comes with Windows 10 Creators Update and it’s named “Windows Mixed Reality Simulator”. You can read the documentation to know how to use it. The experience is better if you’ve got an Xbox controller connected to your PC. Let’s test it also!
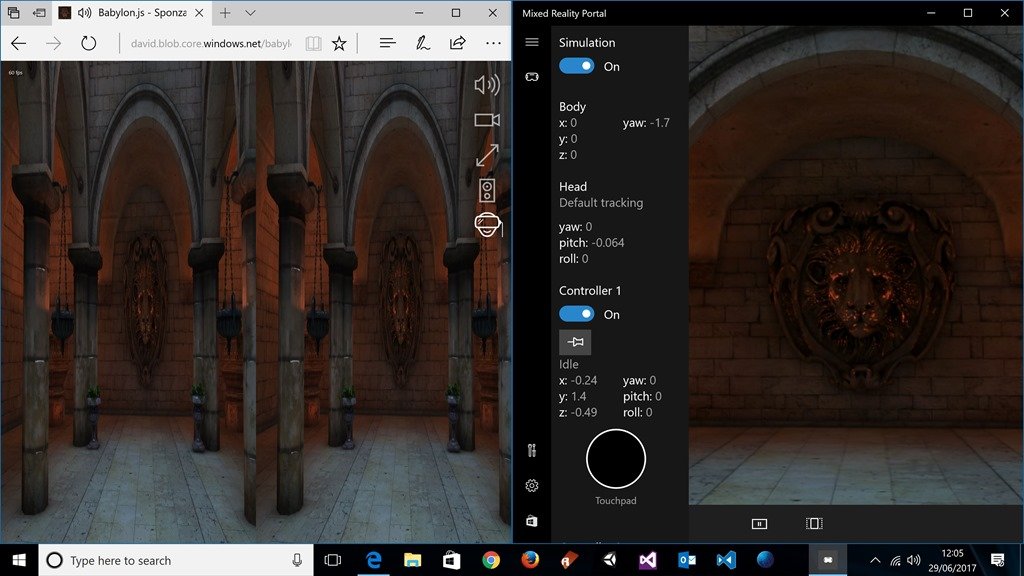
– Launch the “Mixed Reality Portal” application and enable the “Simulation” button to “On”
– Open the same Babylon.js WebVR demo: http://aka.ms/sponzavr inside Edge and press the VR button
You’ll be able to move / rotate the camera using the gamepad inside the simulator.
Your smartphone
As we’ll see later on in this tutorial, you can use any WebGL compatible smartphone using a fallback based on the Device Orientation API even if some smartphones start to support WebVR (Samsung Gear VR and Google DayDream).
Navigate to the same demo on your smartphone (Windows Mobile 10, iOS or Android) and click the VR button. Moving/rotating your smartphone will rotate the VR camera.
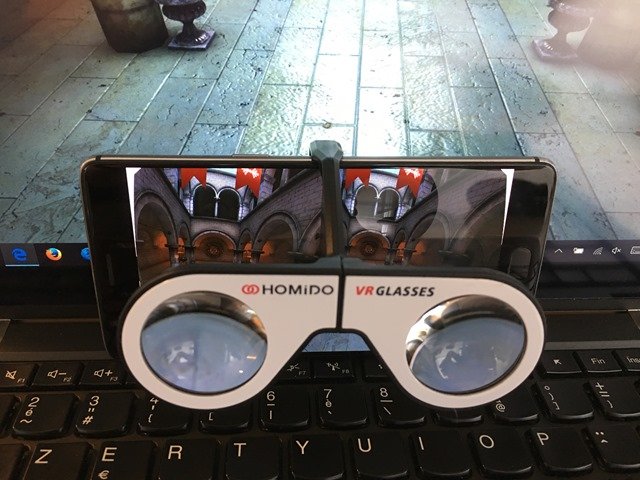
Babylon.js Sponza VR running on a OnePlus 3 using Homido VR Glasses
Videos of Sponza VR on real devices
Finally, to give you an idea of what you should expect in VR, here are 2 videos:
– WebVR Tutorial – Edge MR Headset Demo Sponza
– HTC Vive Controllers in Babylon.js WebVR
The first one is using the Mixed Reality headset with MS Edge thanks to my friend Etienne Margraff and the second one is with my HTC Vive inside Chromium that shows also the controllers being displayed and tracked.
Pay a lot of attention to performance: 90 fps is your target
When we’re rendering in VR, we need to do a double rendering of the scene for the stereographic effect to work and have real 3D. We’re then rendering a first frame for the left eye and a second frame for the right eye based on the distance supposed to separate them. Studies also has shown that rendering at 90 fps improves a lot the comfort and tend to avoid motion sickness. On mobiles, screens are currently limited to 60 Hz which means that 60 fps should then be your target. On desktop, you’re usually have much more powerful GPU and headsets (Oculus, HTC Vive, Windows Mixed Reality) have a refresh rate of 90 Hz. 90 fps should then be your target on desktop. Indeed, when a browser supports WebVR, it changes the animation loop, triggered via requestAnimationFrame, from the default 60 fps usual max limit to 90 fps.
This means that you should pay a lot of attention to the complexity of the 3D content you’d like to render in VR. If your scene isn’t yet rendering at 60 fps or 90 fps before going VR on your targeted platform, start first by reconsidering it to reduce its complexity. For instance, the Sponza VR scene we’ve used at the beginning is clearly targeting powerful GPU like nVidia GTX970 or higher. On mobile, you need a recent Samsung S8 or iPhone 7 to be able to render it smoothly in VR.
On the Babylon.js side, you can use our Debug Layer tool to try to identify the bottlenecks. It could come from several parts:
– You’re using too much the CPU, raising up to 100%. The GPU is then waiting for orders and the framerate is going down. It could be the case if you’re using too much collisions, physics, or anything being computed on the CPU/JavaScript side. You could use the developer tool of your favorite browser to do performance review also.
– You’re rendering a too complex scene for the current GPU: too many vertices or polygon, too advanced effects like post processes, etc. The Debug Layer tool can help you disabling some effects or remove some objects to check if it’s improving the performance. This could be useful to find the right balance for the right platform.
– You’re having too many individual objects or draw calls, you’ll need to consider merging or other approach when possible. Again, our Debug Layer/Inspector tool will help you identifying that.
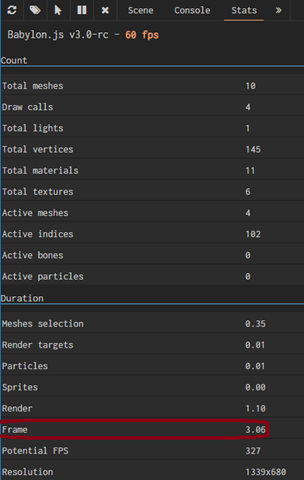
However, if you see that the time needed to compute each frame is below 11 ms, this means you’re a pretty good shape. For instance, here’s a screenshot of our debug layer/inspector showing a perfect candidate on the device tested:
But a lot of the job must be done on the 3d artist’s side: merging the objects when possible, avoiding too many materials, etc. Our 3d artist, Michel Rousseau, is particularly good in this exercise and has shared his tips in this video: NGF2014 – Create 3D assets for the mobile world & the web, the point of view of a 3D designer where he explains how he managed to move from 1 fps to 60 fps in WebGL/Babylon.js on the Back To The Future/Hill Valley scene.
Generally speaking, I think that the Mobile First approach perfectly still applies if you’d like to create a WebVR experience running on all platforms, from mobile to desktop. Start first with a smooth experience on mobile Cardboard / GearVR / DayDream with simple 3D models and progressively enhance the visual quality / UI / UX for desktop headsets. We could even call that Progressive WebVR Experience (PWVRE :-P)
Our first simple scene in WebVR
Note: if you’re a total beginner to Babylon.js, please read our Babylon.js Primer section.
Our startup scene
We’re going to use our online Playground tool for this tutorial. You won’t have to install anything on your machine. You only need a recent modern browser.
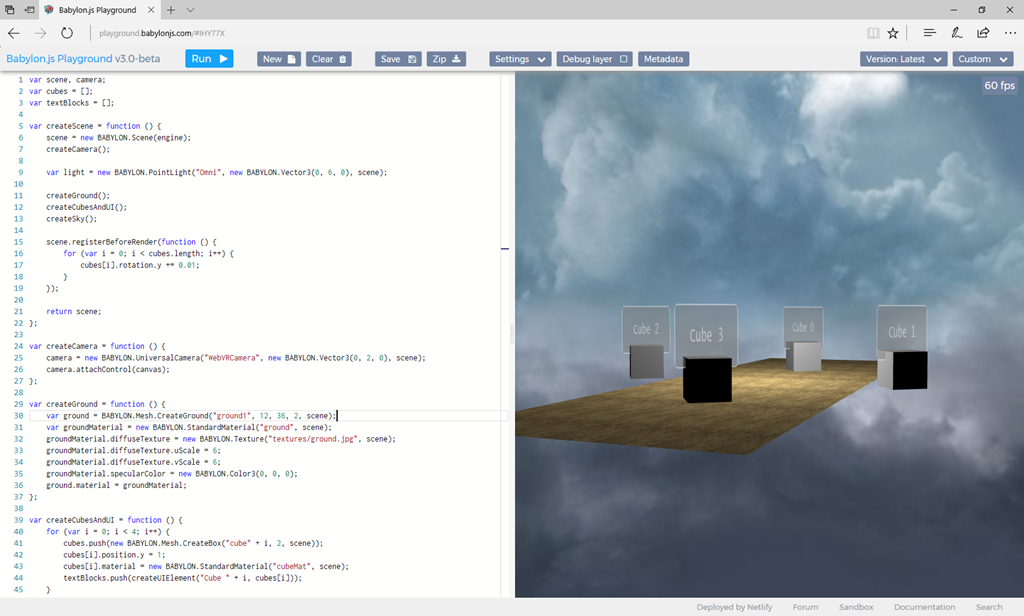
Open this sample in your favorite browser: http://playground.babylonjs.com/#IHY77X
It will display 4 rotating cubes, a textured ground and a textured sky. Each cube has some UI attached to it. We’re using our new Babylon.GUI feature shipping with v3.0.
Indeed, in WebVR, the WebGL canvas where you’ll render your scene will be displayed full screen inside the headset. This means that you can’t use regular approach of using DOM elements on top of the canvas to add user’s interaction or to display additional information. You need to render the graphical user interface inside the WebGL canvas to be able to view & interact with it in VR. Babylon.GUI allows that.
A few notes:
– We’re using the UniversalCamera in this first sample code meaning you can move inside the scene like in a FPS game using either the keyboard/mouse, touch or a gamepad.
– You can go full screen by going into “Settings” –> “Fullscreen”
– If you’d like to share your sample with friends without displaying the code, simply add “frame.html” before your playground’s reference ID like: http://playground.babylonjs.com/frame.html#IHY77X
Switching to WebVR
Switching to WebVR is basically just about modifying a single line of code. It follows the philosophy we’ve developed since the beginning of Babylon.js.
Indeed, Babylon.js is providing lot of various cameras with different services (gamepad, touch, arc rotate, virtual joystick). And since the beginning, our philosophy is to be able to quickly move from a camera to another by just changing a single line of code. We’re going to see that we kept this approach for VR cameras. You can read our documentation on cameras: http://doc.babylonjs.com/tutorials/cameras to better understand how it works.
Go into the Monaco editor on the left and navigate to line 25. Change “UniversalCamera” by “WebVRFreeCamera”.
If you’ve pressing the “Run” button, you won’t see any change in most browser with the previous sample. Indeed, if Babylon.js detects that WebVR is not supported by your browser or if it doesn’t detect any device attached, even if WebVR is supported, we’re displaying the default FreeCamera behavior. It’s to guarantee to have a fallback behavior.
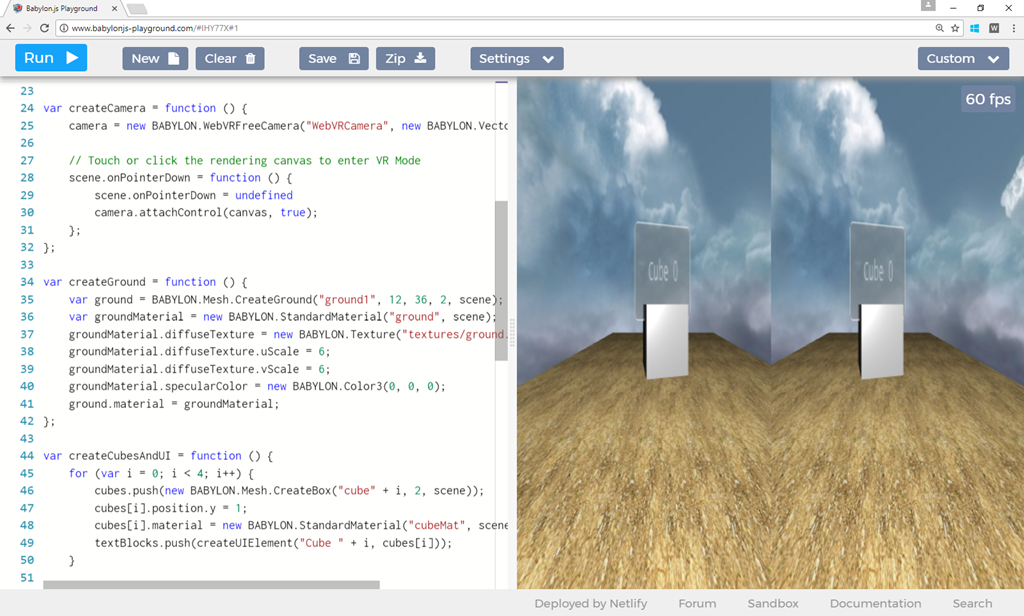
However, if you’re running this updated code inside Chrome with the WebVR extension, you should have a double rendering displayed:
You can use the F12 WebVR extension to rotate the camera and check it already works fine.
We need to do a last operation to be able to have a true WebVR experience running inside a headset.
The WebVR W3C specification indicates that the rendering inside the headset “must be called within a user gesture”. This means that the underlying requestPresent WebVR function has to be called after the user has clicked on a button or has touched an element. That’s why, all WebVR demonstrations you may have already seen require you to click on a VR button. In Babylon.js, this function is called for you inside the attachControl() function.
So instead of calling directly attachControl() directly after creating the WebVRFreeCamera, you need to use such an approach:
// Touch or click the rendering canvas to enter VR Mode
scene.onPointerDown = function () {
    scene.onPointerDown = undefined
    camera.attachControl(canvas, true);
};
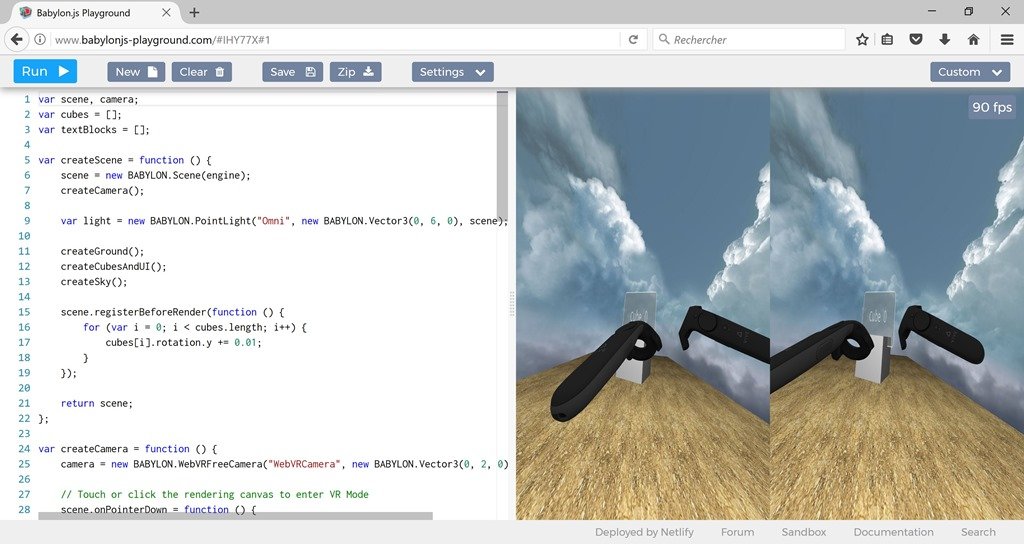
You can try this via this updated sample: http://www.babylonjs-playground.com/#IHY77X#1. Load it inside a WebVR compatible browser with a connected headset and click/touch the canvas.
Inside the headset, you’ll be positioned in the middle of the 4 rotating cubes and you’ll be able to move your head to look into all directions.
If you’re using a HTC Vive or an Oculus Rift with Touch controllers, they will be displayed and tracked for you:
With one line of code, you’ll get this out of the box experience in Babylon.js with controllers displayed and tracked for you
Note also that we’re adding a hemispheric light on the 3d model/mesh of the controllers by default. This is useful when, like most of our scenes on our website, you don’t have specific lightning in your scene using emissive or baked lightning.
To override this default behaviors for your controllers, you’ve got 2 options/boolean:
– controllerMeshes set to true by default to display the models of Vive Wand or Touch. Set it to false to not display them and use your own preferred model if wanted.
– defaultLightningOnControllers set to true by default to have a light dedicated to the controllers. Set it to false to use lights of your current scene to illuminate them.
Usage:
camera = new BABYLON.WebVRFreeCamera("WebVRCamera",
            new BABYLON.Vector3(0, 2, 0), scene,
            { controllerMeshes: true, defaultLightningOnControllers: false });
Managing fallback to Device Orientation
Let’s now see how to update this code to support all platforms, including mobile phones which doesn’t have yet WebVR supported. We can fallback to simulate the behavior of WebVR using the sensors of the phone (accelerometers, gyroscope, etc.) using the Device Orientation API.
Hopefully, again, you can simply switch to Device Orientation using a single line of code in Babylon.js. You need to use our VRDeviceOrientationFreeCamera.
Next, we need to feature detect WebVR support. The simplest way to do that is to test if navigator. getVRDisplays is defined.
In conclusion, here is the code to use to have a complete VR support for all platforms:
if (navigator.getVRDisplays) {
    camera = new BABYLON.WebVRFreeCamera("WebVRCamera",
                new BABYLON.Vector3(0, 2, 0), scene);
}
else {
    camera = new BABYLON.VRDeviceOrientationFreeCamera("WebVRFallbackCamera",
                new BABYLON.Vector3(0, 2, 0), scene);
}
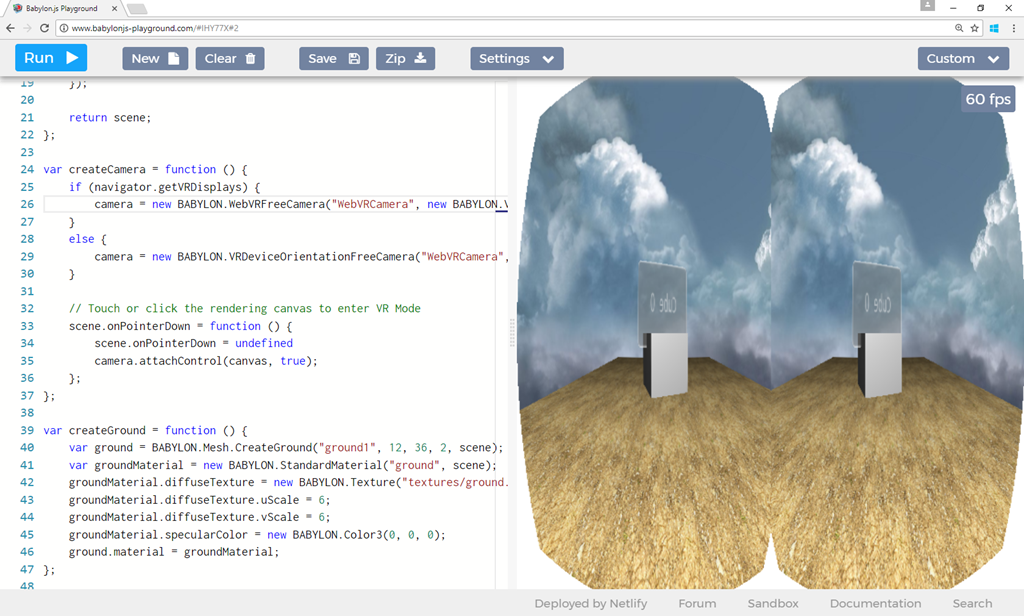
You’ll obtain that in a browser doesn’t supporting yet WebVR or on a phone:
You can test it on your smartphone with this URL: http://www.babylonjs-playground.com/frame.html#IHY77X#2 and touch the canvas to activate the tracking. When you’ll move your smartphone, it will simulate the head movement for a Cardboard usage. It runs at 60 fps on my iPhone 6s.
You’ll see that Babylon.js is adding by default a post-process to manage lens distortion with the VRDeviceOrientationFreeCamera.
You can disable this lens distortion post-process to have a less accurate rendering but a faster one if needed by setting the proper boolean value to false in the constructor parameters:
camera = new BABYLON.VRDeviceOrientationFreeCamera("WebVRFallbackCamera",
            new BABYLON.Vector3(0, 2, 0), scene, false);
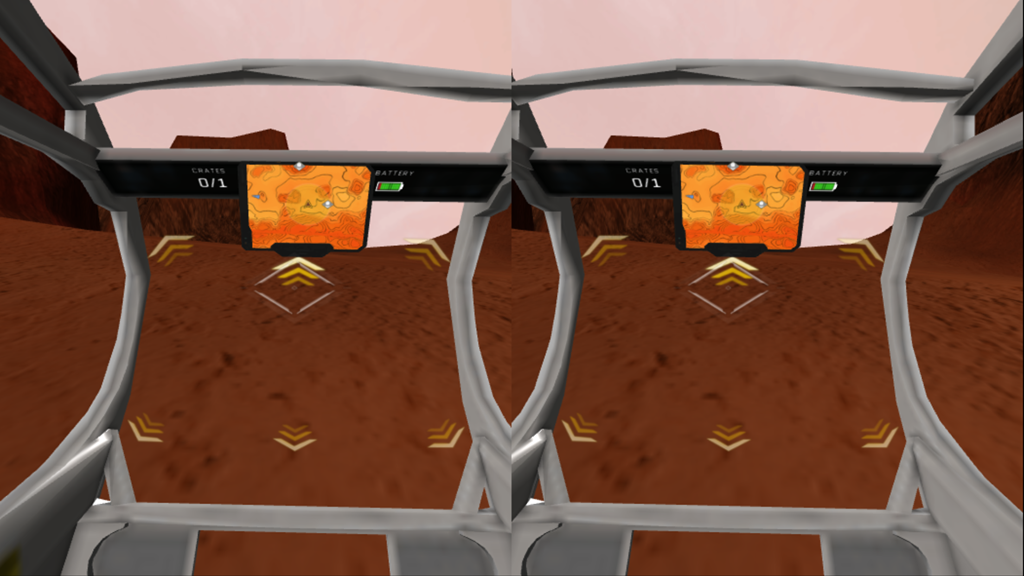
This is what Neo-Pangea have been using with Babylon.js for the National Geographic Make Mars Home experience where you can explore Mars in VR on your smartphone.
Make Mars Home mobile VR experiment using the Babylon.js VRDeviceOrientationFreeCamera
Videos of VR headsets in action
In those videos, we’re improving the demo we’ve just built by adding some assets from a small game I’ve created before. You can test it there: http://www.babylonjs-playground.com/#IHY77X#4
Those assets are loaded thanks to the loadAssets() function using our Assets Manager. You’ll know more on how to generate those assets in the next section.
If you’re loading this demo inside MS Edge using a Mixed Reality headset, you’ll obtain that:
If you’re loading it inside Chromium or Firefox using an Oculus Rift & Touch controllers, you’ll see that instead:
Using the same code. Babylon.js is taking care of the various VR headsets support for you.
Loading a complex scene and switching it into VR
If you’re a 3D artist or if you’d like to quickly create a 3D scene to be displayed in VR on the web, the quickest and simplest option is to export it from a 3D authoring tool such as 3DS Max, Blender, Clara.io or Unity. We’ve got exporters for each of them. We also have a FBX exporter if needed.
You’ll find all of them documented there: http://doc.babylonjs.com/exporters and you can view a video tutorial of an Blender & 3DS Max exportation: 05._game_pipeline_integration_with_babylon.js.
Babylon.js can also directly import some models from .obj or .stl format and more interestingly from the currently standardized glTF format. You may find some of them downloadable on the web.
For instance, some of our famous scenes on our website have been entirely done using 3DS Max and the Babylon.js exporter: Espilit, V8 Engine, Mansion, Sponza (including animations & sounds export for some of them).
We’re going to see that making a VR experience from these scenes is just a matter of a couple of minutes using Babylon.js. But before using those high-end scenes for VR, remember what we’ve just said about taking performance into consideration. The above scenes will clearly require a powerful machine to have a smooth rendering in VR.
Let’s use the Sponza scene available on our home page for this tutorial. This beautiful 3D scene has been made with 3DS Max by Michel Rousseau and exported into Babylon.js using the above linked exporter. You can move into the scene using touch, gamepad or keyboard/mouse.
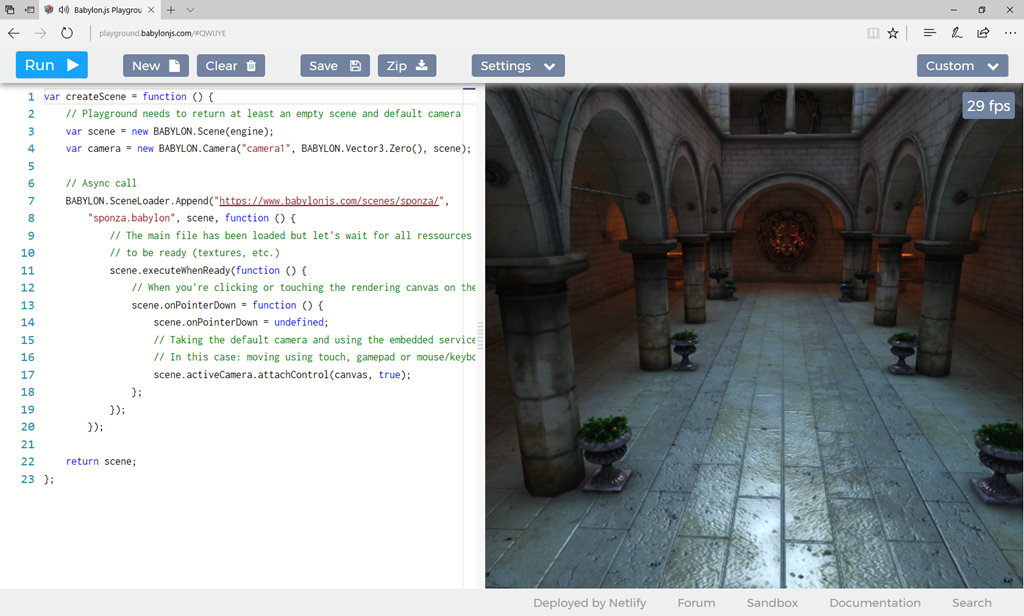
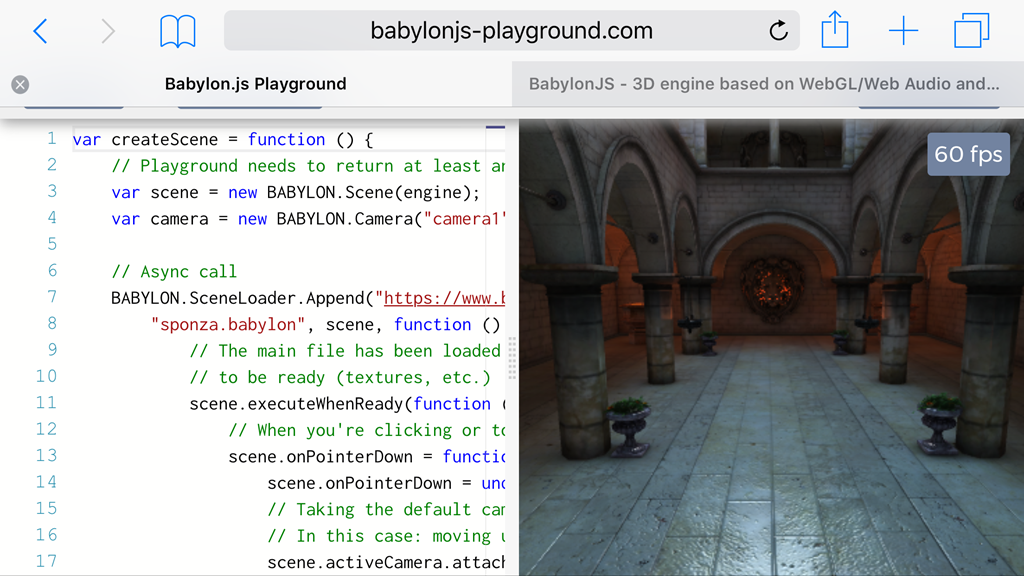
First, let’s review the code needed to load any scene with Babylon.js in non-VR. Open this sample in your desktop browser or mobile: http://playground.babylonjs.com/#E0WY4U.
You’ll see the code on the left to load a scene and the rendering on the right. It’s basically a single line of code:
BABYLON.SceneLoader.Append("https://www.babylonjs.com/scenes/sponza/",
    "sponza.babylon", scene);
The above sample also implements the callback function where it waits for the complete scene to be ready to be rendered and then, on a specific user’s interaction (clicking on the rendering canvas), it’s attaching control to canvas events to move the camera accordingly. Indeed, in Babylon.js, to use the service exposed by a camera, you need to call the attachControl() function. It’s the same function we’ve used with the VR cameras before.
To switch to VR, we simply need to re-use the code seen before with the WebVR feature detection as detailed in this updated sample: http://playground.babylonjs.com/#E0WY4U#1
We’ve just recreated the very same demo we’ve used at the beginning in the simulator sections.
But how to move inside this scene in VR now?
Teleportation
To my point of view, the best way to move inside a VR world is teleportation. Indeed, most of the people will support it without suffering from motion sickness. You can also move using a gamepad with the sticks or trackpad but much more people will complain about motion sickness. The best approach is probably to offer both options to satisfy your users.
Let’s implement teleportation on the Sponza scene in VR.
Headsets without extended controllers
Let’s first address the case of VR headsets that don’t have VR controllers provided with them like the Oculus Rift default package or Mixed Reality base package.
We will mimic the behavior currently available in the Mixed Reality Portal. Using an Xbox gamepad, we will press the Y button to display the teleportation target on the floor and releasing it will teleport you on the targeted area.
To be able to target the floor, we need to send a ray (like a laser beam) in a specific direction (where we will look at) and test if this ray is intersecting with the desired mesh/3d object.
You can see the result in this screenshot:
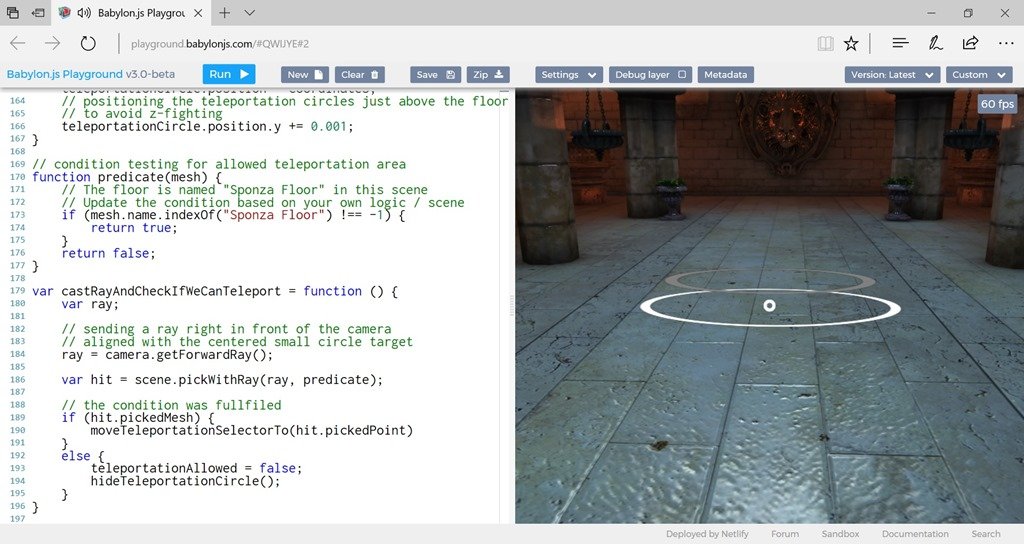
Teleportation using the Xbox gamepad controller and gaze
The middle little white circle is attached to the camera (your head in VR) and is representing the target where you’re looking at (also known as the gaze) as it’s centered. When pressing on Y, we’re displaying 2 circles, a large white one stick on the floor and an animated inner grey one to help the user understanding where he will teleport.
You can read the code or test it: http://playground.babylonjs.com/#E0WY4U#2 to better understand how to reproduce that with your own content.
Here’s the global idea:
– on every frame (thanks to the registerBeforeRender function), we’re sending a ray forward the current camera (where you’re looking at) via the castRayAndCheckIfWeCanTeleport function
– we’re doing the hit testing via the pickWithRay function that uses this generated ray and a predicate function to avoid testing against too many objects. In our case, we’re just checking if the ray is touching the floor (named “Sponza Floor” in this scene).
– If it’s a hit, we’re allowing the teleportation by copy/pasting the coordinates of the intersection between the ray and the floor
– teleporting is then finally just about moving the camera (your virtual head) directly to this point on those specifics X & Z coordinates. Y remains stable when the floor is horizontal as your height doesn’t change, your head is supposed to remain at the same Y over time 😉
You can also test it in a non-VR browser connecting a gamepad or without a gamepad by right clicking with your mouse on the canvas to simulate the Y button of an Xbox controller.
Headsets with extended controllers
Let’s see now the case of VR Headsets with extended controllers: Oculus with Touch controllers, HTC Vive or DayDream.
Rather than pointing the floor using the gaze, we could rather use one of the controller to display a ray from it and pointing into a specific direction using it.
The logic is identical expect that the ray is emitted from one of the controller instead of camera, which was representing your virtual head. We’re also displaying a yellow ray from the controller to help you pointing to the floor thanks to BABYLON.RayHelper.CreateAndShow.
Test and check the resulting sample: http://playground.babylonjs.com/#E0WY4U#3
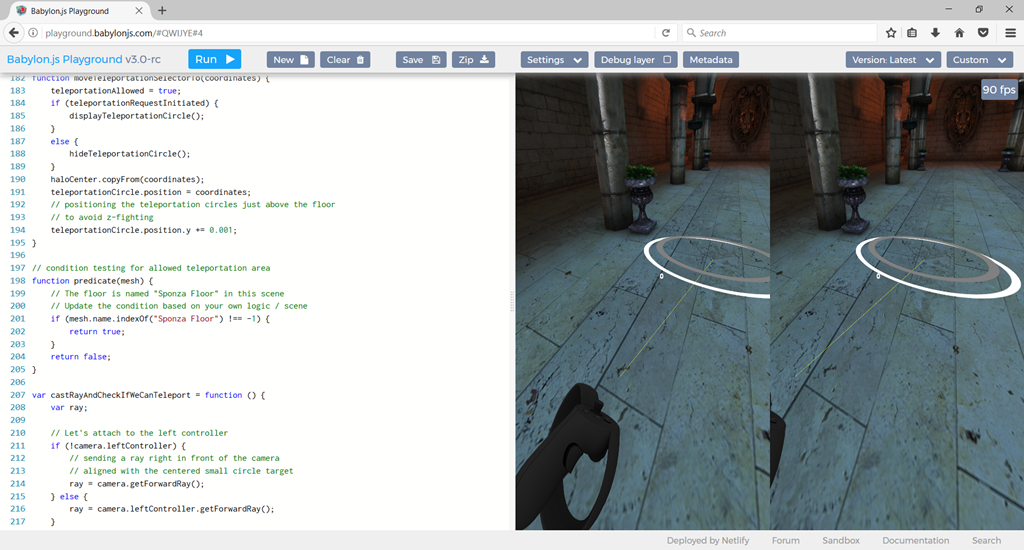
Teleportation using the Oculus Touch controller: a yellow ray is sent from the left controller to select destination
Interaction
Interacting with objects follows the same approach as teleportation.
First, if you don’t have VR controllers, there are several solutions:
– you can use the gaze approach with a gamepad to select an element
– if you don’t have a gamepad (like on smartphone), you can consider using a timing approach on gaze. For instance, let’s say if you’re looking at a specific target for 2s, it will validate an action. You can couple that with some anchors like in the Make Mars Home experiment I’ve shared before.
– you could image using voice recognition via getUserMedia and use predefined orders.
It’s really up to you to decide the behavior you’d like to implement. Technically speaking, it’s just about testing the ray against something else than the floor, with some “pickable” objects you can interact with.
To illustrate that, I’ve built the following sample: http://playground.babylonjs.com/#E0WY4U#4 where I’m inviting you to review the code.
I’ve mixed the previous code we’ve seen to teleport inside Sponza using either the Xbox gamepad, the left VR controller or the right mouse click and the first simple sample using the 4 rotating cubes.
I’ve also added some simple logic that modifies our previous predicate to test also against the cubes and not just the floor. If a cube is currently looked at (using the gaze) or pointed at using the yellow ray sent from the left controller, it will first change from grey to red and will change the text above from “cube #” to “selecting”. After a small amount of time, it will change from red to blue and will change the text from “selecting” to “selected”.
Looking at or pointing outside the cube will revert the changes.
This scene is working cross-platforms:
– if you run it on your smartphone: http://playground.babylonjs.com/frame.html#E0WY4U#4, touch the canvas once loaded and you’ll be able to select the cube just by moving around your smartphone like inside a cardboard experience. We’re using the gaze + timing approach.
– If you run it inside MS Edge with a Mixed Reality headset without controllers, you’ll be able to use the gaze to select a cube and the Y button of the Xbox controller to teleport in the scene looking at the floor.
– If you run it inside an Oculus Rift with Touch or HTC Vive, you’ll be able to use the left controller to select the cube and to point somewhere on the floor to teleport with the main button (X on left controller).
Finally, compiling all we’ve learned in this long tutorial will enable you to build the same experience shared in the very first video with our Mansion VR demonstration.
You can test and read the code here: http://playground.babylonjs.com/#E0WY4U#5
The behavior I’ve decided on this one:
– Run it on a smartphone: http://playground.babylonjs.com/frame.html#E0WY4U#5 and you’ll be only able to look 360 around in front of the Mansion.
– Run it inside a VR/MR Headset without controllers and you’ll be able to teleport using a gamepad with Y and the gaze. If you look at an actionable item (like just above the Mansion entrance), the white circle from the gaze will turn red. Pressing Y will launch the action.
– Run it inside a VR/MR Headset with VR controllers. The left controllers will send a yellow ray to point on the flow to be able to teleport. The ray will turn blue on actionable items and using the main button will launch the action.
Additional resources
With Etienne Margraff and David Catuhe, we’ve done 2 sessions dedicated to WebVR during //BUILD 2017. This tutorial is an extension of those 2 sessions:
– WebVR: Adding VR to your websites and web apps
– Creating immersive experiences on the web, from mobiles to VR devices, with WebVR
If you need help, share what you’ve done, give feedback or request new features:
– Twitter: @babylonjs
– Our forum: http://www.html5gamedevs.com/forum/16-babylonjs/
You’re now ready to build great cross-platforms WebVR content now! ![]()
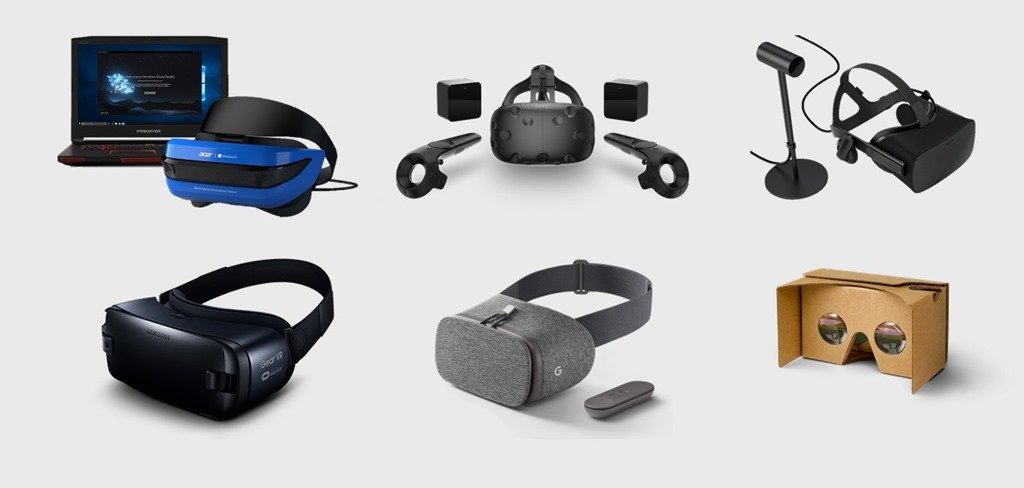


Fantastic post! Thanks for writing about cross-platform WebVR dev! Would love to see Firefox added to the Android side of your support matrix, since it supports it also 😀
Good catch! I’ll update the post to add this. Congrats on Firefox 55, it’s a great browser for WebGL & WebVR.
>>Navigate to the same demo on your smartphone (Windows Mobile 10, iOS or Android) and click the VR button. Moving/rotating your smartphone will rotate the VR camera.
Tried your demo (BTW, it’s a really good work!) in Edge on Lumia 950 (CU) and on desktop (Win10 CU) but VR button isn’t working 🙁 Instead of switching demo to two VR screens, it just changed camera position and view.
hi!
Yes, I know, starting with Win10 CU Mobile, Mobile Edge has shipped the WebVR API but not activated as no VR screen is available. My code is then doing a false positive. To avoid that, we should test for navigator.getVRDisplays and call the promise to check that no headset is available to switch to Device Orientation. I’ll add this logic in helpers I’ll do in babylon.js v3.1
David
Yes this is like totally awesome hey
Hello David,
I tried the sponza sample codes by downloading the files onto my local web server and re-run it against my local web.
It works but the windwos motion controllers are not showing up.
I am getting error downloading the controller assets. I tried to copy to assets to my local web server to no avail.
I posted the question here: http://www.html5gamedevs.com/topic/33682-getting-error-babylonguiadvanceddynamictexture-is-undefined/
If you have the time, please take a look. I would really appreciate it.
Thanks
HoloLite
Hi! I’ve answered on the forum 🙂 thanks for your feedback
Thanks David for the quick turn-around. Yes it worked now! Really appreciated the help.
Hello David:
Impressive post with all the stages and milestones very well identified and explained.
Seeing all this I have a question for you. In order achieve a consistent “one base code-many platforms” development pipeline, always with that base code implemented in HTML/CSS/JS (obviously, as we are using BJS), we´ll need a port to mobile and also desktop world.
First is granted using cordova-phonegap. About desktop version, do you foresee any problem in using Electron?
Best regards.