I’m going to tell you the impact of our recent “success story” around our WebGL open-source gaming framework, babylon.js and its official website: http://www.babylonjs.com. We’ll see how Microsoft Azure helped us to keep our site live! We’re going to see also the various optimizations we’ve put in place to limit as much as possible the output bandwidth from our servers to your browser. I think our recent story could be compared to what a startup could live when its solution suddenly become very successful or popular.
- Introduction
- Step 1: moving to Azure Web Sites & the Autoscale service
- Step 2: moving assets into Azure Blob Storage, enabling CORS, gzip support & CDN
- Step 3: using HTML5 IndexedDB to avoid re-downloading the assets
Introduction
Babylon.js is a personal project we’ve been working on for now 1 year. As it’s a personal (=== our time & money), we’ve hosted the website, textures & 3d scenes on a relatively cheap hosting solution (30€/months) using a small dedicated Windows/IIS machine. The project started in France but was quickly under the radar of several 3D & web specialists around the globe as well as some gaming studios. We were happy about the community’s feedbacks but the traffic on our website wasn’t crazy. And we were completely ok with that! ![]()
For instance, between 01/02/2014 and 30/04/2014, we had an average of 7K+ users/months with an average of 16K+ pages/viewed/months. Some of the events we’ve been speaking at have generated some interesting peaks:

But the experience on the website was still good enough. Loading our scenes wasn’t done at stellar speed but users weren’t complaining that much.
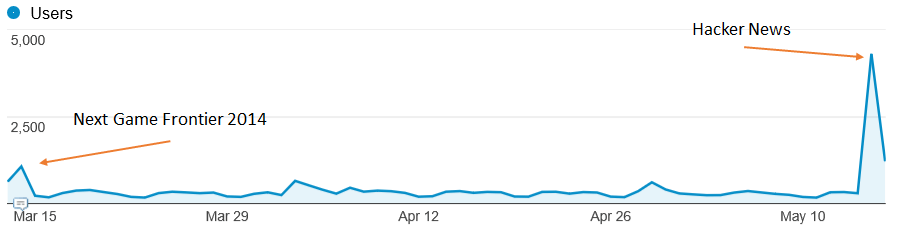
However, recently, a cool guy decided to share our work on Hacker News: https://news.ycombinator.com/item?id=7748413 . We were really happy of such a news! But look at what happened on the site’s connections:

Game over for our little server! It slowly stopped working and the experience for our users was really bad. The IIS server was spending its time serving large static assets & images and the CPU usage was too high. As we were about to launch the Assassin’s Creed Pirates WebGL experience project running on babylon.js, it’s was time to switch to a more scalable professional hosting by using a cloud solution.
But before reviewing our hosting choices, let’s briefly talk about the specifics of our engine & website:
1 – Everything is static on our website. We currently don’t have any server-side code running.
2 – Our scenes (.babylon JSON files) & textures (.png or .jpeg) files could be very big (up to 100 MB). This means that we absolutely needed to activate gzip compression on our “.babylon” scene files. Indeed, in our case, the pricing is going to be indexed a lot on the outgoing bandwidth.
3 – Drawing into the WebGL canvas needs special security checks. You can’t load our scenes & textures from another server without CORS enabled for instance.
Credits: I’d like to special thank Benjamin Talmard, one of our French Azure Technical Evangelist who helped us moving to Azure.
Step 1: moving to Azure Web Sites & the Autoscale service
As we’d like to spend most of our time writing code & features for our engine, we don’t want loosing time on the plumbing. That’s why, we immediately decided to choose a PaaS approach and not a IaaS one.
Moreover, the Visual Studio integration of Azure is just awesome. I can almost do everything from my favorite IDE. And even if babylon.js is hosted on Github, we’re using Visual Studio 2013, TypeScript and Visual Studio Online to code our engine. Azure was then just an evidence for us. And last but not least, if you’ve got a MSDN subscription, you’ve got some benefits: Azure benefit for MSDN subscribers . In our case, we’re lucky enough to have the Ultimate version which means that this covers 115€ of credits/months. I still don’t know why we haven’t done the move before.
Moving to Azure took me approximately 5 min:
1 – I’ve created a new Web Site in the admin page: http://manage.windowsazure.com (could be done inside VS too)
2 – Took the right changeset from our source code repository matching the version that was currently online
3 – Right-click the Web project in the Visual Studio Solution Explorer

4 – Here comes the awesomeness of the tooling. As I was logged into VS using the Microsoft Account bind to my Azure subscription, the wizard let me simply choose the web site on which I’d like to deploy.

No need to worry about complex authentication, connection string or whatever.
“Next, Next, Next & Publish” and a couple of minutes later, at the end of the uploading process of all our assets & files, the web site was up & running!
On the configuration side, we wanted to benefit from the cool autoscale service. It would have helped a lot in our previous Hacker News scenario.
First, your instance has be configured in “Standard” mode in the “Scale” tab.

Then, you can choose up to how many instances you’d like to automatically scale, in which CPU conditions and also on which scheduled times. In our case, we’ve decided to use up to 3 small instances (1 core, 1.75 GB memory) and to auto-spawn a new instance if the CPU goes over 80% of its utilization. We will remove one instance if the CPU drops under 60%. The autoscaling mechanism is always on in our case, we haven’t set some specific scheduled times.

The idea is really to only pay for what you need during specific timeframes and loads. I love the concept. With that, we would have been able to handle previous peaks by doing nothing thanks to this Azure service! This what I call a service.
You’ve got also a quick view on the autoscaling history via the purple chart. In our case, since we’ve moved to Azure, we never went over 1 instance up to now. And we’re going to see below how to minimize the risk into falling into an autoscaling.
To conclude on the web site configuration, we wanted to enable automatic gzip compression on our specific 3d engine resources (.babylon & .babylonmeshdata files). This was critical to us as it could save up to 3x the bandwidth and thus… the price. ![]()
Web Sites are running on IIS. To configure IIS, you need to go into the web.config file. We’re using the following configuration in our case:
<system.webServer>
  <staticContent>
    <mimeMap fileExtension=".dds" mimeType="application/dds" />
    <mimeMap fileExtension=".fx" mimeType="application/fx" />
    <mimeMap fileExtension=".babylon" mimeType="application/babylon" />
    <mimeMap fileExtension=".babylonmeshdata" mimeType="application/babylonmeshdata" />
    <mimeMap fileExtension=".cache" mimeType="text/cache-manifest" />
    <mimeMap fileExtension=".mp4" mimeType="video/mp4" />
  </staticContent>
  <httpCompression>
    <dynamicTypes>
      <clear />
      <add enabled="true" mimeType="text/*"/>
      <add enabled="true" mimeType="message/*"/>
      <add enabled="true" mimeType="application/x-javascript"/>
      <add enabled="true" mimeType="application/javascript"/>
      <add enabled="true" mimeType="application/json"/>
      <add enabled="true" mimeType="application/atom+xml"/>
      <add enabled="true" mimeType="application/atom+xml;charset=utf-8"/>
      <add enabled="true" mimeType="application/babylonmeshdata" />
      <add enabled="true" mimeType="application/babylon"/>
      <add enabled="false" mimeType="*/*"/>
    </dynamicTypes>
    <staticTypes>
      <clear />
      <add enabled="true" mimeType="text/*"/>
      <add enabled="true" mimeType="message/*"/>
      <add enabled="true" mimeType="application/javascript"/>
      <add enabled="true" mimeType="application/atom+xml"/>
      <add enabled="true" mimeType="application/xaml+xml"/>
      <add enabled="true" mimeType="application/json"/>
      <add enabled="true" mimeType="application/babylonmeshdata" />
      <add enabled="true" mimeType="application/babylon"/>
      <add enabled="false" mimeType="*/*"/>
    </staticTypes>
  </httpCompression>
</system.webServer>
This solution is working pretty well and we even noticed that the time to load our scenes has been reduced compared to our previous hoster. I’m guessing this is thanks to the better infrastructure & network used by Azure datacenters.
However, I have been thinking about moving into Azure for a moment now. And my first idea wasn’t to let web sites instances serving my large assets. Since the beginning, I was more interested into storing my assets into the blob storage better designed for that. It would offer us also a possible CDN scenario.
Step 2: moving assets into Azure Blob Storage, enabling CORS, gzip support & CDN
The main interest of using blob storage in our case is to avoid loading the CPU of our web site instances to serve them. If everything is being served via the blob storage except a few html, js & css files, our web site instances will have few chances to autoscale.
But this raises 2 problems to solve:
1 – As the content will be hosted on another domain name, we will fall into the cross-domain security problem. To avoid that, you need to enable CORS on the remote domain (Azure Blob Storage)
2 – Azure Blob Storage doesn’t support automatic gzip compression. And we don’t want to lower the CPU web site usage if in exchange we’re paying 3x time the price because of the increased bandwidth!
Enabling CORS on blob storage
CORS on blob storage is supported since a few months: Windows Azure Storage: Introducing CORS. This article explains how to use Azure APIs to configure CORS. On my side, I was lazy and didn’t want to write a small app to do that. I’ve found one on the web already written ![]()
It’s this one: Cynapta Azure CORS Helper – Free Tool to Manage CORS Rules for Windows Azure Blob Storage
I’ve then just enabled the support for GET and proper headers on my container. To check if everything works as expected, simply open your F12 developer bar and check the console logs:

As you can see, the green log lines imply that everything works well. ![]()
Here is a sample case where it will fails. If you try to load our scenes from our blob storage directly from your localhost machine (or any other domain), you’ll get these errors in the logs:

In conclusion, if you see that your calling domain is not found in the “Access-Control-Allow-Origin” header with an “Access is denied” just after that, it’s because you haven’t set properly your CORS rules. This is very important to control your CORS rules otherwise anyone could use your assets, and thus your bandwidth, and thus your money without letting you know!
Enabling gzip support on our blob storage
As I was telling you before, Azure Blob Storage doesn’t support automatic gzip compression. It seems to be also the case of competitors’ solutions like S3. You’ve got 2 options to workaround that:
1 – gzip yourself the files on the client before uploading, upload it in the blob storage using your classical tools and set the “content-encoding” header to “gzip”. This solution works but only for browsers supporting gzip (is there still a browser not supporting gzip anyway?)
2 – gzip yourself the files on the client & upload 2 versions in the blob storage: one with the default .extension & one with the .extension.gzip for instance. Setup a handler on the IIS side that will catch the HTTP request from the client, check for the header “accept-encoding” set to “gzip” and serve the appropriate files based on this support. You’ll find more details on the code to implement in this article: Serving GZip Compressed Content from the Azure CDN
In our case, I don’t know any browser supporting WebGL and not gzip compression. So if the browser doesn’t support gzip, there’s no real interest in going further as this probably means that WebGL is not supported neither. ![]()
I’ve then chosen the first solution. As we don’t have a lot of scenes and we’re not producing a new one every day, I’m currently using this manual process:
1 – Using 7-zip, I’m compressing the .babylon files on my machine using gzip encoding and “compression level” to “fastest”. The other compression levels seems to generate issues in my tests.
2 – Uploading the file using CloudBerry Explorer for Microsoft Azure Cloud Storage
3 – Manually setting the HTTP header “content-encoding” to “gzip” with CloudBerry

I know what you’re thinking about. Am I going to do that for all my files?!? No, you could work on building a tool or post-build script that would automate that. For instance, here is a little command-line tool I’ve built:
string accountName = "yoda";
string containerName = "wwwbabylonjs";
string accountKey = "yourmagickey";
string sceneTextContent;

// First argument must be the directory into the Azure Blob Container targeted
string directory = args[0];

try
{
StorageCredentials creds = new StorageCredentials(accountName, accountKey);
CloudStorageAccount account = new CloudStorageAccount(creds, useHttps: true);
CloudBlobClient client = account.CreateCloudBlobClient();
CloudBlobContainer blobContainer = client.GetContainerReference(containerName);
blobContainer.CreateIfNotExists();

var sceneDirectory = blobContainer.GetDirectoryReference(directory);

string[] filesArgs = args.Skip(1).ToArray();

foreach (string filespec in filesArgs)
{
    string specdir = Path.GetDirectoryName(filespec);
    string specpart = Path.GetFileName(filespec);

    if (specdir.Length == 0)
    {
        specdir = Environment.CurrentDirectory;
    }
    foreach (string file in Directory.GetFiles(specdir, specpart))
    {
        string path = Path.Combine(specdir, file);
        string sceneName = Path.GetFileName(path);

        Console.WriteLine("Working on " + sceneName + "...");

        CloudBlockBlob blob = sceneDirectory.GetBlockBlobReference(sceneName);
        blob.Properties.ContentEncoding = "gzip";
        blob.Properties.ContentType = "application/babylon";

        sceneTextContent = System.IO.File.ReadAllText(path);

        var bytes = Encoding.UTF8.GetBytes(sceneTextContent);
        using (MemoryStream ms = new MemoryStream())
        {
            using (GZipStream gzip = new GZipStream(ms, CompressionMode.Compress, true))
            {
                gzip.Write(bytes, 0, bytes.Length);
            }
            ms.Position = 0;
            Console.WriteLine("Gzip done.");
            blob.UploadFromStream(ms);
            Console.WriteLine("Uploading in " + accountName + "/" + containerName + "/" + directory + " done.");
        }
    }
}
}
catch (Exception ex)
{
Console.WriteLine(ex);
}
To use it, I could do:
UploadAndGzipFilesToAzureBlobStorage Scenes/Espilit C:BoulotBabylonScenesEspilit*.babylon* to push a scene containing multiple files (our incremental scenes with muliples .babylonmeshdata files)
Or simply
UploadAndGzipFilesToAzureBlobStorage Scenes/Espilit C:BoulotBabylonScenesEspilitEspilit.babylon to push a unique file.
To check that gzip was working as expected using this solution, I’m using Fiddler: http://www.telerik.com/fiddler . Load your content from your client machine and check in the network traces if the content returned is really compressed and can be uncompressed:

Enabling CDN
Once you’ve done the 2 previous steps, you basically need to click on a single button in the Azure administration page to enable CDN and map it to your blob storage:

This is that simple! In my case, I need to simply change the following URL: http://yoda.blob.core.windows.net/wwwbabylonjs/Scenes by http://az612410.vo.msecnd.net/wwwbabylonjs/Scenes. Note that you can customize this CDN domain to your own if you want to.
Thanks to that, we are able to serve you our 3D assets in a very fast way as you’ll be served from one of the node locations listed here: Azure Content Delivery Network (CDN) Node Locations
Our web site is currently hosted on the Northern Europe Azure datacenter. But if you’re coming from Seattle, you’ll ping this server just to download our basic index.html, index.js, index.css files & a couple of screenshots. All the 3D assets will be served from the Seattle node just near you!
Note: All our demos are using the fully optimized experience (blob storage using gzip, CDN & DB caching).
Step 3: using HTML5 IndexedDB to avoid re-downloading the assets
Optimizing loading times and controlling output bandwidth costs is not just about server-side. You can also build some logic client-side to optimize things. Fortunately, we’ve done that since v1.4 of our babylon.js engine. I’ve explained in great details how I’ve implemented the support for IndexedDB in this article: Using IndexedDB to handle your 3D WebGL assets: sharing feedbacks & tips of Babylon.JS and you’ll find how to activate it in babylon.js on our wiki: Caching the resources in IndexedDB
Basically, you just have to create a .babylon.manifest file matching the name of the .babylon scene, set what you’d like to cache (textures and/or JSON scene) and that’s all.
For instance, check what’s going on with the Hill Valley demo scene. First time you’re loading it, here are the requests sent:

153 items and 43.33 MB received. But if you’ve accepted to let babylonjs.com to “use additional storage on your computer”, here is what you’ll see the second time you’ll load the same scene:

1 item and 348 bytes! We’re just checking if the manifest file has changed. If not, we’re loading everything from the DB and we’re saving 43+ MB of bandwidth.
For instance, this approach is being used in the Assassin’s Creed Pirates games:

Thank to that:
– the game launches almost immediately once it has been loaded once as the assets are served directly from the local DB
– your web storage is less stressed, less bandwidth are used and then this costs you less money!
Everybody should be happy! ![]()
Excellent article, thank you for all the detailed information. We are planning a migration to Azure in the next 12 months and this post will definitely come in handy. Thanks again!
Awesome stuff! Thanks for sharing.
Thanks for the detailed explanation, I'm gonna transfer my site to Azure too!
How about using OpenDGC (github.com/…/Open-3D-Graphics-Compression) to compress 3D meshes and animations?
Great pointer Khaled! Thanks for pointing this out. Will definitely have a look to that.
This is very valuable stuff. Thank you!