We’ve seen in the previous article how to animate our sprites using EaselJS: HTML5 Gaming: animating sprites in Canvas with EaselJS
We’re now going to see how to create some of our game objects like ennemies and our platformer hero. We will also see how to implement a simple collision mechanism between them.
You’ll find a live working sample at the end of this article. It’s the base of a simple game.
This article is the 2nd of a series of 3:
– HTML5 Gaming: animating sprites in Canvas with EaselJS
– HTML5 Gaming: building the core objects & handling collisions with EaselJS
– HTML5 Platformer: the complete port of the XNA game to <canvas> with EaselJS
Building the Monster object
A monster object has 2 states:
1 – Running along all the width of the screen
2 – Being idle once one of the side is reached during a certain amount of time before running again
It’s very stupid. But if you touch it, you’re dead. This time I’ve merged the sprites coming from the XNA Platformer sample defining the running & the idle sequence inside a unique PNG file. For instance, here is the PNG file for MonsterC:
![]()
Our Monster object is defined inside Monster.js and takes the BitmapAnimation object as its prototype which has to be used indeed for such scenarios. It contains everything we need: a tick() method, some hit testing mechanism for our collisions and a way to handle our sprites into several animations.
We just need to add some specific logic of our monster like the timing part to handle the idle state and we’re done. Here is the code of our Monster.js file defining our enemies object:
(function (window) {
    function Monster(monsterName, imgMonster, x_end) {
        this.initialize(monsterName, imgMonster, x_end);
    }
    Monster.prototype = new createjs.BitmapAnimation();

    // public properties:
    Monster.prototype.IDLEWAITTIME = 40;
    Monster.prototype.bounds = 0; //visual radial size
    Monster.prototype.hit = 0;     //average radial disparity

    // constructor:
    Monster.prototype.BitmapAnimation_initialize = Monster.prototype.initialize; //unique to avoid overiding base class

    // variable members to handle the idle state
    // and the time to wait before walking again
    this.isInIdleMode = false;
    this.idleWaitTicker = 0;

    var quaterFrameSize;

    Monster.prototype.initialize = function (monsterName, imgMonster, x_end) {
        var localSpriteSheet = new createjs.SpriteSheet({
            images: [imgMonster], //image to use
            frames: {width: 64, height: 64, regX: 32, regY: 32},
            animations: {
                walk: [0, 9, "walk", 4],
                idle: [10, 20, "idle", 4]
            }
        });

        createjs.SpriteSheetUtils.addFlippedFrames(localSpriteSheet, true, false, false);

        this.BitmapAnimation_initialize(localSpriteSheet);
        this.x_end = x_end;

        quaterFrameSize = this.spriteSheet.getFrame(0).rect.width / 4;

        // start playing the first sequence:
        this.gotoAndPlay("walk_h");     //animate

        // set up a shadow. Note that shadows are ridiculously expensive. You could display hundreds
        // of animated monster if you disabled the shadow.
        this.shadow = new createjs.Shadow("#000", 3, 2, 2);

        this.name = monsterName;
        // 1 = right & -1 = left
        this.direction = 1;
        // velocity
        this.vX = 1;
        this.vY = 0;
        // starting directly at the first frame of the walk_h sequence
        this.currentFrame = 21;
    }

    Monster.prototype.tick = function () {
        if (!this.isInIdleMode) {
            // Moving the sprite based on the direction & the speed
            this.x += this.vX * this.direction;
            this.y += this.vY * this.direction;

            // Hit testing the screen width, otherwise our sprite would disappear
            if (this.x >= this.x_end - (quaterFrameSize + 1) || this.x < (quaterFrameSize + 1)) {
                this.gotoAndPlay("idle");
                this.idleWaitTicker = this.IDLEWAITTIME;
                this.isInIdleMode = true;
            }
        }
        else {
            this.idleWaitTicker--;

            if (this.idleWaitTicker == 0) {
                this.isInIdleMode = false;

                // Hit testing the screen width, otherwise our sprite would disappear
                if (this.x >= this.x_end - (quaterFrameSize + 1)) {
                    // We've reached the right side of our screen
                    // We need to walk left now to go back to our initial position
                    this.direction = -1;
                    this.gotoAndPlay("walk");
                }

                if (this.x < (quaterFrameSize + 1)) {
                    // We've reached the left side of our screen
                    // We need to walk right now
                    this.direction = 1;
                    this.gotoAndPlay("walk_h");
                }
            }
        }
    }

    Monster.prototype.hitPoint = function (tX, tY) {
        return this.hitRadius(tX, tY, 0);
    }

    Monster.prototype.hitRadius = function (tX, tY, tHit) {
        //early returns speed it up
        if (tX - tHit > this.x + this.hit) { return; }
        if (tX + tHit < this.x - this.hit) { return; }
        if (tY - tHit > this.y + this.hit) { return; }
        if (tY + tHit < this.y - this.hit) { return; }

        //now do the circle distance test
        return this.hit + tHit > Math.sqrt(Math.pow(Math.abs(this.x - tX), 2) + Math.pow(Math.abs(this.y - tY), 2));
    }

    window.Monster = Monster;
} (window));
The collision part is handled via the hitPoint() and hitRadius() functions. The hit testing is done via circle which is a bit less accurate than a boxing mode.
Building the Player object
The logic of the player object is a bit different than the monsters. The x & y position are normally controlled by the user moving the character with the keyboard. Our hero has more animations than the monsters as he can die, jump, move, celebrate and be in the idle mode.
Here is the PNG associated to him:

In this tutorial, we’ll keep it simple. We will only handle the walk, idle & die sequence. Still, let’s load all the animations for a future potential usage. Here is the code available in the Player.js file. Reading the code and its comments should provide enough details:
(function (window) {
    function Player(imgPlayer, x_start, x_end) {
        this.initialize(imgPlayer, x_start, x_end);
    }
    Player.prototype = new createjs.BitmapAnimation();

    // public properties:
    Player.prototype.bounds = 0;
    Player.prototype.hit = 0;
    Player.prototype.alive = true;

    // constructor:
    Player.prototype.BitmapAnimation_initialize = Player.prototype.initialize; //unique to avoid overiding base class

    var quaterFrameSize;

    Player.prototype.initialize = function (imgPlayer, x_end) {
        var localSpriteSheet = new createjs.SpriteSheet({
            images: [imgPlayer], //image to use
            frames: { width:64, height:64, regX:32, regY: 32 },
            animations: {
                walk: [0, 9, "walk", 4],
                die: [10, 21, false, 4],
                jump: [22, 32],
                celebrate: [33, 43],
                idle: [44, 44]
            }
        });

        createjs.SpriteSheetUtils.addFlippedFrames(localSpriteSheet, true, false, false);

        this.BitmapAnimation_initialize(localSpriteSheet);
        this.x_end = x_end;

        quaterFrameSize = this.spriteSheet.getFrame(0).rect.width / 4;

        // start playing the first sequence:
        this.gotoAndPlay("idle");     //animate
        this.isInIdleMode = true;

        // set up a shadow. Note that shadows are ridiculously expensive. You could display hundreds
        // of animated monster if you disabled the shadow.
        this.shadow = new createjs.Shadow("#000", 3, 2, 2);
        this.name = "Hero";
        // 1 = right & -1 = left
        this.direction = 1;

        // velocity
        this.vX = 1;
        this.vY = 0;
        // starting directly at the first frame of the walk_h sequence
        this.currentFrame = 66;

        //Size of the Bounds for the collision's tests
        this.bounds = 28;
        this.hit = this.bounds;
    }

    Player.prototype.tick = function () {
        if (this.alive && !this.isInIdleMode) {
            // Hit testing the screen width, otherwise our sprite would disappear
            // The player is blocked at each side but we keep the walk_right or walk_animation running
            if ((this.x + this.direction > quaterFrameSize) && (this.x + (this.direction * 2) < this.x_end - quaterFrameSize + 1)) {
                // Moving the sprite based on the direction & the speed
                this.x += this.vX * this.direction;
                this.y += this.vY * this.direction;
            }
        }
    }

    window.Player = Player;
} (window));
The player will be remotely controlled into the main page.
Building the Content Manager object
Usually, the first step of a HTML5 game is to download all the needed resources before starting the game. In my case, you’ll find a very basic ContentManager available in the ContentManager.js file.
Note: the CreateJS suite now expose a library named PreloadJS that is far more advanced that the basic method exposed below.
Here is the code:
// Used to download all needed resources from our
// webserver
function ContentManager() {
    // Method called back once all elements
    // have been downloaded
    var ondownloadcompleted;
    // Number of elements to download
    var NUM_ELEMENTS_TO_DOWNLOAD = 15;

    // setting the callback method
    this.SetDownloadCompleted = function (callbackMethod) {
        ondownloadcompleted = callbackMethod;
    };

    // We have 4 type of enemies, 1 hero & 1 type of tile
    this.imgMonsterA = new Image();
    this.imgMonsterB = new Image();
    this.imgMonsterC = new Image();
    this.imgMonsterD = new Image();
    this.imgTile = new Image();
    this.imgPlayer = new Image();

    // the background can be created with 3 different layers
    // those 3 layers exist in 3 versions
    this.imgBackgroundLayers = new Array();
    var numImagesLoaded = 0;

    // public method to launch the download process
    this.StartDownload = function () {
        SetDownloadParameters(this.imgPlayer, "img/Player.png", handleImageLoad, handleImageError);
        SetDownloadParameters(this.imgMonsterA, "img/MonsterA.png", handleImageLoad, handleImageError);
        SetDownloadParameters(this.imgMonsterB, "img/MonsterB.png", handleImageLoad, handleImageError);
        SetDownloadParameters(this.imgMonsterC, "img/MonsterC.png", handleImageLoad, handleImageError);
        SetDownloadParameters(this.imgMonsterD, "img/MonsterD.png", handleImageLoad, handleImageError);
        SetDownloadParameters(this.imgTile, "img/Tiles/BlockA0.png", handleImageLoad, handleImageError);

        // download the 3 layers * 3 versions
        for (var i = 0; i < 3; i++) {
            this.imgBackgroundLayers[i] = new Array();
            for (var j = 0; j < 3; j++) {
                this.imgBackgroundLayers[i][j] = new Image();
                SetDownloadParameters(this.imgBackgroundLayers[i][j], "img/Backgrounds/Layer" + i
                                      + "_" + j + ".png", handleImageLoad, handleImageError);
            }
        }
    }

    function SetDownloadParameters(imgElement, url, loadedHandler, errorHandler) {
        imgElement.src = url;
        imgElement.onload = loadedHandler;
        imgElement.onerror = errorHandler;
    }

    // our global handler
    function handleImageLoad(e) {
        numImagesLoaded++

        // If all elements have been downloaded
        if (numImagesLoaded == NUM_ELEMENTS_TO_DOWNLOAD) {
            numImagesLoaded = 0;
            // we're calling back the method set by SetDownloadCompleted
            ondownloadcompleted();
        }
    }

    //called if there is an error loading the image (usually due to a 404)
    function handleImageError(e) {
        console.log("Error Loading Image : " + e.target.src);
    }
}
It lacks several things to be a good content manager: a download progress indicator, a better error handler, localStorage usage, a more generic code, etc. But I’ve tried to build a basic & easy to understand game. ![]()
Setting up all the pieces inside the main page
Now that we have the core parts of our game, we can start to use them to build a very basic platformer game. Let’s review each part of our main page hosting our game. In the init() method, we’re creating the stage and we’re using the ContentManager object to download our PNG files:
function init() {
    //find canvas and load images, wait for last image to load
    canvas = document.getElementById("testCanvas");

    // create a new stage and point it at our canvas:
    stage = new createjs.Stage(canvas);
    // grab canvas width and height for later calculations:
    screen_width = canvas.width;
    screen_height = canvas.height;

    contentManager = new ContentManager();
    contentManager.SetDownloadCompleted(startGame);
    contentManager.StartDownload();
}
Once done, the startGame() function is called. It first uses the CreateAndAddRandomBackground() function which create a random background based on 3 different layers. Then, it creates our Hero and set its Y position in a random place. Just under the hero, we’re building a very basic platform where our hero will be able to walk on to. Finally, we’re building 4 Monster() objects inside the Monsters array and we add them also to the stage.
function startGame() {
    // Random number to set the Y position
    // of our Hero & Enemies
    var randomY;

    CreateAndAddRandomBackground();

    // Our hero can be moved with the arrow keys (left, right)
    document.onkeydown = handleKeyDown;
    document.onkeyup = handleKeyUp;

    // Creating the Hero
    randomY = 32 + (Math.floor(Math.random() * 7) * 64);
    Hero = new Player(contentManager.imgPlayer, screen_width);
    Hero.x = 400;
    Hero.y = randomY;

    //Tile where the hero & the ennemies will be able to walk on to
    bmpSeqTile = new createjs.Bitmap(contentManager.imgTile);
    bmpSeqTile.regX = bmpSeqTile.frameWidth / 2 | 0;
    bmpSeqTile.regY = bmpSeqTile.frameHeight / 2 | 0;

    // Taking the same tile all over the width of the game
    for (var i = 0; i < 20; i++) {
        // clone the original tile, so we don't need to set shared properties:
        var bmpSeqTileCloned = bmpSeqTile.clone();

        // set display properties:
        bmpSeqTileCloned.x = 0 + (i * 40);
        bmpSeqTileCloned.y = randomY + 32;

        // add to the display list:
        stage.addChild(bmpSeqTileCloned);
    }

    // Our Monsters collection
    Monsters = new Array();

    // Creating the first type of monster
    randomY = 32 + (Math.floor(Math.random() * 7) * 64);
    Monsters[0] = new Monster("MonsterA", contentManager.imgMonsterA, screen_width);
    Monsters[0].x = 20;
    Monsters[0].y = randomY;

    // Creating the second type of monster
    randomY = 32 + (Math.floor(Math.random() * 7) * 64);
    Monsters[1] = new Monster("MonsterB", contentManager.imgMonsterB, screen_width);
    Monsters[1].x = 750;
    Monsters[1].y = randomY;

    // Creating the third type of monster
    randomY = 32 + (Math.floor(Math.random() * 7) * 64);
    Monsters[2] = new Monster("MonsterC", contentManager.imgMonsterC, screen_width);
    Monsters[2].x = 100;
    Monsters[2].y = randomY;

    // Creating the forth type of monster
    randomY = 32 + (Math.floor(Math.random() * 7) * 64);
    Monsters[3] = new Monster("MonsterD", contentManager.imgMonsterD, screen_width);
    Monsters[3].x = 650;
    Monsters[3].y = randomY;

    // Adding all the monsters to the stage
    for (var i=0; i<Monsters.length;i++){
        stage.addChild(Monsters[i]);
    }
    stage.addChild(Hero);

    // we want to do some work before we update the canvas,
    // otherwise we could use Ticker.addListener(stage);
    createjs.Ticker.addListener(window);
    // Best Framerate targeted (60 FPS)
    createjs.Ticker.useRAF = true;
    createjs.Ticker.setFPS(60);
}
And the end, there are 2 obvious keyboard handler that simply play the walk_left or walk_right animation of our hero based on the arrows keys. And finally, the core logic of our game is contained in a few line of code inside the tick() method of course:
function tick() {
    // looping inside the Monsters collection
    for (monster in Monsters) {
        var m = Monsters[monster];
        // Calling explicitly each tick method
        // to launch the update logic of each monster
        m.tick();

        // If the Hero is still alive and if he's too near
        // from one of the monster...
        if (Hero.alive && m.hitRadius(Hero.x, Hero.y, Hero.hit)) {
            //...he must die unfortunately!
            Hero.alive = false;

            // Playing the proper animation based on
            // the current direction of our hero
            if (Hero.direction == 1) {
                Hero.gotoAndPlay("die_h");
            }
            else {
                Hero.gotoAndPlay("die");
            }

            continue;
        }
    }

    // Update logic of the hero
    Hero.tick();

    // update the stage:
    stage.update();
}
We’re just checking during each tick if one of the monsters is not currently hitting our hero based on their collision parameters. If one monster is too near of our hero, our poor hero must die.
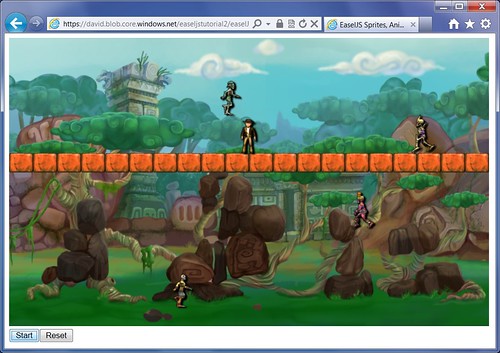
Play with the live sample
You can now play with the live sample just below. Every time you’ll press the start button a new background will be generated and each character (enemies & hero) will be placed at a different position. You can also move right or left using the keyboard. By the way, don’t panic. As you can’t jump, there is currently no way to win in this game. This is a 100% looser game (first of genre?). ![]()
Note: as there is no progress bar, you need to wait a bit before playing after pressing the “Start” button.
You can play it also via this link: easelJSCoreObjectsAndCollision
Next part will be to handle the jump sequence using a simple physics engine, loading the music & sound effects and finally loading the levels. But the core is here if you’d like to create your own simple game, you now have all the cards in your hand! ![]()
But if you’d like to review the full game with all its source code, jump to the next article : HTML5 Platformer: the complete port of the XNA game to <canvas> with EaselJS
David
Note : this tutorial has originally been written for EaselJS 0.3.2 in July 2010 and has been updated for EaselJS 0.6 on 04/03/2013. For those of you who read the version 0.3.2, here are the main changes for this tutorial to be aware of:
- BitmapSequence is not available anymore in 0.4 and has been replaced by BitmapAnimation
- You can now slow down the animation loop of the sprites natively while building the SpriteSheet object
- EaselJS 0.4 can now use requestAnimationFrame for more efficient animations on supported browsers (like IE10+, Firefox 4.0+ & Chrome via the appropriate vendors’ prefixes).
- You have to explicitly call the tick() method of each object in a global handler rather than having a global Ticker automatically calling your tick implementation.
- Since EaselJS 0.4.2 and in 0.5, you need to add the createjs namespace before every EaselJS objects by default. Otherwise, simply affect the createjs namespace to the window object.
Brilliant thanks! Can't wait for the next installment.
Cool, very easy to understand
great tutorial!
Monster.prototype.BitmapAnimation_initialize = Monster.prototype.initialize; //unique to avoid overiding base
Could you possibly explain this line a little more?
Hi pau1,
It is just to save the original constructor of BitmapAnimation object to be able to call it later on. Otherwise, it would be overriden.
Bye,
David
Another great job.
For some reason the demo does not work on my iPad with iOS 5.1.1 (though some other EaselJS demos around the web does work). Any ideas?
Hi Lorenzo,
I've updated the turorials & samples to EaselJS 0.5. They should now work again on iPads.
Bye,
David
I don't play it. Do you give me code?
Not sure why, but the demo is not working for me. I am trying from my ipad 2.0
Ho !!!… tick function are so bad now… must parse all arrays for tick function… so loos time and performance…
marvelouse
For those of you still checking out this tutorial but trying to use EaselJs v.0.8.1:
github.com/…/HTML5-Game-Tutorial-by-David-Rousset-P2-Easeljs-v.0.8.1.git