This tutorial will introduce some of the new Silverlight 4 features in order to enhance the default “Silverlight Business Template” that comes with WCF RIA Services. We’re then going to see how to modify the server & the client parts in order to let you add an avatar (profile’s picture) during the login process. This picture will come either from the disk, via drag’n’drop or via the Webcam. You can see the result in action in the video at the end of this article.
Pour les lecteurs Français, vous pouvez retrouver une version française ici.
Updated in June 2010 for Silverlight 4 RTW and WCF RIA Services RTW
Tutorial’s objectives
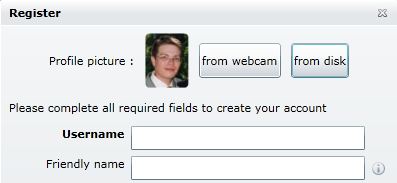
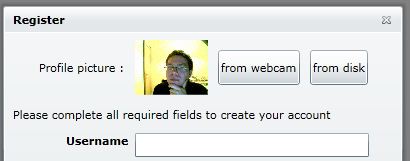
Once the tutorial done, you should be able to use the 2 screens below. During the registration process, here is the new suggested screen:
 |
|
Figure 1 – the new registration screen |
Once logged in, the provided picture will be shown in the login status area:
 |
|
Figure 2 – the new login status control |
Thus, we need to work on 2 parts:
1 – By modifying the server part like the RegistrationData & User classes to add support for the picture that will be sent back through the network by the Silverlight client.
2 – By modifying the Silverlight client part itself on 2 different levels:
a – the LoginStatus control that will display the avatar picture once logged in
b – the RegistrationForm control will accept 3 different ways to provide the picture: from the disk via the OpenFileDialog API, via drag’n’drop or by using the Webcam.
If you’re too curious (and/or lazy), you can check out the final result at the end of this post. I’ll show you through a video the final project and you’ll be able to download the complete source code.
Prerequisites : you’ll need Visual Studio 2010 RTM, Silverlight 4 Tools RTW & WCF RIA Services RTW in order to follow this tutorial or load the final project. You can find all the needed resources here: http://silverlight.net/getstarted/silverlight-4/#tools
Step 1: Modifying the server’s logic
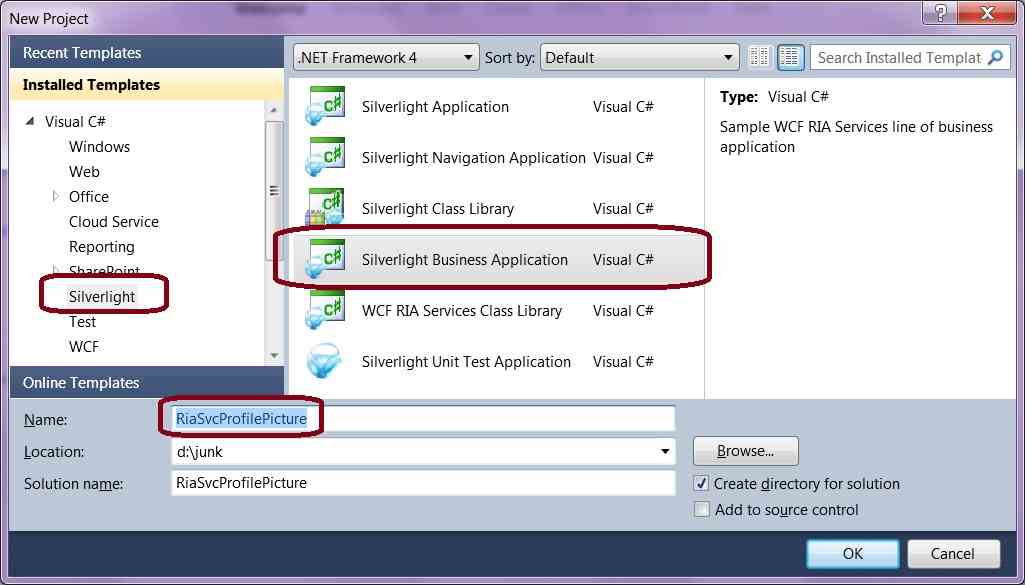
1. Start Visual Studio 2010. Under the Silverlight part, create a new project of type “Silverlight Business Application”. Name it “RiaSvcProfilePicture”
Here is the global logic we’re going to work on. First, we’ll add a new property to the user’s profile that will contain his avatar’s URL. This property will be used by Silverlight to display the avatar inside the new login control (Figure 2). This URL will be made by the ASP.NET layer when it will receive the image thanks to WCF RIA Services.
In order to let Silverlight sending back an image through the network using WCF RIA Services, we’re going to use a bytes array as the serialization type. Let’s implement that now.
2. Let’s start by the simplest task : create a new directory on the root of the RiaSvcProfilePicture.Web project and name it UserPictures. This is where we will store the user’s avatars pictures.
3. Navigate to the RegistrationData.cs class and add this new property just under the Answer one:
[Display(AutoGenerateField=false)]
public byte[] ProfilePicture { get; set; }
RegistrationData is a type that will be automatically recreated on the Silverlight side by RIA Service as it’s used for instance by this method:
public void CreateUser(RegistrationData user)
inside the UserRegistrationService class marked with the [EnableClientAccess] attribute.
In summary, thanks to this piece of code, we will have a new property on the client side where we will be able to store our picture as a bytes array.
4. Navigate to the User.cs class and add this new property:
[DataMember]
public string PictureURL { get; set; }
User is a type used inside the AuthenticationService class also marked with the magical attribute. We will then also have access to this property on the Silverlight client side.
In order to let the current ASP.NET Membership Provider architecture automatically persisting this new information, you need to go inside the web.config file and localize this area:
<profile>
  <properties>
    <add name="FriendlyName"/>
  </properties>
</profile>
Just add this piece of XML:
<add name="PictureURL"/>
5. Now that we have defined the required types, let’s work on the methods that will work on them. The goal is to retrieve the ProfilePicture property of the RegistrationData class that will be sent back and write it down on the file system. Once done, we will need to generate the corresponding URL of this fresh file. This job is accomplished by the 2 following methods. Add them inside the UserRegistrationService class:
private Uri GetPictureUrl(byte[] imageToSave, string userName)
{
    Uri pictureUrl;

    if (imageToSave == null)
    {
        pictureUrl = ConstructUri("UserPictures/default.jpg");
    }
    else
    {
        try
        {
            string path = HttpContext.Current.Server.MapPath("~/UserPictures");
            string filePath = path + "/" + userName + ".jpg";
            FileStream pictureStream = new FileStream(filePath, FileMode.Create);

            pictureStream.Write(imageToSave, 0, imageToSave.Length);
            pictureStream.Close();

            pictureUrl = ConstructUri("UserPictures/" + userName + ".jpg");
        }
        catch (Exception ex)
        {
            pictureUrl = ConstructUri("UserPictures/default.jpg");
        }
    }

    return pictureUrl;
}

private static Uri ConstructUri(string path)
{
    return new Uri(GenerateUrl(path));
}

private static string GenerateUrl(string suffix)
{
    Uri currentHost = new Uri("http://" + HttpContext.Current.Request.Headers["Host"]);
    return new Uri(currentHost, suffix).ToString();
}
You’ll need this 2 using lines also:
using System.Web;
using System.IO;
By reading the code, you can see that the path will be made of the UserPictures directory followed by username.jpg or default.jpg in case of an excepetion or if the user hasn’t provided a custom avatar. Thus, you’ll need to add a default image named default.jpg inside the UserPictures directory. In my case, I’m using the following one:

You can download it if you want to. It originally comes from the experimentations I’ve done with ActiveDirectory.Show which was based on the Family.Show Vertigo’s sample.
To conclude this first step, we need to persist somewhere this generated URL inside the user’s profile. To do that, navigate to the CreateUser() method. Just under this line of code:
profile.SetPropertyValue("FriendlyName", user.FriendlyName);
Simply add those one:
Uri pictureUrl = GetPictureUrl(user.ProfilePicture, user.UserName);
profile.SetPropertyValue("PictureURL", pictureUrl.AbsoluteUri);
And voilà! The server’s side modifications are done. We will now exclusively work on the Silverlight part.
Step 2: Modifying the LoginStatus control
For this tutorial, all the interesting screens are located under “ViewsLogin”
1. Once more, let’s start by the simplest task, the LoginStatus.xaml control. Under this XAML line:
<TextBlock x:Name="welcomeText" Style="{StaticResource WelcomeTextStyle}"/>
Add this piece of XAML:
<Image x:Name="welcomeImage" Margin="10,0,0,0" Height="55"/>
It’s the Image control that will display our future avatar like shown in figure 2.
2. We need now to increase the current defined height where our login status control lives. Indeed, we currently not have enough space to display properly our avatars. For that, let’s slightly modify the current style applied. Navigate to the Styles.xaml file under the Assets directory. Localize the LoginContainerStyle style and modify the height property from 21 to 55:
<Setter Property="Height" Value="55"/>
Let’s also modify the WelcomeTextStyle style by modifying the VerticalAlignment property value to Center:
<Setter Property="VerticalAlignment" Value="Center"/>
At last, you’ll need to modify the Margin property of the ContentBorderStyle style to change the height from 62 to 96:
<Setter Property="Margin" Value="0,96,0,0"/>
3. To fill the image control, add inside the LoginStatus constructor method, just after this line of code:
this.welcomeText.SetBinding(TextBlock.TextProperty,
  WebContext.Current.CreateOneWayBinding("User.DisplayName",
  new StringFormatValueConverter(ApplicationStrings.WelcomeMessage)));
This new line of code:
this.welcomeImage.SetBinding(Image.SourceProperty,
  WebContext.Current.CreateOneWayBinding("User.PictureURL"));
Once you’ve done that, you can already test that our application starts to work as expected. Launch it, click on the login link, click on the “Register now” link and finally fill all the fields respecting all the validation rules. You should then be redirected to this page:

Indeed, as we can’t provide a custom picture yet, the server side logic took the default.jpg picture as the avatar. This is the expected behavior.
Step 3: Modifying the RegistrationForm control to get an image from the disk
1. Take the default.jpg picture from the server part and copy it inside the Assets folder of the Silverlight project.
2. Navigate to the RegistrationForm.xaml XAML file and replace the local:BusyIndicator content by this one:
<local:BusyIndicator x:Name="busyIndicator"
         BusyContent="{Binding Path=ApplicationStrings.BusyIndicatorRegisteringUser, Source={StaticResource ResourceWrapper}}"
         IsBusy="{Binding IsRegistering}">
    <StackPanel>
        <StackPanel Orientation="Horizontal" HorizontalAlignment="Center"
            VerticalAlignment="Center">
            <TextBlock Text="Profile picture :" VerticalAlignment="Center"/>
            <Image x:Name="ImageProfileControl" Source="../../Assets/default.jpg"
            Height="55" Margin="10,0,0,0" />
            <Button x:Name="btnWebCam" Content="from webcam" Margin="10" />
            <Button x:Name="btnDisk" Content="from disk" Margin="0,10" />
        </StackPanel>
        <Line Margin="5" />
        <local:CustomDataForm x:Name="registerForm"
                            CurrentItem="{Binding}"
                            IsEnabled="{Binding IsRegistering, Converter={StaticResource NotOperatorValueConverter}}"
                            AutoEdit="True" CommandButtonsVisibility="None"
                            Header="{Binding Path=ApplicationStrings.RegistrationFormHeader, Source={StaticResource ResourceWrapper}}"
                            AutoGeneratingField="RegisterForm_AutoGeneratingField"
                            Style="{StaticResource DataFormStyle}" />
    </StackPanel>
</local:BusyIndicator>
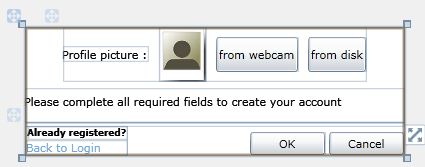
Under Visual Studio, the surface designer should then display something like that:
3. Go to the behind C# code and add these private members:
// bool used to indicate if the user wants to use the default 'default.jpg'
// profile picture or not
private bool UseDefaultProfilePicture = true;
// stream cache element to send the appropriate
// bytes[] back to the server
private Stream lastStreamProfilePicture = null;
Don’t forget to add this little using for the Stream type:
using System.IO;
Then, add this event handler that will be used by the “from disk” button’s click:
// Getting a profile picture directly from the disk
private void btnDisk_Click(object sender, RoutedEventArgs e)
{
    Stream profileImageStream = null;
    OpenFileDialog openWindow = new OpenFileDialog();
    openWindow.Filter = "Jpeg image files (*.jpg)|*.jpg|All files (*.*)|*.*";
    if (openWindow.ShowDialog() == true)
    {
        FileInfo targetFile = openWindow.File;
        profileImageStream = targetFile.OpenRead();
        // Saving a copy of the image's stream provided for future byte[] generation
        lastStreamProfilePicture = profileImageStream;

        System.Windows.Media.Imaging.BitmapImage image =
           new System.Windows.Media.Imaging.BitmapImage();
        image.SetSource(profileImageStream);

        // Filling the XAML image control
        ImageProfileControl.Source = image;
        UseDefaultProfilePicture = false;
    }
}
Finally, associate this method to the click event handler of the button on the XAML side:
<Button x:Name="btnDisk" Content="from disk" Margin="0,10" Click="btnDisk_Click" />
4. Before putting our image into the this.registrationData object that will be sent back through WCF RIA Services to our server layer, we need to add a small additional procedure. We just need a method that will return an array of bytes from the stream object we’ve put in the memory cache. Here it is:
private byte[] GetPictureAsBytes()
{
    if (lastStreamProfilePicture != null)
    {
        byte[] binaryData = new Byte[lastStreamProfilePicture.Length];
        lastStreamProfilePicture.Seek(0, SeekOrigin.Begin);
        long bytesRead = lastStreamProfilePicture.Read(binaryData, 0,
               (int)lastStreamProfilePicture.Length);
        return binaryData;
    }

    return null;
}
5. Last thing is to fill the object that will be sent back to the server layer. For that, navigate to the RegisterButton_Click method and add the following code:
// if the user has provided his own picture
// (via webcam, file access or drag'n'drop)
if (!UseDefaultProfilePicture)
{
    // Getting the picture as bytes
    byte[] profilePictureAsBytes = GetPictureAsBytes();

    // Pushing the result into the registrationData's
    // ProfilePicture member that will be sent back
    // automatically by Ria Services during the SubmitChanges op
    if (profilePictureAsBytes != null)
        this.registrationData.ProfilePicture = profilePictureAsBytes;

}
Just before this line of code:
this.registrationData.CurrentOperation = this.userRegistrationContext.CreateUser(
    this.registrationData,
    this.registrationData.Password,
    this.RegistrationOperation_Completed, null);
You can now test again if the application works fine. Launch it, create a new user and choose a picture by clicking on the “from disk” button. Logically, you should obtain this kind of result (but probably with a different image ;-)):

Step 4: Modifying the RegistrationForm control to get an image via drag’n’drop
Up to now, all the code we’ve done could have been written against Silverlight 3. Let’s then start by using one of the new features of the 4th version: the native drag’n’drop support of elements. The user will then be able to provide his avatar’s picture via a simple drag’n’drop operation.
1. Here is the method we’re going to call when the user will drop an image on the form:
private void StackPanel_Drop(object sender, DragEventArgs e)
{
    // Get FileInfo array from DragEventArgs
    IDataObject dataObject = e.Data;
    var files = (FileInfo[])dataObject.GetData(DataFormats.FileDrop);

    // taking arbitrary the first file of the dropped files collection
    FileInfo file = files[0];

    if (file != null && IsImageFile(file.Extension))
    {
        Stream stream = file.OpenRead();
        string name = file.Name;

        // Saving a copy of the image's stream provided for future byte[] generation
        lastStreamProfilePicture = stream;

        BitmapImage droppedImage = new BitmapImage();
        droppedImage.SetSource(stream);

        ImageProfileControl.Source = droppedImage;
        UseDefaultProfilePicture = false;
    }
}
This StackPanel_Drop method needs this one:
// Checking if image is in JPG format
private bool IsImageFile(string extension)
{
    return (extension.Equals(".jpg", StringComparison.InvariantCultureIgnoreCase)
        || extension.Equals(".jpeg", StringComparison.InvariantCultureIgnoreCase));
}
Its only goal is to check if the dropped files extensions are of type “.jpg” or “.jpeg”. This is a first basic check easy to do.
2. Well, next step is now to decide who is going to listen the drop events. We’re going to set that at the top level of our RegistrationForm controls tree by setting the AllowDrop property to true and by associating the Drop event with the method we just defined above:
x:Class="RiaSvcProfilePicture.LoginUI.RegistrationForm"
…
d:DataContext="{d:DesignInstance Type=web:RegistrationData}" AllowDrop="True" Drop="StackPanel_Drop">
That’s all! Simple isn’t? Test again this application. You should obtain the same result as in the previous step by now being able to choose an image from the files explorer and drag’n’drop it on the registration form.
Step 5: Modifying the RegistrationForm control to get an image from the Webcam
This step requires a bit more work. Not because accessing to the Webcam in Silverlight 4 is something complicated. No, this is linked to the fact we will have an image completely generated by Silverlight for the first time. In the previous cases, the pictures were taken directly from the disk as streams and were already encoded in the Jpeg format. With the webcam, the image provided will be in the RAW format and it will requires some specific tasks to be converted to Jpeg. Indeed, Silverlight doesn’t natively support image encoding in PNG, Jpeg or whatever. It needs additional third-party libraries for that. Here are 2 good examples I’m recommending you:
– a PNG encoder brought by Joe Stegman : Dynamic image generation in Silverlight. You can download the source code here.
– the FJCore library which is an open source library allowing us to encode image in the Jpeg format inside a Silverlight application. The project could be found here: http://code.google.com/p/fjcore/ and you can directly download the source code here: http://fjcore.googlecode.com/svn/trunk/ or with a Subversion client (SVN).
As we need Jpeg, let’s use the second option.
1. Download the FJCore project and add it to the current Visual Studio solution. Check that it properly compiles. If you have issues downloading it or compiling it, you can find this project inside the final source code provided at the end of this blog’s post.
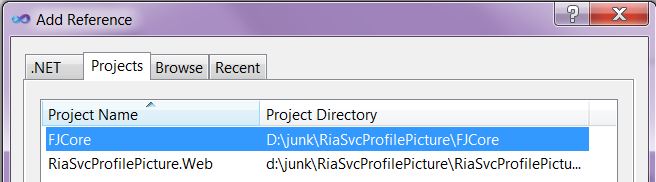
2. Add a reference to the FJCore project from the RiaSvcProfilePicture Silverlight project:
 |
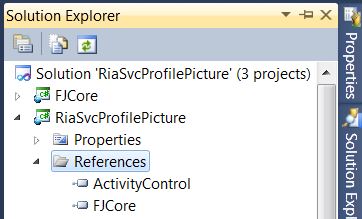 |
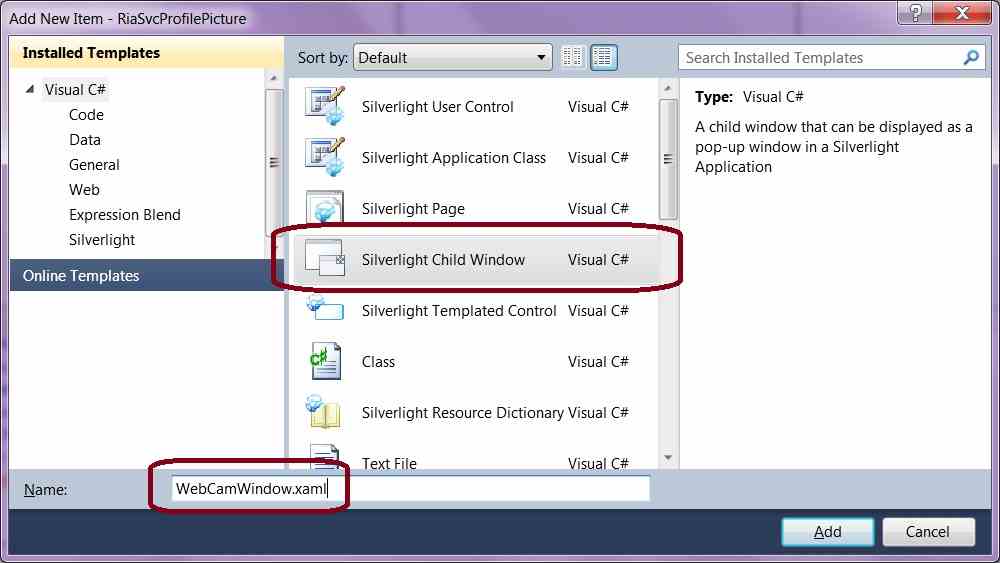
3. Add a new element of type “Silverlight Child Windows” under the Login folder and name it WebCamWindows.xaml:
4. In the XAML part, change the height value of the form from 300 (default) to 340 and then add this rectangle just above the Cancel button:
<Rectangle x:Name="PreviewScreen" RadiusX="5" RadiusY="5" Fill="Black" />
This will be the area we’re going to paint with the Webcam.
5. Replace the code of the WebCamWindow class by this one:
public CaptureSource captureSource;
// event used to notify callers that the image captured from
// the webcam is available
public event EventHandler<System.Windows.Media.CaptureImageCompletedEventArgs> ImageAvailable;

public WebCamWindow()
{
    InitializeComponent();
}

protected override void OnOpened()
{
    base.OnOpened();
    StartWebCam();
}

private void StartWebCam()
{
    if (captureSource == null)
    {
        // Create new CaptureSource if first run
        captureSource = new CaptureSource();
        captureSource.CaptureImageCompleted
            += new EventHandler<CaptureImageCompletedEventArgs>(captureSource_CaptureImageCompleted);
    }
    else
    {
        // Stops old source if second run
        captureSource.Stop();
    }

    // Set VideoCaptureDevice to selected WebCam
    captureSource.VideoCaptureDevice = CaptureDeviceConfiguration.GetDefaultVideoCaptureDevice();

    // Create VideoBrush to paint WebCam preview
    VideoBrush PreviewBrush = new VideoBrush();
    PreviewBrush.SetSource(captureSource);
    PreviewScreen.Fill = PreviewBrush;

    // Start capture source
    captureSource.Start();
}

void captureSource_CaptureImageCompleted(object sender, CaptureImageCompletedEventArgs e)
{
    ImageAvailable(this, e);
    captureSource.Stop();
}

private void OKButton_Click(object sender, RoutedEventArgs e)
{
    PreviewScreen.Fill = null;
    captureSource.CaptureImageAsync();
    this.DialogResult = true;
}

private void CancelButton_Click(object sender, RoutedEventArgs e)
{
    captureSource.Stop();
    this.DialogResult = false;
}
The job on the child window is then over. Let’s go back to the registration window.
6. Once back in the RegistrationForm.xaml.cs class, add these 2 new members:
// cache element for Jpeg generation to send
// the appropriate bytes[] back to the server
private WriteableBitmap lastWriteableWebCamProfilePicture = null;
// custom child window embedding the webcam
private Views.Login.WebCamWindow webCamWindow;
Inside the constructor, add this code:
webCamWindow = new Views.Login.WebCamWindow();
webCamWindow.Closed += new EventHandler(webCamWindow_Closed);
webCamWindow.ImageAvailable +=
   new EventHandler<CaptureImageCompletedEventArgs>(webCamWindow_ImageAvailable);
Thus, you’ll need these 2 events handlers:
// Event raised by the Web Cam Child Window once
// the capture is available
void webCamWindow_ImageAvailable(object sender, CaptureImageCompletedEventArgs e)
{
    lastWriteableWebCamProfilePicture = e.Result;
    ImageProfileControl.Source = lastWriteableWebCamProfilePicture;
    lastStreamProfilePicture = null;
}

// handling the closed event of the Web Cam child window
void webCamWindow_Closed(object sender, EventArgs e)
{
    // If the user has clicked 'Ok', we'll use webcam picture
    // as its avatar
    if (webCamWindow.DialogResult == true)
    {
        UseDefaultProfilePicture = false;
    }
}
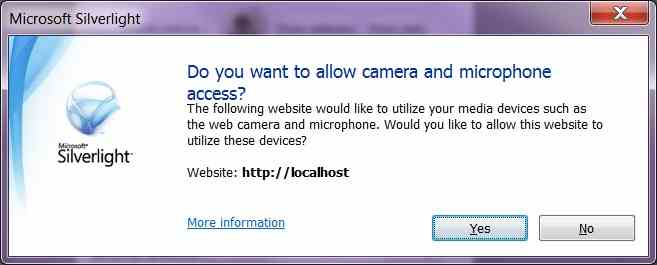
7. We now need to ask the user to grant access to the Webcam from our Silverlight application. We will then be able to use the WebCamWindow form to take his picture:
private void btnWebCam_Click(object sender, RoutedEventArgs e)
{
    // Determine if we have access to webcams
    if (!CaptureDeviceConfiguration.AllowedDeviceAccess)
    {
        // if not, request access
        if (!CaptureDeviceConfiguration.RequestDeviceAccess())
        {
            // denied!
            return;
        }
    }

    // Displaying the WebCam child window to take a picture from the webcam
    webCamWindow.Show();
}
You’ll need this using:
using System.Windows.Media;
Connect this event handler to the associated button in the XAML part:
<Button x:Name="btnWebCam" Content="from webcam" Margin="10" Click="btnWebCam_Click" />
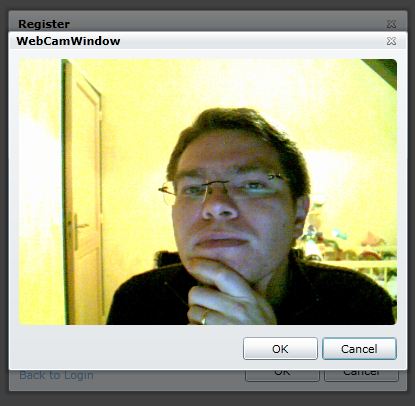
If you now test the application at this stage, you should be able to make the webcam works properly and even take a picture that will be displayed as a thumbnail in the registration form. Here are the steps you will normally encounter:
 |
 |
Still, we need an ultimate step to be able to help the Silverlight client sending back this webcam picture to our server layer with WCF RIA Services.
Step 6: Jpeg encoding
For that, we’re going to modify the GetPictureAsBytes() method to transform into an array of bytes containing an image encoded in the Jpeg format the WriteableBitmap type that is provided by the AsyncCaptureImage() method .
Before this line of code:
return null;
you’ll find inside the private byte[] GetPictureAsBytes() method. Add this code block:
if (lastWriteableWebCamProfilePicture != null)
{
    int width = lastWriteableWebCamProfilePicture.PixelWidth;
    int height = lastWriteableWebCamProfilePicture.PixelHeight;
    int bands = 3;
    byte[][,] raster = new byte[bands][,];

    //Convert the Image to pass into FJCore
    //Code From http://stackoverflow.com/questions/1139200/using-fjcore-to-encode-silverlight-writeablebitmap
    for (int i = 0; i < bands; i++)
    {
        raster[i] = new byte[width, height];
    }

    for (int row = 0; row < height; row++)
    {
        for (int column = 0; column < width; column++)
        {
            int pixel = lastWriteableWebCamProfilePicture.Pixels[width * row + column];
            raster[0][column, row] = (byte)(pixel >> 16);
            raster[1][column, row] = (byte)(pixel >> 8);
            raster[2][column, row] = (byte)pixel;
        }
    }

    ColorModel model = new ColorModel { colorspace = ColorSpace.RGB };
    FluxJpeg.Core.Image img = new FluxJpeg.Core.Image(model, raster);

    //Encode the Image as a JPEG
    MemoryStream stream = new MemoryStream();
    FluxJpeg.Core.Encoder.JpegEncoder encoder = new FluxJpeg.Core.Encoder.JpegEncoder(img, 100, stream);
    encoder.Encode();

    //Back to the start
    stream.Seek(0, SeekOrigin.Begin);

    //Get the Bytes and write them to the stream
    byte[] binaryData = new Byte[stream.Length];
    long bytesRead = stream.Read(binaryData, 0, (int)stream.Length);
    return binaryData;
}
This last using will be required:
using FluxJpeg.Core;
And that’s it! We’ve just finished the complete tutorial. During the registration process, you can now provide a picture from the hard drive either using the files explorer or via drag’n’drop. You can also provide a picture using your Webcam. This picture will then be stored inside the UserPictures folder on the server’s side. It will be reused during each login phase.
Silverlight 4 helped us a lot to handle in a very easy & simple way the drag’n’drop & webcam support. WCF RIA Services was also here to completely hide any complexity in the client/server communication. Silverlight 4 & WCF RIA Services are definitely better together! 😉
Fun note: if you have a Microsoft webcam like mine (LifeCam VX-6000), you can even add some very profesionnal looking effects to generate your avatar with this application. For instance:


Video demonstration & final source code to download
* I’m speaking French in this video
Media files:
Download the source code here:
I’ll probably do an additional blog’s post on this topic to show how to modify this application to host it into Windows Azure. There are currently 2 blocking points:
– The user’s profile is currently handled by the default ASP.NET Membership Provider which writes into the ASPNETDB SQL Express database. This one is easy to handle by either using SQL Azure or by connecting the providers to the Azure storage like I’ve already done with Cloudy Pizza.
– We shouldn’t write the pictures directly on the web server as it prevents us to increase the number of Azure instance to more than… 1. 🙂 We will then have to write somewhere that can be access by any instance: the Azure storage again which is easily accessed by HTTP REST.
In the meantime, I wish you a merry Christmas and an happy new year. May the force be with you!
David
This is very cool! One of the best extentions of the business app template so far!
Excellent !! Superbe article 🙂 j’ai que survolé, mais j’approfondis ma lecture dès le retour de mon déjeuner !
J’ai remarqué que tu n’utilises pas le busyIndicator mais l’activityControl. Pourquoi ? 🙂
Ce qui est fun : j’ai commandé hier une webcam juste pour m’amuser un peu avec silverlight 4 … xD
outstanding tutorial as you really display some of the power that makes Silverlight such an attractive option for building great web applications. a good thing just gets better!
Hi, this is actually excelent… very cool…
I have a question. I dont know why when I going to use the button "from webcam", the project closes….
any idea??
thanks
Hello Mictian,
No, I have no idea. But don’t forget that SL4 is still in Beta. That’s probably why. Do you have another Webcam to test with?
@all: thanks for your feedbacks. 🙂
Regards,
David
Hi David,
I had tried with other webcam and occurr the same…must be SL4… anyway thanks
Bonjour,
j’ai essaye de vous contacter par email mais le formulaire de contact ne fonctionne pas. Auriez vous un mail ou je puisse vous joindre.
In converting this to VB, everything works as planned, up until the jpeg encoding. The raster functions fail due to overflow, which c# simply ignores…I think..any ideas on coding around this in vb?
int pixel = lastWriteableWebCamProfilePicture.Pixels[width * row + column];
raster[0][column, row] = (byte)(pixel >> 16); 'Fails here
raster[1][column, row] = (byte)(pixel >> 8);
raster[2][column, row] = (byte)pixel;
Thanks for any ideas, great work on this tutorial!
Hi DanS,
You mean this code doesn't work ?
Dim pixel As Integer = lastWriteableWebCamProfilePicture.Pixels(width * row + column)
raster(0)(column, row) = CByte(pixel >> 16)
raster(1)(column, row) = CByte(pixel >> 8)
raster(2)(column, row) = CByte(pixel)
Next Row, Col
Regards,
David
Hi,
When deploying this to a dev server, the picture is not diaplyed and fiddler shows /Userpictures/default.jpg cannot ne found 404 error.
Have you seen this error?
Thanks
This was an issue with the folder structure, the app was looking in the wrong place for the UserPictures folder.
All fixed now.
I have the same problem with Dan S. What I did to solve the problem of overflow in vb.net is I added a &HFF in each raster.
raster(0)(column, row) = CByte((pixel >> 16) And &HFF)
raster(1)(column, row) = CByte((pixel >> 8) And &HFF)
raster(2)(column, row) = CByte((pixel) And &HFF)
Hi,
Very well job David,
Ihave question,in my LoginStatus.xaml.cs there isn't the code for the welcomeText, as mentioned .
there is my file code :
public partial class LoginStatus : UserControl
{
/// <summary>
/// Creates a new <see cref="LoginStatus"/> instance.
/// </summary>
public LoginStatus()
{
this.InitializeComponent();
if (DesignerProperties.IsInDesignTool)
{
VisualStateManager.GoToState(this, "loggedOut", false);
}
else
{
this.DataContext = WebContext.Current;
WebContext.Current.Authentication.LoggedIn += this.Authentication_LoggedIn;
WebContext.Current.Authentication.LoggedOut += this.Authentication_LoggedOut;
this.UpdateLoginState();
}
}
private void LoginButton_Click(object sender, RoutedEventArgs e)
{
LoginRegistrationWindow loginWindow = new LoginRegistrationWindow();
loginWindow.Show();
}
private void LogoutButton_Click(object sender, RoutedEventArgs e)
{
WebContext.Current.Authentication.Logout(logoutOperation =>
{
if (logoutOperation.HasError)
{
ErrorWindow.CreateNew(logoutOperation.Error);
logoutOperation.MarkErrorAsHandled();
}
}, /* userState */ null);
}
private void Authentication_LoggedIn(object sender, AuthenticationEventArgs e)
{
this.UpdateLoginState();
}
private void Authentication_LoggedOut(object sender, AuthenticationEventArgs e)
{
this.UpdateLoginState();
}
private void UpdateLoginState()
{
if (WebContext.Current.User.IsAuthenticated)
{
this.welcomeText.Text = string.Format(CultureInfo.CurrentUICulture, ApplicationStrings.WelcomeMessage, WebContext.Current.User.DisplayName);
}
else
{
this.welcomeText.Text = ApplicationStrings.AuthenticatingMessage;
}
if (WebContext.Current.Authentication is WindowsAuthentication)
{
VisualStateManager.GoToState(this, "windowsAuth", true);
}
else
{
VisualStateManager.GoToState(this, (WebContext.Current.User.IsAuthenticated) ? "loggedIn" : "loggedOut", true);
}
}
}
how and where to place the code :
this.welcomeImage.SetBinding(Image.SourceProperty, WebContext.Current.CreateOneWayBinding("User.PictureURL"));
thanks
Exactly Same problem like Red..
how and where to place the code :
this.welcomeImage.SetBinding(Image.SourceProperty, WebContext.Current.CreateOneWayBinding("User.PictureURL"));
thanks