We’re going to see in this series of tutorials/articles how to expose a standard application based on the .NET 4.0 WCF RIA Services framework and Silverlight 4 to other type of clients like: Excel, standard web-apps, WPF, Windows Phone 7 & a HTML5/jQuery application. To enable this scenario, we’ll see how to expose and consume your RIA services in different ways thanks to OData, using the lower classic WCF services stack and finally by using a JSON serialization. Here is the agenda of the tutorials I’ve planned to publish during the next days.
1 – Review of the initial application (this article)
2 – How to expose the service as an OData stream consumed by Excel and from a web application built with WebMatrix
3 – How to expose the service as a “standard” WCF Service used from a WPF application and a Windows Phone 7 application
4 – How to expose the service as a JSON stream to be used by a HTML5/jQuery web application
5 – Step by step procedure to publish this WCF RIA Services application to Windows Azure & SQL Azure
This will then cover a very common scenario I’ve met during my various customers’ meetings & architecture design sessions. You start a new project that needs to use the most productive & recent frameworks as you only have a few months to implement it. You can then select a full Microsoft stack with an UI presentation served by Silverlight. You will then maybe follow this common workflow: your database (SQL Server, Oracle, mySQL, whatever…) –> Entity Framework 4.0 –> WCF RIA Services –> Silverlight 4.
Entity Framework 4.0 (our ORM) will take care of the data access layer for you by first building an object relational mapping of your tables and by giving you a nice LINQ provider. WCF RIA Services will then work on top of this LINQ provider to expose automatically this data access layer on the network. Finally, Silverlight will retrieve via the network the data from the WCF RIA Services layer and will give you a set of high level controls/framework to help you building quickly some UI screens in a clean way.
You will then have a clean n-tiers architecture entirely handled & generated for you for free.
Ok, very nice. But what if I need to expose part of the data and/or the logic to other types of clients?
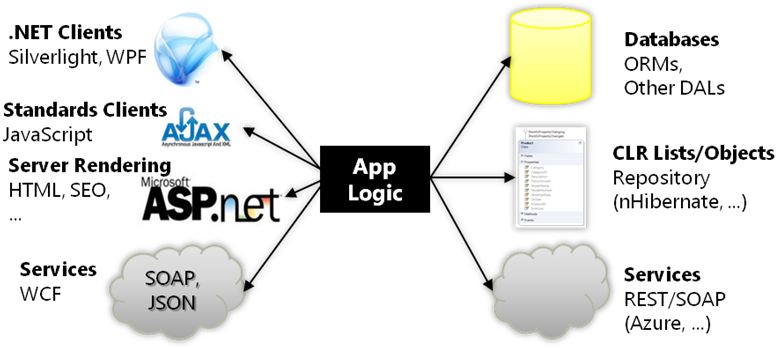
This is exactly the purpose of these articles! And you’ll then better understand why I’ve already shown you in the past this following schema explaining how RIA Services is an open pattern:
Note: If you’re reading French, I’ve already published a set of 3 very simple tutorials on WCF RIA Services. If you don’t know yet this marvelous technology, I’m suggesting you to start by reading this 3 tutorials that will show you how to create a n-tiers enterprise RIA application built on top of .NET 4.0/Silverlight 4 with almost 0 line of code:
– Tutorial Silverlight 4 WCF RIA Services avec 0 ligne de code
– Tutorial Silverlight 4 WCF RIA Services avec 0 ligne de code – partie 2
– Tutorial Silverlight 4 WCF RIA Services avec quelques lignes de code – partie 3
Otherwise, you’ll find plenty of awesome contents on the official Silverlight site in the Ria Services section: http://www.silverlight.net/getstarted/riaservices/
As the goal of these new tutorials is not to help you discovering the basics on RIA services, we will start directly by using an already built application that we’re going to review in this first article.
You can download the source code of the base solution here:
For this serie, the application I’m using as a base is from this excellent webcast: Silverlight TV 26: Exposing SOAP, OData, and JSON Endpoints for RIA Services
You can play with the “Live” application hosted in Windows Azure here:
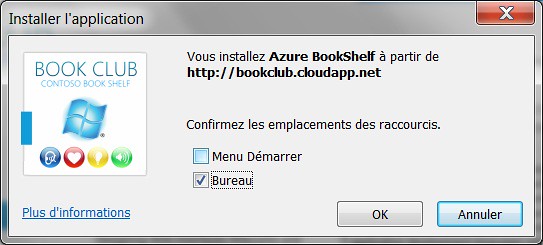
Or in another separated window here: http://bookclub.cloudapp.net in order to discover by yourself all the features described in details below. You can even install this application on your machine by using the “out of browser” features natively supported by Silverlight. For that, you just have to right-click on the application in your browser and ask for installation:
One of the articles will explain you the work I’ve done to publish this WCF RIA Services application on Windows Azure and SQL Azure.
Note: I’m then reusing the sample application provided by Deepesh Mohnani on his blog: http://blogs.msdn.com/b/deepm . I’ve just slightly modified it for the needs of this article.
First of all, if you have already played with WCF RIA Services, you will notice that the screenshots of the application we will use for this series is slightly different from the design proposed by the default Silverlight Business Application template shipped with the SL4 Tools for VS 2010. Indeed, we’re using here some new templates that have been shipped in the meantime and that give you some alternate design (who said more beautiful?). You can download them here: new Silverlight Business Application themes and you will then have 4 new nice templates available in the New –> Project Wizard for Silverlight.
They look like this after a New->Project and a little F5:
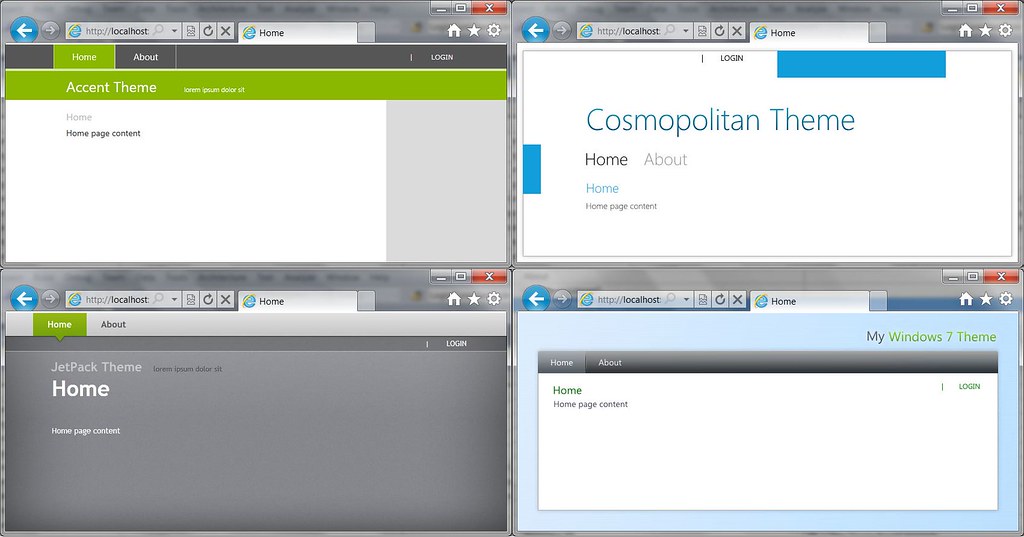
In our case, we will use the “Cosmopolitan Theme” as a based. It slightly looks like the Metro design concepts of our Windows Phone 7. You will also notice that a lot of elements have been re-styled with those themes: the child window, a lot of controls like the progress bar, the datagrid, etc. Well, with them, you should be ready to build some not too ugly RIA applications even if you are a developer like me with poor design skills! ![]()
If you’d like to see them in action, you can test these new styles here:
– Accent : http://www.silverlight.net/content/samples/sl4/themes/accent.html
– Cosmopolitan : http://www.silverlight.net/content/samples/sl4/themes/cosmopolitan.html
– Jet Pack : http://www.silverlight.net/content/samples/sl4/themes/jetpack.html
– Windows 7 : http://www.silverlight.net/content/samples/sl4/themes/windows7.html
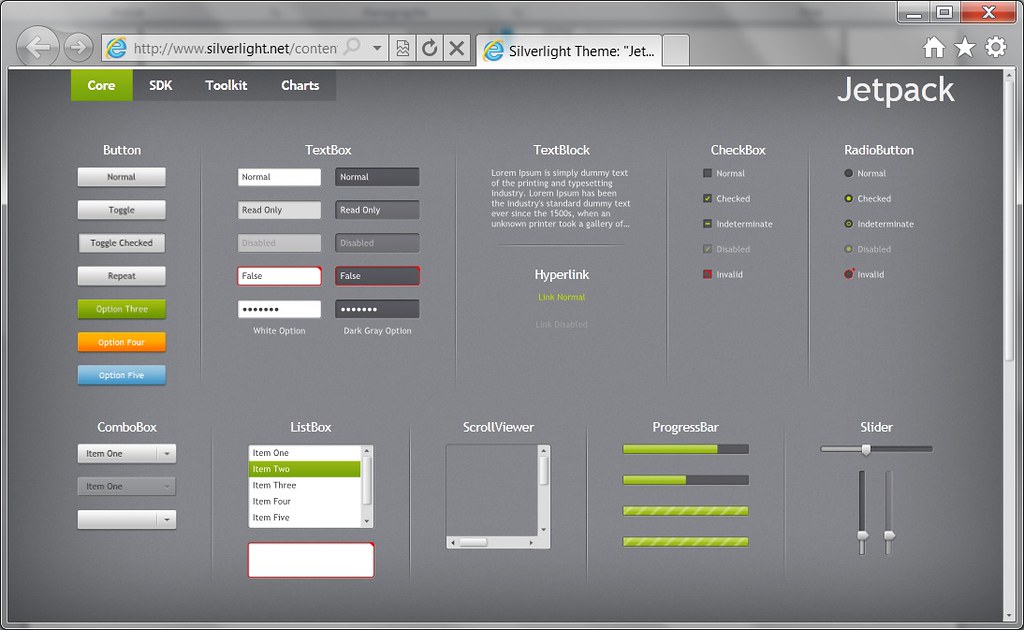
The Jet Pack one remains one of my favorite:
Ok, let’s go. Let’s now analyze how this Book Club application is made of:
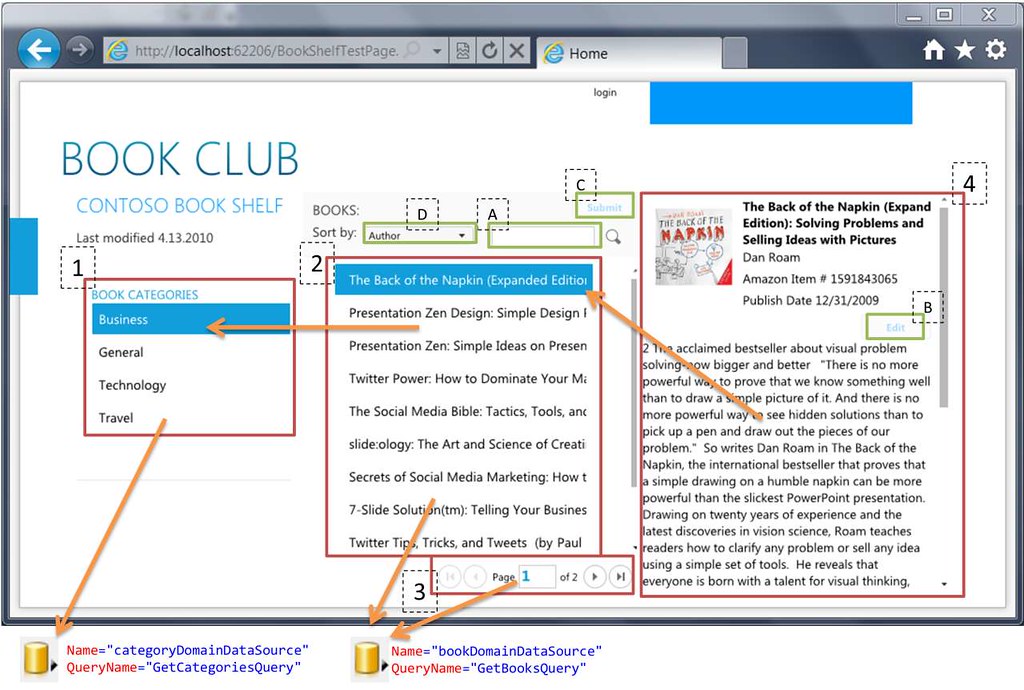
And here is briefly the list of controls highlighted in this diagram (which is a kind of graphical representation of the Home.xaml page):
1 – categoryListBox of type ListBox
2 – bookListBox of type ListBox
3 – sans nom of type DataPager
4 – ctrlBook of type BookControl (which is a custom control available in the Controls directory)
A – txtFilter of type TextBox
B – btnEdit of type Button contained in the BookControl control.
C – btnSubmit of type Button
D – cboSort of type ComboBox
Try to keep them in mind to better understand the rest of the following explanations.
You’ll also notice 2 “DomainDataSource” controls that feed the Silverlight client. The 1st one, named categoryDomainDataSource, is the simplest one:
<riaControls:DomainDataSource AutoLoad="True" d:DesignData="{d:DesignInstance my1:Category, CreateList=true}"
  Height="0" LoadedData="categoryDomainDataSource_LoadedData_1"
  Name="categoryDomainDataSource" QueryName="GetCategoriesQuery" Width="0">
    <riaControls:DomainDataSource.DomainContext>
        <my:BookClubContext />
    </riaControls:DomainDataSource.DomainContext>
</riaControls:DomainDataSource>
It simply calls the GetCategoriesQuery() method which drives our data access layer through the following remote method:
public IQueryable<Category> GetCategories()
{
    return this.ObjectContext.Categories.OrderBy(c => c.CategoryName);
}
available in our RIA Domain Service named BookClubService
This 1st Domain Service will act as the source of the binding of our control 1 displayed on the left. It’s in charge of displaying the categoryies list of our different books:
<ListBox ItemsSource="{Binding ElementName=categoryDomainDataSource, Path=Data}"
Name="categoryListBox" ItemTemplate="{StaticResource CategoryItemTemplate}" />
The 2nd control on the center of the screen is in charge of displaying the books list based on several criteria. Its data source is of course the DomainDataSource named bookDomainDataSource. However, this data source is driven in different ways. Having a look to the XAML describing this DomainDataSource and to comment it is the simplest way to understand how:
<riaControls:DomainDataSource AutoLoad="True" d:DesignData="{d:DesignInstance my1:Book, CreateList=true}"
  Height="0" LoadedData="bookDomainDataSource_LoadedData_1" Name="bookDomainDataSource"
  QueryName="GetBooksQuery" Width="0">
    <riaControls:DomainDataSource.SortDescriptors>
        <riaControls:SortDescriptor PropertyPath="{Binding Path=SelectedItem.Content, ElementName=cboSort}" />
    </riaControls:DomainDataSource.SortDescriptors>
    <riaControls:DomainDataSource.FilterDescriptors>
        <riaControls:FilterDescriptor Operator="IsEqualTo"
                PropertyPath="CategoryID" Value="{Binding ElementName=categoryListBox, Path=SelectedItem.CategoryID, FallbackValue=1}" />
        <riaControls:FilterDescriptor Operator="Contains"
                PropertyPath="{Binding Path=SelectedItem.Content, ElementName=cboSort}" Value="{Binding ElementName=txtFilter, Path=Text}" />
    </riaControls:DomainDataSource.FilterDescriptors>
    <riaControls:DomainDataSource.DomainContext>
        <my:BookClubContext />
    </riaControls:DomainDataSource.DomainContext>
</riaControls:DomainDataSource>
First of all, the main data source will be the GetBooksQuery() method that sends back by default all the books stored in our DB. However, as this method exposes our objects via an IQueryable, we will be able to drive this remote data source with filtering and sorting conditions.
The 1st condition applied is a filter condition described by this piece of XAML:
<riaControls:DomainDataSource.SortDescriptors>
    <riaControls:SortDescriptor PropertyPath="{Binding Path=SelectedItem.Content, ElementName=cboSort}" />
</riaControls:DomainDataSource.SortDescriptors>
This says that we’d like to sort the books by their title or author. That’s why there is a binding in place to the currently selected item of the ComboBox control D named cboSort. As soon as the user will modify the current value selected in this combobox, thanks to the power of the binding engine, the data source will be driven by the DomainDataSource associated with this SortDescriptor and the data will flow through the different tiers for you.
There are also 2 filtering conditions dynamically applied to this DomainDataSource. Here is the first one:
<riaControls:FilterDescriptor Operator="IsEqualTo" PropertyPath="CategoryID"
Value="{Binding ElementName=categoryListBox, Path=SelectedItem.CategoryID, FallbackValue=1}" />
This FitlerDescriptor asks to only display the books related to the category currently selected in the ListBox control 1 on the left (displaying all the available categories). Thus, if the user changes from the “Business” category to the “Technology” category, again thanks to the binding engine, the DomainDataSource object will be notified of this change and will reflect this change by controlling the remote GetBooksQuery() method to ask for the books included in the “Technology” category. As our center control 2 is binded to this high level DomainDataSource object, it will be also notified as soon as the new data will be available on the last tier (the Silverlight client) and will refresh itself automatically. You can thank IObservable ![]() . You will notice also that you didn’t have to take care of the asynchronous calls being made for you under the hood.
. You will notice also that you didn’t have to take care of the asynchronous calls being made for you under the hood.
The second filter is the following one:
<riaControls:FilterDescriptor Operator="Contains"
PropertyPath="{Binding Path=SelectedItem.Content, ElementName=cboSort}"
Value="{Binding ElementName=txtFilter, Path=Text}" />
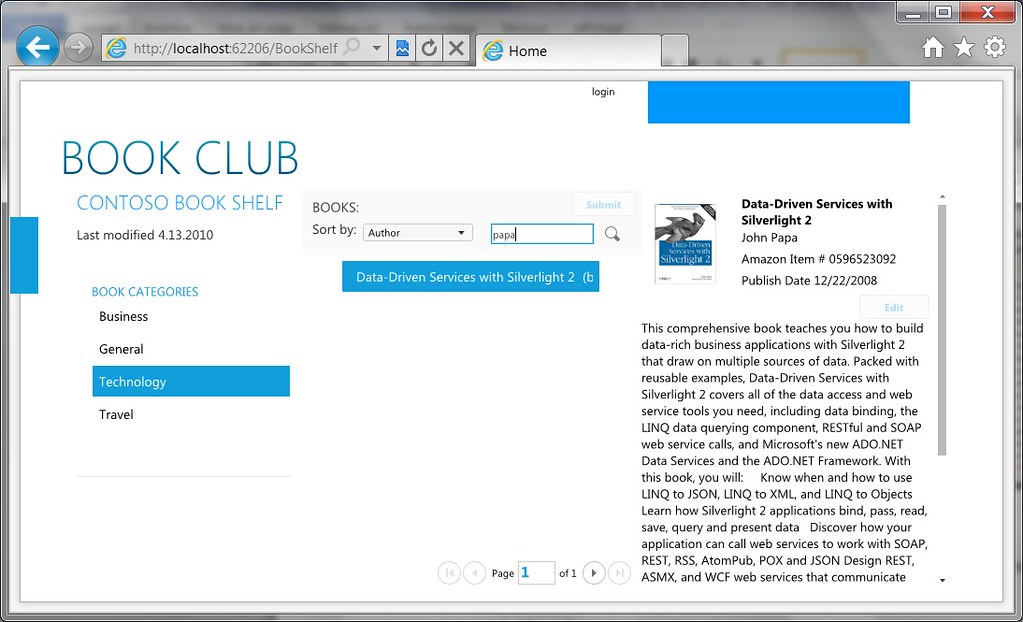
This FilterDescriptor is in charge of filtering the DomainDataSource rather on the property “Author” or on the “Title” property selected in the ComboBox control and based on what you will type in the TextBox control A named txtFilter. For instance, if you type the keyword “Papa” in the TextBox, if you’re sorting by “Author” and finally if you have selected the “Technology” category, you will have the following result:
To enable the paging, it’s still the same DomainDataSource which is used. It’s definitely the main part of our application!
This time, it’s controlled by the high level control 3 (DataPager) thanks to the following piece of XAML:
<sdk:DataPager PageSize="10" Source="{Binding ElementName=bookDomainDataSource, Path=Data}" />
We’re indicating here that we’d like to display the books 10 by 10. The Silverlight client won’t then load all the data in memory from the server data layer but will only load 10 items max during each network round-trip. Very simple, isn’t it?
The last “binded” control is the book currently selected in the central ListBox and displayed in details on the right inside the custom control 4. The XAML is pretty forward to read:
<appControls:BookControl DataContext="{Binding ElementName=bookListBox, Path=SelectedItem}" x:Name="ctrlBook" />
The DataContext of the BookControl control is simply fed by the item currently selected in the control 2 named bookListBox. Once more, if the user clicks on another book in the list, the BookControl will be automatically notified and will update itself magically.
All this magic has been possible thanks to the high level controls provided by WCF RIA Services for Silverlight combined with the native Silverlight binding engine. You have then probably noticed that there is no specific code-behind that tracks the changes done inside the UI controls or any kind of callback methods in this sample that handles the communication with the data access layer to then notify the UI. Still, we have some relatively advanced features in place like paging, data synchronization between controls (via the ElementName binding), etc. This sample is then a good example on how WCF RIA Services and Silverlight 4 cover these common needs with out-of-the-box ready-to-use controls. They will provide you a high level of productivity.
If you’d like to have a curious look on what’s happening on the network during the actions done on the Silverlight UI, you can use the developement bar of IE9 by simply pressing the F12 key and by starting a network trace capture. This is our equivalent of the Firebug extension of Firefox. Just after having loaded the application for the first time, here is for instance the request sent on the network when I’m navigating on the second page of books using the DataPager control:
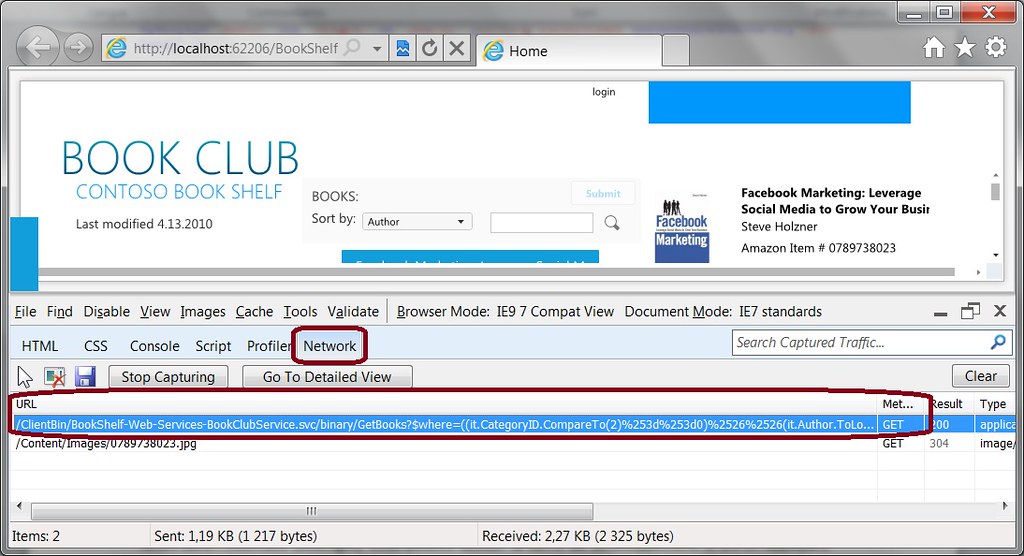
which gives us the following complete URL:
http://localhost:62206/ClientBin/BookShelf-Web-Services-BookClubService.svc/binary/GetBooks$where=((it.CategoryID.CompareTo(2)%253d%253d0)%2526%2526(it.Author.ToLower().Contains(%2522%2522)%253d%253dTrue))&$orderby=it.Author&$skip=10&$take=10&$includeTotalCount=
Asking for the second page of 10 elements can be seen in this part of the HTTP request: $skip=10&$take=10. This briefly means that I don’t want the 10 first elements (skip=10), I already have them, but please give me the following next 10 (which is indeed the second page with a paging of 10 blocks).
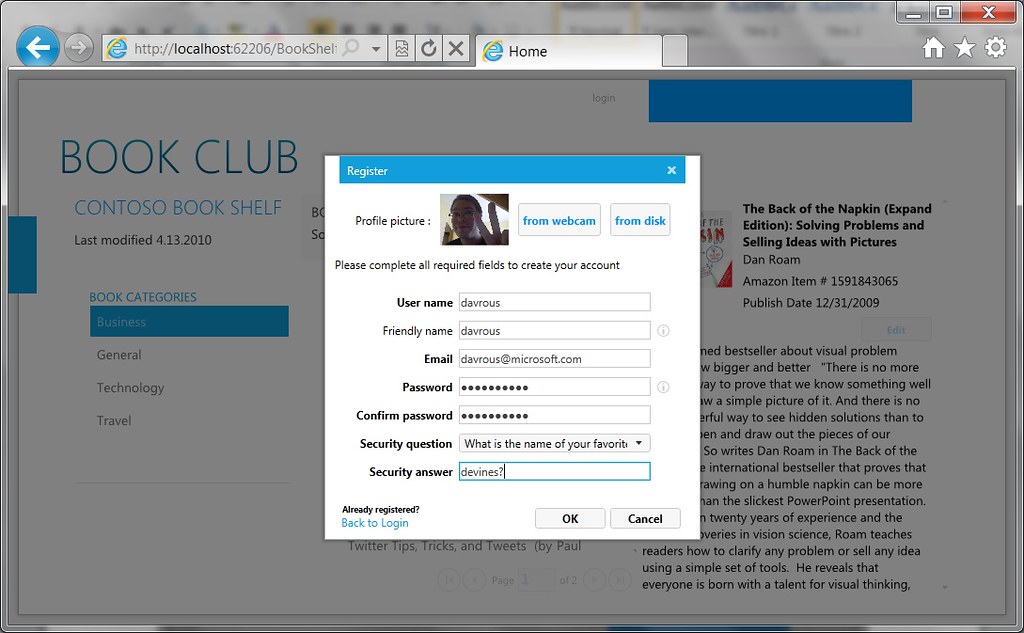
Let’s finish analyzing our application by looking at the behavior of the 2 Button controls B & C. You’ll notice that by default these buttons are greyed/disabled and they seem unusable. In order to be able to use the “Edit” button, you need be authenticated. This can simply be done by pressing on the “Login” button and by creating a new account if you’ve not already created one. As a reminder, the login process is using the ASP.NET Membership Provider as I’ve already explained you in my previous French tutorials.
By the way, I’ve slightly modified the behavior of the login screens as you can see on the following screenshots by adding the logic suggested by one of my previous tutorial (in English): Silverlight 4 tutorial: adding avatar support to the WCF RIA Services Business Template . You will then be able to add a picture to your profile during the user creation process by generating an image with a Webcam capture, from an image stored on your disk or by drag’n’dropping it on the window.
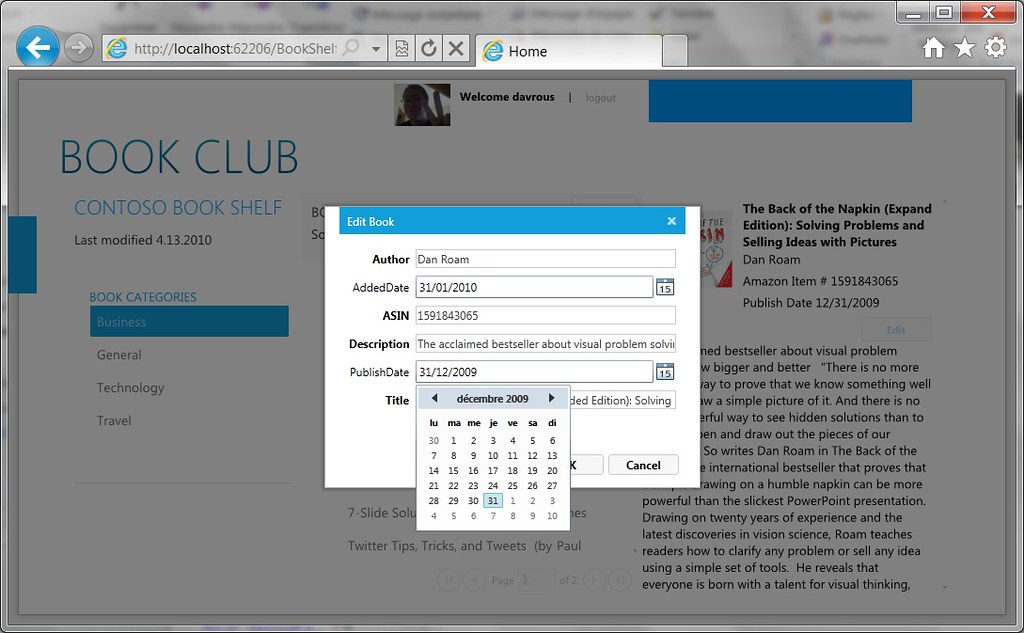
Once logged in, you will be able to edit a book by pressing on the appropriate button which is now enabled:
The way the button is being enabled or not is done via this line of code-behind inside the BookControl control:
this.btnEdit.SetBinding(Button.IsEnabledProperty,
   new Binding("User.IsAuthenticated") { Source = App.Current.Resources["WebContext"] });
We’re simply verifying if the user is authenticated and it it’s the case, we’re changing the property IsEnabled from false to true.
You need also to add some attributes on the server methods to allow updates operations (provided by the UpdateBook method) only for a specific class of users. For instance, by adding this method’s attribute on the server side inside the DomainService:
[RequiresRole("Admin")]
public void UpdateBook(Book currentBook)
This will allow only the users member of the “Admin” role to be able to do some updates. Thus, even if you’re logging in on my application hosted in Windows Azure, you won’t be able to update the data stored inside my SQL Azure DB as you’ll have an exception raised when you will press the “Submit” button . A cleaner way would be to enable the “Edit" & “Submit” buttons only for users being members of the proper role.
To finish, you’ll notice also that the “Submit” button (control C) is only available when some data has been marked as dirty. This is thanks to the following piece of XAML inside the Home.xaml page:
<Button Command="{Binding ElementName=bookDomainDataSource, Path=SubmitChangesCommand}"
  Content="Submit" Height="26" Name="btnSubmit" Width="69"
  HorizontalAlignment="Right" Grid.Column="3" Margin="0,3,6,8" />
We’re using here the new “commanding” features that came with Silverlight 4 by connecting the button on the SubmitChangesCommand command.
That’s it. We’ve just finished reviewing this nice little application. I’ve thought it could be useful to have a quick look to the way it was built as it implements some interesting concepts. Some of you may state that it would have been possible to make this application cleaner by implementing some patterns like MVVM to avoid using some of the converters and to make our view simpler. But this is another story… ![]()
Ok, see you in the second step of this series to discover how to open your WCF RIA Services layer to other clients by adding an OData endpoint.
David
Excelente publicación!
Great work.Thanks for taking the time to put this together.